2010年10月27日 星期三

sample "entry case" 2 our trade API

當你握有滿手好牌,卻又不知該怎麼辦時,我想數據分析應該還有一定的準確性..@@ 底下我們就用 Trader API 來寫個簡單的進出場判斷. 透過 "策略分析" 跟 "profit-analysis" 來回測我們的進出場判斷條件...@@
#!/usr/bin/perl

#==================================================
#author: sean chen mail: funningboy@gmail.com
#publish 2010/10/27
#License: BSD
#
# 進場策略 rules
# R1. ( T[0]_K(9) cross over T[0]_D(9) ) && ( T[-1]_K(9) <> D(9). 且 昨日 KD 必須小於 今日 KD
#
# R2. T[0]_MACD_DIF(12-26) > 0 && T[0]_MACD_DIFF(12-26) > T[1]_MACD_DIFF(12-26)
#     當日 MACD-DIFF > 0 且 必須大於昨日的 MACD-DIFF
#
# R3. 外資連續買超1日
#
#==================================================

use SYS::GLB;

use FINANCE::KD;
use FINANCE::MACD;

use TRADER::UTIL;
use Data::Dumper;
use strict;

my $pre_time   = "2010/10/25";
my $cur_time   = "2010/10/26";

my %stock_list =(
                "STOCKID" => ["2330.TW",
                              "2409.TW",
                              "2317.TW",],
                "PATH"    => ["./data_off/stock/2330.TW.csv",
                              "./data_off/stock/2409.TW.csv",
                              "./data_off/stock/2317.TW.csv",],
                "KD"      => ["-1",
                              "-1",
                              "-1",],
                "MACD"    => ["-1",
                              "-1",
                              "-1",],
                "EXTERNAL"=> ["-1",
                              "-1",
                              "-1",],
);

#printf Dumper(\%stock_list);

my $global = SYS::GLB->new();
my $market_super_hstable  = $global->get_market_super_hstable;
my $market_trader_hstable = $global->get_market_trader_hstable;

my $trader = TRADER::UTIL->new();
$trader->set_market_super_hstable($market_super_hstable);
$trader->set_market_trader_hstable($market_trader_hstable);

#==========================================================
# step 1 get KD value && Check R1
#==========================================================
my @KD_Arr =();

foreach my $path ( @{$stock_list{PATH}} ){
my $info   = FINANCE::HISTORY_INFO->new();
my $hslist = $info->get_file_info($path);

my $ikd = FINANCE::KD->new($hslist);
         $ikd->run_all('9');

my $pre_kd  = $ikd->get_KD('9',$pre_time); my %pre_kd = %{$pre_kd};
my $cur_kd  = $ikd->get_KD('9',$cur_time); my %cur_kd = %{$cur_kd};

#printf Dumper($pre_kd);
#printf Dumper($cur_kd);

  if( ($cur_kd{K} > $cur_kd{D} )&&
      ($cur_kd{K} > $pre_kd{K} )&&
      ($cur_kd{D} > $pre_kd{D} )   ){
        push(@KD_Arr,1);
} else{ push(@KD_Arr,-1); }

}

@{$stock_list{KD}} = @KD_Arr;

#==========================================================
# step 2 get MACD value && Check R2
#==========================================================
my @MACD_Arr =();

foreach my $path ( @{$stock_list{PATH}} ){
my $info   = FINANCE::HISTORY_INFO->new();
my $hslist = $info->get_file_info($path);

my $imacd = FINANCE::MACD->new($hslist);
           $imacd->run_all('9');

my $pre_macd  = $imacd->get_MACD('9',$pre_time); my %pre_macd = %{$pre_macd};
my $cur_macd  = $imacd->get_MACD('9',$cur_time); my %cur_macd = %{$cur_macd};

#printf Dumper($pre_macd);
#printf Dumper($cur_macd);

  if( ($cur_macd{DIF} > 0 )&&
      ($cur_macd{DIF} > $pre_macd{DIF} ) ){
        push(@MACD_Arr,1);
} else{ push(@MACD_Arr,-1); }

}

@{$stock_list{MACD}} = @MACD_Arr;

#========================================
# step 3. get super buy info && check R3
#========================================
my @Super_Arr =();

my $super = $trader->get_bk_external_super_buy_hstable('1','2010/10/26'); my %super = %{$super};
#print Dumper($super);

foreach my $sid (@{$stock_list{STOCKID}} ){
my $ch =0;
foreach my $id (keys %super ){
  if( $super{$id}->STID eq $sid ){
      $ch =1;
  }
}

if( $ch==1 ){ push(@Super_Arr,1);  }
else{         push(@Super_Arr,-1); }
}

@{$stock_list{EXTERNAL}} = @Super_Arr;

#=====================================
# Dumper results
#=====================================
printf Dumper(\%stock_list);

ref : http://github.com/funningboy

2010年10月26日 星期二

Trader API top view @ perl ...

Target: 其實理由很簡單,為了簡化我的交易系統,讓整體的 flow 更完整點,不然東一塊西一塊的看起來真醜....像之前的所寫過的 learning plus: SDDE Server-V1 ,learning plus: DDE server for Stock ..怎現在都不知道在做啥....XD, 不過人說最初的心血是不會白費的,好在之前有些紀錄.不然還真是砍掉重練. Trader API 我們主要分成 3 大部份來講解 在 part 1 DDE, 主要透過 Web/DDE server 來抓取我們要的 info. 1. DDE part support 1-1 OFF_TIME data 1-1-1. history data @(Yahoo,Google) 1-1-2. super sell/buy [1,5,10,30] @ Web(yuanta) 1-1-3. trader info [1,5,10,30] @ Web (yuanta) 1-1-4. finance_bill [1] @ Web (yuanta) 1-2 ON_TIME data 1-2-1 Real DDE server @ Fubon e01 ex: data.pl
my $google = NET::GoogleDailyData->new();
 $google->get_history_data('2330.TW','2010/01/01','2010/10/10');
 $google->exp_history_data('2330.TW',"./DATA/2330.TW.csv");

my $yahoo  = NET::YahooDailyData->new();
 $yahoo->get_history_data('2330.TW','2010/01/01','2010/10/15');
 $yahoo->exp_history_data('2330.TW',"2330.TW.csv");

my $trader = NET::TraderDetail->new();
 $trader->get_trader_data();
 $trader->exp_trader_data("2010_10_20_trader_detail.csv");

#===========================================
#
# get super buy/sell[1,5,10,30] info from web
# get trader [1,5,30] info from web
#
#============================================
my $global = SYS::GLB->new();
my $market_super_hstable = $global->get_market_super_hstable;
#  printf Dumper($market_super_hstable);
my $market = NET::Market->new($market_super_hstable);
 $market->get_market_super_buyer_seller_data();
 $market->exp_market_data();

my $market_trader_hstable = $global->get_market_trader_hstable;
#printf Dumper($market_trader_hstable);
my $td4bysel = NET::Trader4BuySellDetail->new($market_trader_hstable);
 $td4bysel->get_market_trader_data();
 $td4bysel->exp_market_trader_data();
在 part 2 FINANCE 為資料分析 跟 簡單的判斷 2. FINANCE part support 2-1 Indicator 2-1-1 KD 2-1-2 BIAS 2-1-3 DMI 2-1-3 MACD 2-1-4 MA 2-1-5 OBV 2-1-6 PSY 2-1-7 RSI 2-1-8 SAR 2-1-9 VR 2-1-10 WR 2-2 Trader info 2-2-1 get trader info list by day 2-2-2 get statistic info by constrain 2-3 super buy/sell info 2-3-1 get super buy/sell by day 2-3-2 get statistic info by constrain ex:
my $ikd = FINANCE::KD->new($hslist);
my $kd  = $ikd->get_KD('30','2010/08/12');
printf Dumper($kd);

my $ibias = FINANCE::BIAS->new($hslist);
my $bias  = $ibias->get_BIAS('30','2010/08/12');
printf Dumper($bias);

my $idmi = FINANCE::DMI->new($hslist);
my $dmi  = $idmi->get_DMI('30','2010/08/12');
printf Dumper($dmi);

my $trader = TRADER::UTIL->new();
  $trader->set_market_super_hstable($market_super_hstable);
  $trader->set_market_trader_hstable($market_trader_hstable);

my $rst = $trader->get_bk_external_super_buy_hstable('1','2010/10/26');
  $rst = $trader->get_bk_main_super_sell_hstable('1','2010/10/26');
printf Dumper($rst);

  $rst = $trader->get_bk_external_trader_buy_hstable('1','2010/10/26','1440');
  $rst = $trader->get_bk_internal_trader_sell_hstable('1','2010/10/26','9800');
在 part 3 PROFIT 為回測分析我們進場點的 report
my %data = (
       "START_TIME"        => '2010/09/01',    #開始時間
       "END_TIME"          => '2010/10/18',    #結束時間
       "CAPITAL"           => '500000',        #成本
       "LEAVE_PROFIT_LOST" => '15.0',          #出場停損 10%
       "LEAVE_PROFIT_MAKE" => '10.0',           #出場獲利 7%
       "KEEP_PROFIT_LOST"  => '5.0',           #持有時確保 損失 達 -5%,如超過則回補
       "KEEP_PROFIT_MAKE"  => '3.0',           #持有時確保 獲利 達  3%,如操過則加碼  
       "KEEP_PROFIT_LOST_T"=> '1',             #最多回補次數 3 次
       "KEEP_PROFIT_MAKE_T"=> '0',             #最多加碼次數 3 次
       "KEEP_PROFIT_LENGTH"=> '1',             #每5 天 check 損失/獲利
       "PRICE_UP_LIMIT"    => '40',            #股價 <> '10',            #股價 > 10  的才會進場 check
);

my $prt = PROFIT::profit->new(\%data);
  $prt->get_input_set();
  $prt->set_history_path("./daily/");
  $prt->set_profit_info("Sharkv2_2010_09_10_c3.csv");
  $prt->get_profit_run();
  $prt->get_profit_report("rep.csv");
~                                          
有興趣的人可以到 http://github.com/funningboy 參考看看,當然也歡迎一起開發..@@

2010年10月20日 星期三

git 初體驗

git 是個分散式的版本控制軟體, 透過 repo 的方式,使用者可以修改/上傳 所屬的 project. 除了可以確保 master 的 version 外. master 也可以藉由別人修改的 patch 來 update 原來所屬的 project. 可避免共同開發時所造成的 "版本" 不符 跟 file overwrite 的狀況. ps: 最近會慢慢把之前的 project 改成 git 的型式 ... Refs: 使用Git與Github管理軟體開發專案 Git 版本控制系統(2) 開 branch 分支和操作遠端 repo. Github 使用

2010年10月19日 星期二

Tiger preview && Shark v2 2010_08~10 profit reports

好久沒有更新交易資料了,除了目前已經在 run 的 Shark_v2 外,感覺似乎少了Real Data 的部份. 雖然之前有發過些零星的 DDE 程式,如 CDP 當沖程式 From TSTS星人, RealDDE 4 Fubon Server...,NDde....,但感覺好像就是少了個什麼. 畢竟 Shark_v2 是盤後分析 tool, 而盤中的變化要依靠券商所提供的 tool,但券商的 tool 的策略跟我想要的還是有些差距,變的是我們要透過外加個殼去 access DDE. 而主要在 real data(Tiger) 的部份, 是要分析盤中的委買賣價差, 成交量是否放大... 因為我們是反轉系統(Shark_v2),判斷底端頭部位置一但出現強勢攻擊訊號,表示頭部形成準備上衝...^_^ 底下是 2010-09~10 Shark_v2 的 profit reports,發現在高價股 2454.TW 的進場判斷失去準度,且連續賠錢出場...ㄟ害...不過如果扣除 2454.TW 的虧損,還是有不錯的獲利拉 ...ps 自我安慰中...XD

DBI::SQL link @ perl

底下找了些link for SQL link,也不知道有沒有幫助,不過多知道點也是不錯的拉...@@ Refs: SQLite Tutorial http://defindit.com/readme_files/sqlite.html http://mailliststock.wordpress.com/2007/03/01/sqlite-examples-with-bash-perl-and-python/

2010年10月15日 星期五

CUDA @ NVIDIA hardware driver

除了透過 OpenGL 來做2D/3D 硬體加速控制外. NVIDIA 也有一套類似 OpenGL 的 software (hardware)control 叫 "CUDA",只能說這是家很有個性的公司,因為連 Linux 的 driver 也要透過 wrapper 來溝通,這邊姑且不論 wrapper 的架構.我們就以 GPU 的觀點來看,在 GPU 的 design 上,主要是處理影像的運算(float point),如 vertex, ploy, text...的type.所以內部可分成很多的 ALU macros 跟 private/share cache ...可以 parallel or pipeline 的架構處理大量的 DSP 運算.而 CUDA 可以用 software 的語法描述來直接控制 hardware macros. Refs CUDA tutorial pycuda @ python CUDA Training ps: 沒有 NVIDIA 的顯卡,所以只好無聊寫個 ALU macro emulator...XD 大致上是有 3 個 independent 的 ALU macros, 每個 ALU 的 status 會存入 queue 中, 而 schedule management 會去 ask work queue, 判斷每個 ALU macro 的狀態, 如果 ALU macro = IDLE, schedule management 就會把 command assign 給這個 ALU macro. sample part @ code
void *check_work_queue(void *t){
int i;

  for(;;){
   //check 4 each ALU in work_queue
   pthread_mutex_lock(&count_mutex);
   gid = -1;
   for(i=0; i<3; i++){
       if( is_work_queue_exist(&qulist,i) == QUEUE_ER_ARB ){
            gid = i;
            break;
        }
    }

 //   dump_work_queue(qulist);
   pthread_mutex_unlock(&count_mutex);

   sleep(ALU_DEF_DELAY);

     if( DONE == ALU_OK)
         pthread_exit(NULL);
  }
}
Results
time @ Fri Oct 15 16:51:49 2010

assign ALU 0
command :     0,in_a :     3,in_b :     4

time @ Fri Oct 15 16:51:51 2010
queue :: id  0,cmd :     0,in_a :     3,in_b :     4, (pre)out_c :     7

assign ALU 1
command :     1,in_a :     3,in_b :     4

time @ Fri Oct 15 16:51:53 2010
queue :: id  1,cmd :     1,in_a :     3,in_b :     4, (pre)out_c :    -1

assign ALU 1
command :     2,in_a :     3,in_b :     4

time @ Fri Oct 15 16:51:55 2010
queue :: id  0,cmd :     0,in_a :     3,in_b :     4, (pre)out_c :     7
queue :: id  1,cmd :     1,in_a :     3,in_b :     4, (pre)out_c :    -1

assign ALU 2
project download here

2010年10月13日 星期三

why use verilator....

今天被問到一個有趣的問題."為什麼要用verilator 來跑模擬呢?".就用以下幾點來回答這個問題好了. Answers: 1. simulation time SystemC(gcc) < Verilog(VCS + PLI) 2. license SystemC(free), Verilog(nc-sim/nc-verilog) 3. library 公司之前的 project 沒有 high level 的 model lib,為了要跟現有的 project 結合,且又要加快驗證流程. 4. dumper 在 SytemC 上寫 dump function 比 Verilog 簡單.可以用 c++ 的語法,做成個class 可重複使用.而 Verilog 則比較困難,還要考慮每個 cycle(timing) 的關係,且 dump waveform 的時間太久.連我自己看 waveform 都要眼花了...XD design flow 大致長這樣,我們會跳過 SystemC 的 cycle accurate time model, 畢竟這跟 RTL 的 verilog 類似, 爾且我們在前端已經做過 TLM 的 verify, 所以更可以確保 RTL 的 Verilog 的正確性, 之後再用 verilator 轉成 SystemC 的 cycle accurate time model 來加速驗證. Refs: Verilog to c++/ SystemC @ Verilator Design Automation Tool from Behavior Level to Transaction Level System Level - SystemC

2010年10月11日 星期一

spirit @ iphone JB case study

有 JB 過 iphone 的人,應該對 spirit 不陌生. 底下就針對 spirit 的 JB flow 做簡易的分析. 在之前的 post IPhone Case Study 有大概介紹過, 如何用 libimobiledevice 來 access iphone 的 file system, 可參考 iphone wiki 是如何使用 MobileDevice. flow charts step1. find top flow
    idevice_get_device_list() //透過'usblib'取得 idevice(iphone) 的位置
    memset()                  //建立個 mem space 給 idevice
    memcpy()                  
    idevice_device_list_free()//free device list
    idevice_new()             //建立 idevice
    time()                    //建立 time stamp
    send_files_thread()       //把 dylib 放到 (idevice)iphone 上
    restore_thread()          //同時 backup (idevice) 的資料
    idevice_free()            //free idevice
step 2. call 'idevice_get_device_list()' @ libimobiledevice 會去 call 'usbmuxd' lib 來取得 dev_list
idevice_error_t idevice_get_device_list(char ***devices, int *count)
{
...
 if (usbmuxd_get_device_list(&dev_list) < 0) {
                debug_info("ERROR: usbmuxd is not running!\n", __func__);
                return IDEVICE_E_NO_DEVICE;
        }
...

        for (i = 0; dev_list[i].handle > 0; i++) {
                newlist = realloc(*devices, sizeof(char*) * (newcount+1));
                newlist[newcount++] = strdup(dev_list[i].uuid);
                *devices = newlist;
        }

}
usbmux為 iphone 跟 pc 間的主要橋樑,流程可參考 usbmuxd 內的 README, 從流程中大概可以知道 usbmuxed 會建立起一組 tcp (ssl) 的連線. 利用這個 channel 來做 synchronous iphone and pc 的動作. 而 channel 間彼此是用 XML Message @ Mac OS X 的 format 來溝通.利用 plist @ python 的 lib 當 XML parser, 把上層的 command 跟底層 Transport layer 的 info 做溝通.
0. iTunes opens a connection to usbmuxd and asks it for device notifications
1. User inserts phone into computer
2. usbmuxd notices the phone and pings it with a version packet
3. phone replies
4. usbmuxd now considers the phone to be connected and tells iTunes
5. iTunes opens another separate connection to usbmuxd and asks it to connect
   to, say, the afc port on the device
6. usbmuxd sends a pseudo-TCP SYN packet to the phone
7. the phone's kernel driver receives the SYN packet and itself opens a
   TCP connection to localhost on the afc port
8. the phone replies with a pseudo-TCP SYN/ACK indicating that the port is open
   and the connection can proceed
7. usbmuxd sends a final ACK to the phone
8. usbmuxd replies to iTunes with a "connection successful" message
9. any data that iTunes writes to the usbmuxd socket from now on is forwarded,
   through pseudo-TCP, through USB, back into a more regular TCP connection to
   localhost, to the afc daemon on the phone, and vice versa
 plist_t n = plist_dict_get_item(props, "DeviceID");
             plist_get_uint_val(n, &val);
             dev->device_id = (uint32_t)val;
//建立到上層的 dev struct 中
  
         n = plist_dict_get_item(props, "ProductID");
         n = plist_dict_get_item(props, "SerialNumber");
         n = plist_dict_get_item(props, "LocationID");

//取得 DeviceID, ProductID...後,利用 SSL 產生 private key 建立加密的socket 連線
step 3. 把 dylib 透過底層的link 加載到 idevice(iphone)的 file system 上. 結論 Level 1. usblib usb connect Level 2. usbmuxd socket connect Level 3. libimobiledevic application/usr space ps: 如果你很懶的話,可以直接用 ubuntu 提供好的 package + source code Refs: iphone wiki libimobiledevic

2010年10月5日 星期二

MESI emulator @ cache protocol

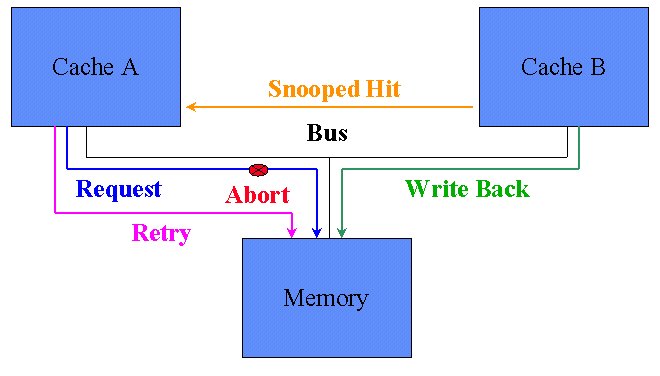
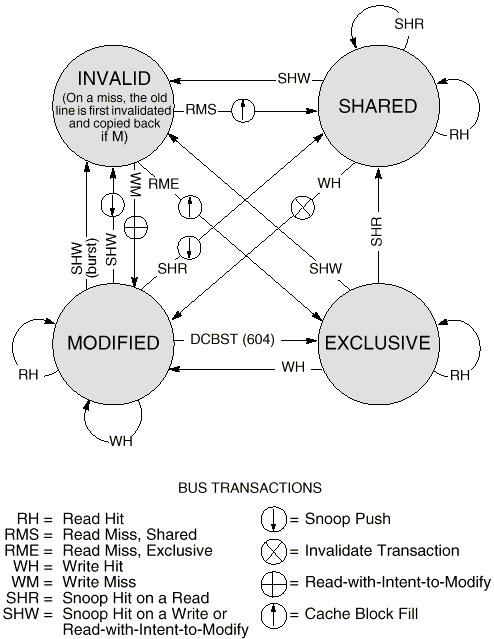
在傳統 single core 下, Cache 只需要考慮 hit/miss 的狀態.但進入 multi cores 的世代, Cache 除了要考慮 hit/miss 之外,還要考慮是否是Share memory part or local(private) memory part. 所以Intel 提出了 MESI 的架構來解決share memory data read/write 的問題. 其實想法很簡單, 如果是share part的部份.有write update 就 broadcast 出去,叫其他的 Cache update, 順便把data 寫回 memory, 如果是 read update 就只要 update 自己本身的 Cache 就好. 底下我們用sample emulator 來實現 MESI 的架構. constrains: CPU 的 schedule 為已知, 避免同時有兩個CPU 的 race condition. cache 架構不是正式的 tags,block, valid. 只有考慮 address 跟 valid 的判斷. 有興趣的人可以抓來玩玩. ^_^ download here. Refs: Memory part 2: CPU caches Cache工作原理-5 Cache Coherence CMP中Cache一致性协议的验证 Optimizing the MESI Cache Coherence Protocol for Multithreaded Applications on Small Symmetric Multiprocessor System Cache is King -or- Things are about to get MESI MESI Cache Coherency Protocol