
tool : android SDK + Eclipse
安裝流程請參考
http://developer.android.com/sdk/index.html
簡易Snake
http://funningboy.blogspot.com/search/label/java
沒想到現在的emulator作的如此漂亮.
 Pic Ref: http://www.wowcataclysminfo.com/wp-content/uploads/2009/09/wow-cataclysm-path-of-the-titans.jpg
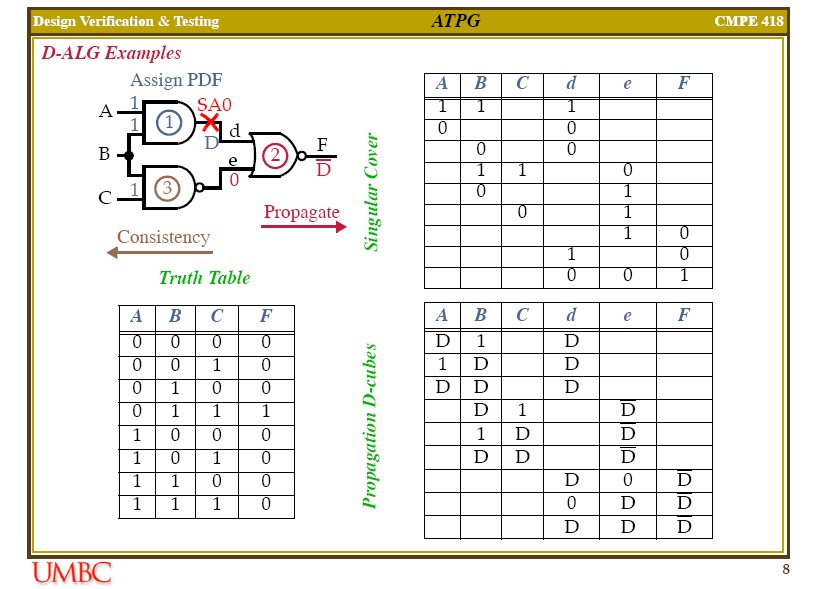
Path Delay Fault :
Pic Ref: http://www.wowcataclysminfo.com/wp-content/uploads/2009/09/wow-cataclysm-path-of-the-titans.jpg
Path Delay Fault : sample case:
the red line is our critical path from input And1 to And3, the fast path is from And1 to And2, so in our methodology the violation may happen in gate Xor2.
sample case:
the red line is our critical path from input And1 to And3, the fast path is from And1 to And2, so in our methodology the violation may happen in gate Xor2.

Result :
 sample download
PS: the license is non-commercial use
sample download
PS: the license is non-commercial use
http://sites.google.com/site/funningboy/perl_code/path_delay.rar?attredirects=0&d=1
演算法流程.
Propagate -> Up Date Look Up Table
+
Consistency -> Up Date Look Up Table
+
Rst

2 . Look Up Table Generator
透過C++ 產生Total Solutions. 假設有n個 inputs , 解空間就有 2^n 個.
3. Emulator (Tool)
PS: 本tool 請勿用在商業用途.
Language: C++.
Desgin Flow
 使用方式:
解壓 stuck.rar到自己的資料夾.
會有 Inc, Src, Pattern 的資料夾在裡面.
Stuck at Fault 的 Source Code 都放在 Inc/Src裡.
Pattern 資料夾內有我們的Test Pattern 跟 Look Up Table Generator.
Step 1. 準備好我們的test design, 存成 Pattern1.v檔
0 -> And
1 -> Or
2 -> Xor
3 -> Inv
PS: Constrain
目前只有支援 And,OR,Xor,Inv的格式,且為2對1的format. 2 input 1 output.
Pattern1.v
0 And1 w3 w1 w2
2 Xor1 w4 w3 w2
3 Inv1 w5 w4 w4
1 Or1 w6 w7 w5
3 Inv2 w7 w8 w8
2 Xor2 w8 w3 w4
0 And2 w9 w3 w8
2 XOr3 w10 w7 w2
0 AND3 w11 w10 w4
EOF
使用方式:
解壓 stuck.rar到自己的資料夾.
會有 Inc, Src, Pattern 的資料夾在裡面.
Stuck at Fault 的 Source Code 都放在 Inc/Src裡.
Pattern 資料夾內有我們的Test Pattern 跟 Look Up Table Generator.
Step 1. 準備好我們的test design, 存成 Pattern1.v檔
0 -> And
1 -> Or
2 -> Xor
3 -> Inv
PS: Constrain
目前只有支援 And,OR,Xor,Inv的格式,且為2對1的format. 2 input 1 output.
Pattern1.v
0 And1 w3 w1 w2
2 Xor1 w4 w3 w2
3 Inv1 w5 w4 w4
1 Or1 w6 w7 w5
3 Inv2 w7 w8 w8
2 Xor2 w8 w3 w4
0 And2 w9 w3 w8
2 XOr3 w10 w7 w2
0 AND3 w11 w10 w4
EOF
Step 2. 準備好我們的IO.log存成 IO.log檔 0-> input 1 ->output IO.log 0 w1 0 w2 1 w9 1 w6 1 w11 EOF Step3. Look Up Table generator 在Pattern 資料夾下鍵入 %make, 會產生一個 Pattern.cpp的file ,這個file會把剛剛的Pattern1.v 轉成 C++的file. PS: 注意inpur output的前後關係,不然產生的Look up table會錯誤. Step4. Generator Look up table 在pattern 資料夾下鍵入 %g++ Pattern.cpp %./a.exe 會產生我們的 look up table 叫 GenPat.log
GenPat.log w1 w2 w3 w4 w5 w7 w6 w8 w9 w10 w11 0 0 0 0 1 1 1 0 0 1 0 1 0 0 0 1 1 1 0 0 1 0 0 1 0 1 1 1 1 1 0 0 0 1 1 1 0 1 1 1 1 1 0 0 EOF
Step5. 回到stuck\inc底下 在define.h 中會定義幾個參數.如Stuck at 的點, 跟Stuck at 的值,還有 Stuck at所要走的Path. #define StFLoc "w5" #define StFValue "0" #define StPath "Or1"
全部定義好後.在stuck資料夾下鍵入
%make
%./p1.exe
就ok了
執行結果

 tool download
http://sites.google.com/site/funningboy/perl_code/stuck.rar?attredirects=0&d=1
tool download
http://sites.google.com/site/funningboy/perl_code/stuck.rar?attredirects=0&d=1
 Pic Ref : http://go2.wordpress.com/?id=725X1342&site=emilysutherland.wordpress.com&url=http%3A%2F%2Femilysutherland.files.wordpress.com%2F2009%2F12%2Fstuck.jpg

 DFS 可參考
http://imfg.wordpress.com/2008/07/30/16/
待續....
DFS 可參考
http://imfg.wordpress.com/2008/07/30/16/
待續....
 底下為Flash 的Variable.
version: "2.1",
firstPlay: "0",
uid: "xxxxxxxxxxx",
sig_user: "xxxxxxxxxx",
sig_session_key: "2.mQZTxp_jEsSSleEDweSIWA__.3600.1269417600-100000063194415",
sig_api_key: "xxxxxxxxxx",
host: "http://img.harvest.6waves.com/farmgame_tw/static/swf_2_1/",
web_base: "http://fbtwgw.farm.elex-tech.us/new_2_1_1/",
database: "http://img.harvest.6waves.com/farmgame_tw/static/swf_2_1/database/v0321/item.xml?4",
sig_time: "1269412560.3995",
mod: "facebook_tw",
farmuid:"xxxxxxx",
secretid: "xxxxxxx",
sig_ss:"Qay4KMXuZQymKSqjbCbdcw__",
sig_photo_upload:"0",
locale:"zh-tw",
appurl:"http://apps.facebook.com/farmgame_tw/",
ga_account:"UA-11729502-8",
invitefriendsURL:"http://apps.facebook.com/farmgame_tw/index.php?mod=friends",
//loadingPath:"http://img.harvest.6waves.com/farmgame_tw/static/swf_2_1/",
ga_path:http://img.harvest.6waves.com/farmgame_tw/static/swf2/tongji/library.swf
底下為Flash 的Variable.
version: "2.1",
firstPlay: "0",
uid: "xxxxxxxxxxx",
sig_user: "xxxxxxxxxx",
sig_session_key: "2.mQZTxp_jEsSSleEDweSIWA__.3600.1269417600-100000063194415",
sig_api_key: "xxxxxxxxxx",
host: "http://img.harvest.6waves.com/farmgame_tw/static/swf_2_1/",
web_base: "http://fbtwgw.farm.elex-tech.us/new_2_1_1/",
database: "http://img.harvest.6waves.com/farmgame_tw/static/swf_2_1/database/v0321/item.xml?4",
sig_time: "1269412560.3995",
mod: "facebook_tw",
farmuid:"xxxxxxx",
secretid: "xxxxxxx",
sig_ss:"Qay4KMXuZQymKSqjbCbdcw__",
sig_photo_upload:"0",
locale:"zh-tw",
appurl:"http://apps.facebook.com/farmgame_tw/",
ga_account:"UA-11729502-8",
invitefriendsURL:"http://apps.facebook.com/farmgame_tw/index.php?mod=friends",
//loadingPath:"http://img.harvest.6waves.com/farmgame_tw/static/swf_2_1/",
ga_path:http://img.harvest.6waves.com/farmgame_tw/static/swf2/tongji/library.swf
Sample version 1 功能: 登入FaceBook, 載入農場資訊 Export 2 Local host 請更改 my $email = 'xxxx@gmail.com'; my $pass = 'xxxx'; 執行後會產生 test.html. 點入 test.html 就會裝載 開心農場到 Local 端 執行結果 如上圖 Code Download http://sites.google.com/site/funningboy/perl_code/farmer.pl?attredirects=0&d=1
 PS: 本教程只提供學術交流,請勿用於破壞or改變原程式設定.
Tool: WireShark + Perl + OpenSLL + Cygwin
WireShark : 做封包分析, 解析我們送出的"封包"跟實際要送的"封包"是否相同.
WireShark 教程可參考
http://blog.shaolin.tw/2008/03/wireshark.html
Perl : 為我們的程式語言
裡面用到的 Lib
use strict;
use WWW::Mechanize;
use HTTP::Cookies;
use HTML::Parse;
可參考
http://search.cpan.org/~petdance/WWW-Mechanize-1.60/lib/WWW/Mechanize.pm
http://search.cpan.org/~gaas/libwww-perl-5.834/lib/LWP/UserAgent.pm
Cygwin: 模擬環境(IDE)
http://www.cygwin.com/
OpenSLL: 為我們加密要用的軟體
http://csc.ocean-pioneer.com/docum/ssl_basic.html
下載安裝: http://www.openssl.org/source/
請下載bin 檔,就不需要重新compiler
Step(1)
先打開WireShark開始抓取封包
capture->interface->broadcom....(選有IP的)->start
就會開始抓取"封包"
PS: 本教程只提供學術交流,請勿用於破壞or改變原程式設定.
Tool: WireShark + Perl + OpenSLL + Cygwin
WireShark : 做封包分析, 解析我們送出的"封包"跟實際要送的"封包"是否相同.
WireShark 教程可參考
http://blog.shaolin.tw/2008/03/wireshark.html
Perl : 為我們的程式語言
裡面用到的 Lib
use strict;
use WWW::Mechanize;
use HTTP::Cookies;
use HTML::Parse;
可參考
http://search.cpan.org/~petdance/WWW-Mechanize-1.60/lib/WWW/Mechanize.pm
http://search.cpan.org/~gaas/libwww-perl-5.834/lib/LWP/UserAgent.pm
Cygwin: 模擬環境(IDE)
http://www.cygwin.com/
OpenSLL: 為我們加密要用的軟體
http://csc.ocean-pioneer.com/docum/ssl_basic.html
下載安裝: http://www.openssl.org/source/
請下載bin 檔,就不需要重新compiler
Step(1)
先打開WireShark開始抓取封包
capture->interface->broadcom....(選有IP的)->start
就會開始抓取"封包"
 這邊我們先確定好登入的位置.
打入"帳號","密碼"看返回的Page. 登入的Type : http Port(80)
http://apps.facebook.com/farmgame_tw/index.php
確定能登入上 FaceBook 的開心農場.
切換到好友List,找個能偷採的人.....就偷採幾個sample看看封包是回傳怎樣的Data.
得知這些Inf後,Stop WireShark. 在WireShark 的 Filter: 中鍵入http,找出我們所要的data,其它的封包就可忽略.
Step(2)
找在 Http底下 尋找 post 的 method
Name: "POST /v3/data/gateway.php HTTP/1.1" 這個封包, 按右鍵 -> follow TCP stream
會看到下圖
紅色是我們Post出去的reguest.
藍色是我們接收到的"封包"
這邊我們先確定好登入的位置.
打入"帳號","密碼"看返回的Page. 登入的Type : http Port(80)
http://apps.facebook.com/farmgame_tw/index.php
確定能登入上 FaceBook 的開心農場.
切換到好友List,找個能偷採的人.....就偷採幾個sample看看封包是回傳怎樣的Data.
得知這些Inf後,Stop WireShark. 在WireShark 的 Filter: 中鍵入http,找出我們所要的data,其它的封包就可忽略.
Step(2)
找在 Http底下 尋找 post 的 method
Name: "POST /v3/data/gateway.php HTTP/1.1" 這個封包, 按右鍵 -> follow TCP stream
會看到下圖
紅色是我們Post出去的reguest.
藍色是我們接收到的"封包"
 待續....
SC_MODULE(fir) {


sc_in; reset;
sc_in<bool> input_valid;
sc_in<int> sample;
sc_out<bool> output_data_ready;
sc_out<int> result;
sc_in_clk CLK;

sc_int<9> coefs[16];

SC_CTOR(fir)
{
SC_CTHREAD(entry, CLK.pos());
reset_signal_is(reset,true);
#include "fir_const.h"
}

void entry();
};
在 fir.cpp中, 會定義這個Black Box的動作,底下是16個tap的Fir.
hw 的架構大概如此, 底下是5個tap 的FIR
 Pic Ref: http://commons.wikimedia.org/wiki/File:Fir_filter_df1.png
這邊會用wait()去模擬HW的Delay.
Pic Ref: http://commons.wikimedia.org/wiki/File:Fir_filter_df1.png
這邊會用wait()去模擬HW的Delay.
void fir::entry() {

sc_int<8> sample_tmp;
sc_int<17> pro;
sc_int<19> acc;
sc_int<8> shift[16];

// reset watching
/* this would be an unrolled loop */
for (int i=0; i<=15; i++)
shift[i] = 0;
result.write(0);
output_data_ready.write(false);
wait();

// main functionality
while(1) {
output_data_ready.write(false);
do { wait(); } while ( !(input_valid == true) );
sample_tmp = sample.read();
acc = sample_tmp*coefs[0];

for(int i=14; i>=0; i--) {
/* this would be an unrolled loop */
pro = shift[i]*coefs[i+1];
acc += pro;
};

for(int i=14; i>=0; i--) {
/* this would be an unrolled loop */
shift[i+1] = shift[i];
};

shift[0] = sample_tmp;
// write output values
result.write((int)acc);
output_data_ready.write(true);
wait();
};
}
執行結果.


 SystemC 是以C++為基礎,並加入Hw synchronous/asynchronous/event trigger 的概念進去.
TLM (Transaction Level Model 0)
http://www.eettaiwan.com/ART_8800316267_480102_TA_5a6d92f3.HTM
Module : Black Box Name
Port : 接口 In/Out/InOut bit
SystemC 是以C++為基礎,並加入Hw synchronous/asynchronous/event trigger 的概念進去.
TLM (Transaction Level Model 0)
http://www.eettaiwan.com/ART_8800316267_480102_TA_5a6d92f3.HTM
Module : Black Box Name
Port : 接口 In/Out/InOut bit

 在按F9又接回return 的地方.似乎找不到任何JMP資訊,也沒有任何關鍵字.
Step (2).
跳出OllyICE,在重新載入.不做run(F9)的動作.
做關鍵字收尋. 按右鍵 Search for -> All referenced string text.
(1). Key word "password" 找不到 .
"passwd" 找到摟, 記錄一下斷點資訊,跟所在的記憶體位置(0X004092F8),
判斷此記憶體的位置是否會Post到不該連上的Web.
(2). 依序向下收尋,看有沒有access這段記憶體位置
跳出 All referrnced string text,回到原本的地方, 改用constant收尋來查找.
Search for -> all constants 鍵入004092f8 (Hex)就會找出所有有用到這段記憶體區段有關的指令.
發現只有找到一個
0042294D . 68 F8924000 push 004092F8; UNICODE "&passwd="
表示只有這個地方會抓 Passwd 到某個地方,在根據這個位置往上/下找,判斷是做怎樣的動作.
在按F9又接回return 的地方.似乎找不到任何JMP資訊,也沒有任何關鍵字.
Step (2).
跳出OllyICE,在重新載入.不做run(F9)的動作.
做關鍵字收尋. 按右鍵 Search for -> All referenced string text.
(1). Key word "password" 找不到 .
"passwd" 找到摟, 記錄一下斷點資訊,跟所在的記憶體位置(0X004092F8),
判斷此記憶體的位置是否會Post到不該連上的Web.
(2). 依序向下收尋,看有沒有access這段記憶體位置
跳出 All referrnced string text,回到原本的地方, 改用constant收尋來查找.
Search for -> all constants 鍵入004092f8 (Hex)就會找出所有有用到這段記憶體區段有關的指令.
發現只有找到一個
0042294D . 68 F8924000 push 004092F8; UNICODE "&passwd="
表示只有這個地方會抓 Passwd 到某個地方,在根據這個位置往上/下找,判斷是做怎樣的動作.
 會發現一堆的regular expression,
0041DD1F . BA 108D4000 mov edx, 00408D10; UNICODE "
會發現一堆的regular expression,
0041DD1F . BA 108D4000 mov edx, 00408D10; UNICODE "

 Pic Ref: http://www.bloggingstocks.com/tag/economic+indicators/


使用方式
 Pic Ref: http://blog.northstarmanifesto.com/2009/01/the-emerging-future/

 Pic Ref: http://www.istockphoto.com/stock-photo-4978052-fortune-teller-with-glowing-crystal-ball.php

待續....


 下載測試檔
libusb-win32-device-bin-0.1.12.2.tar.gz
這邊會有compiler好的Dll, 跟Driver, 把bin/libusb0.dll 放到 windows/system32 底下,
libusb0.sys 放到 windows/system32/driver底下.
Cygwin + Mingw( cross compiler)
Cygwin為模擬Linux的環境, Mingw 為Windows 的 gcc/g++ compiler. 雖然Cygwin 內建有 gcc/g++ compiler,但是那個是針對Linux Based的.我們現在是用Cygwin 來模擬Linux環境, 實際再run的時候, 最底層的Protocl 還是Windows Based, Cygwin 只是個Wrapper用 DLL來溝通.
安裝流程
下載Cygwin (略過) 請記的環境變數 Path的部分要加入系統變數中
Default : /usr/local/bin:/usr/bin:/bin:/usr/X11R6/bin..
可鍵入
% echo $PATH
確定gcc / g++ version
% gcc -v
確保Mingw 的Path 有被安裝進去
Ref : http://www.mingw.org/wiki/FAQ
PS: 如果你要自己compiler 出DLL檔的話, 可以下載src 資料夾.
libusb-win32-src-0.1.12.2.tar.gz
解壓之後,把makefile內的 -mno-cygwin 拿掉, 雖然 -mno-cygwin 會告訴gcc/g++ 現在是用Mingw來當compiler, 但是我用這個指令時會fail. 之後就鍵入
%make
....
會產生 libusb0.dll, libusb0.sys ....
就我們之前用Binary安裝的檔案.
下載測試檔
libusb-win32-device-bin-0.1.12.2.tar.gz
這邊會有compiler好的Dll, 跟Driver, 把bin/libusb0.dll 放到 windows/system32 底下,
libusb0.sys 放到 windows/system32/driver底下.
Cygwin + Mingw( cross compiler)
Cygwin為模擬Linux的環境, Mingw 為Windows 的 gcc/g++ compiler. 雖然Cygwin 內建有 gcc/g++ compiler,但是那個是針對Linux Based的.我們現在是用Cygwin 來模擬Linux環境, 實際再run的時候, 最底層的Protocl 還是Windows Based, Cygwin 只是個Wrapper用 DLL來溝通.
安裝流程
下載Cygwin (略過) 請記的環境變數 Path的部分要加入系統變數中
Default : /usr/local/bin:/usr/bin:/bin:/usr/X11R6/bin..
可鍵入
% echo $PATH
確定gcc / g++ version
% gcc -v
確保Mingw 的Path 有被安裝進去
Ref : http://www.mingw.org/wiki/FAQ
PS: 如果你要自己compiler 出DLL檔的話, 可以下載src 資料夾.
libusb-win32-src-0.1.12.2.tar.gz
解壓之後,把makefile內的 -mno-cygwin 拿掉, 雖然 -mno-cygwin 會告訴gcc/g++ 現在是用Mingw來當compiler, 但是我用這個指令時會fail. 之後就鍵入
%make
....
會產生 libusb0.dll, libusb0.sys ....
就我們之前用Binary安裝的檔案.
 最後就是要K API摟....
Ref: http://dannynote.blogspot.com/2008/11/linuxlibusblibrarylinuxusbkernel-device.html
http://realchecko.blogspot.com/2009/04/build-openocd-under-mingw-with-ftd2232.html
最後就是要K API摟....
Ref: http://dannynote.blogspot.com/2008/11/linuxlibusblibrarylinuxusbkernel-device.html
http://realchecko.blogspot.com/2009/04/build-openocd-under-mingw-with-ftd2232.html
 Pic Ref: http://en.wikipedia.org/wiki/Normal_distribution


 Pic Ref : http://dckaleidoscope.files.wordpress.com/2009/03/clock.jpg
PS: 可以改變 "Dif" 的參數,可以加入 成交量或者K線的大小....,變成一種Discrete的方式.如下 HP : Highest Price. LP : Lowest Price. $Dif = 2 ($HP-$LP)/($HP+$LP) <= 0.3 = 1 ($HP-$LP)/($HP+$LP) <= 0.1
.... 可以自行發揮.


 結論: 發現在WR, OLB, BIAS 對2330.TW 的進出有良好的績效,且WR 在多轉空,空轉多
時也能維持良好的獲利.
PS: 我個人認為每檔股票都有其相對應的技術指標,就像操作原油,黃金....,每樣商
品都有其特殊的地方. 如何發現商品的特性,不外藉由不斷的測試跟Time
Moving,找每一季所對應的symptom...
結論: 發現在WR, OLB, BIAS 對2330.TW 的進出有良好的績效,且WR 在多轉空,空轉多
時也能維持良好的獲利.
PS: 我個人認為每檔股票都有其相對應的技術指標,就像操作原油,黃金....,每樣商
品都有其特殊的地方. 如何發現商品的特性,不外藉由不斷的測試跟Time
Moving,找每一季所對應的symptom...
Rst Download: http://sites.google.com/site/funningboy/stock_data/2010_02_2303_Ga_Rst.xls?attredirects=0&d=1
http://sites.google.com/site/funningboy/stock_data/2010_02_2303_Ga_Rst?attredirects=0&d=1
 Pic Ref : http://www.stepchange.no/
 以底下的Sample 為例. 在Hidden Layer中的 H1, 它的Input 來自 X1, X2, X3, X4. Ouput 為Z1, 所以我們可以表示成 H1 = C1*X1 + C2*X2 + C3*X3 + C4*X4, C1~ C4 分別為 Cofactor(Weight),來決定每個input的權重. 在來決定output 的Direction
Z1 =1; H1 ">="30
Z2 =0; H1 "<" 30 當H1 的Rrank ">=" 30, Output 就傳給 Z1, 相反的傳給Z2....
以底下的Sample 為例. 在Hidden Layer中的 H1, 它的Input 來自 X1, X2, X3, X4. Ouput 為Z1, 所以我們可以表示成 H1 = C1*X1 + C2*X2 + C3*X3 + C4*X4, C1~ C4 分別為 Cofactor(Weight),來決定每個input的權重. 在來決定output 的Direction
Z1 =1; H1 ">="30
Z2 =0; H1 "<" 30 當H1 的Rrank ">=" 30, Output 就傳給 Z1, 相反的傳給Z2....
 Pic Ref : http://www.information-management.com/specialreports/2008_61/10000704-1.html
 table Ref : http://nxforce.blogspot.com/search/label/ANN
用數學公式表示法
table Ref : http://nxforce.blogspot.com/search/label/ANN
用數學公式表示法

 簡單的說就是透過Hidden Layer的層數跟學習係數一直做Recursive的動作,算出Input跟Output的誤差,透過誤差值的調整Weight,讓Output的值最後能達到收斂狀態.所以我們就可以很明確的畫出True, False落在的的區間.在藉由這些Inf 反推回 Input 跟 Output的關係.
smaple 圖示
http://www.openprocessing.org/visuals/?visualID=159
簡單的說就是透過Hidden Layer的層數跟學習係數一直做Recursive的動作,算出Input跟Output的誤差,透過誤差值的調整Weight,讓Output的值最後能達到收斂狀態.所以我們就可以很明確的畫出True, False落在的的區間.在藉由這些Inf 反推回 Input 跟 Output的關係.
smaple 圖示
http://www.openprocessing.org/visuals/?visualID=159