postfix_expression:
          primary_expression
        | (primary_expression)(s) '[' expression ']'
        | (primary_expression)(s) '(' ')'
        | (primary_expression)(s) '(' argument_expression_list ')'
c grammar @ perl
http://cpansearch.perl.org/src/DCONWAY/Parse-RecDescent-1.93/demo/demo_Cgrammar.pl
http://search.cpan.org/~dconway/Parse-RecDescent/MANIFEST
c grammar @ lex yacc
http://www.lysator.liu.se/c/ANSI-C-grammar-l.html
http://www.lysator.liu.se/c/ANSI-C-grammar-y.html
Free Programming Language Grammars for Compiler Construction
http://www.thefreecountry.com/sourcecode/grammars.shtml
PS: try 過 demo_Cgrammar.pl 後. 除了發現 grammar 有些地方要改之外其效能也不太理想. 大體上來說是拿 ANSI C 的 lex yacc 來改的, 但是碰到grammar check 時會有 deep recursive 的問題生. 看來還是得回到最原始的方式先用 lex yacc 轉成 dot/XML format 在餵到 tool 內
2010年12月27日 星期一
ANSI C grammar
http://search.cpan.org/~dconway/Parse-RecDescent-1.965001/lib/Parse/RecDescent.pm
http://www.adp-gmbh.ch/perl/rec_descent.html
Eliminating Left Recursion in Parse::RecDescent
http://www.perlmonks.org/?node_id=153155
http://prlmnks.org/html/553889.html
2010年12月22日 星期三
LLVM case study
compiler design
http://gnuu.org/2009/09/18/writing-your-own-toy-compiler/
To visualize the control flow graph, you can use a nifty feature of the LLVM 'opt' tool. If you put this LLVM IR into "t.ll" and run "llvm-as <>viewCFG()" or "F->viewCFGOnly()" (where F is a "Function*") either by inserting actual calls into the code and recompiling or by calling these in the debugger. LLVM has many nice features for visualizing various graphs.
Viewing graphs while debugging code
LLVM IR is that it requires all basic blocks to be "terminated" with a control flow instruction such as return or branch. This means that all control flow, including fall throughs must be made explicit in the LLVM IR. If you violate this rule, the verifier will emit an error.
% llvm-gcc -O3 -emit-llvm hello.c -c -o hello.bc
The -emit-llvm option can be used with the -S or -c options to emit an LLVM ".ll" or ".bc" file (respectively) for the code. This allows you to use the standard LLVM tools on the bitcode file.
http://llvm.org/docs/Passes.html#basiccg llvm project gen http://llvm.org/docs/Projects.html Refs: 搭建LLVM實驗環境[轉貼] 演講:窮得只剩下 Compiler -- 淺談編譯技術的革命 「身騎 LLVM,過三關:淺談編譯器技術的嶄新應用」簡報上線 拖稿很久的 LLVM 使用文 Hello,LLVM2010年12月21日 星期二
sensitive list condition gen @ SystemC
最近 SystemC 跟 SystemVerilog 吵的沸沸揚揚.估且不論效能跟支援度.其實說穿了就是要把 Hardware level design flow. 往上轉成 software level design flow to map hardware level. 這樣不僅縮短 architecture map 的時間. 透過 top down 的 design view 來建立 SOC 的 platform.畢竟現在 IC 都要包山包海的 multi cores. 傳統的 ASIC design flow 要做到 SOC platform 所花的 cost 實在太大了.而 ESL 有助於改善 ASIC design flow 所欠缺的部份.用 model / algorithm / scheduling ...做到早期的系統驗證.
learning plus: ESL Design Flow
learning plus: Image Scalar 4 ESL Flow Golden Model
learning plus: Image Scalar 4 ESL Flow HW Algorithm
Image Scalar 4 ESL Flow HW c++ code
底下我們用 SystemC 來模擬 Verilog 的寫法,並且證明其實 SystemC 除了有 high level 的 lib 外,它也可以是個很像 hardware 的 description.
ps:心中os其實是想說當然是 SystemC 比 SystemVerilog 好摟...XD
sample c code
 learning plus: encoder 小技巧....
     if(a>20){ a=a-1; }
else if(a<20){ a=a+1; }
module set && sensitive lists gen
@ tt.h
#include >systemc.h>
#include >iostream>

SC_MODULE(SAMPLE){

sc_in>sc_uint>32> > a;
sc_out>sc_uint>32> > c;

sc_signal>sc_uint>1> > _idec_[2];
sc_signal>sc_uint>2> > _dec_;

SC_CTOR(SAMPLE){

SC_METHOD(_iproc_idec_0_);
dont_initialize();
sensitive >> a;

SC_METHOD(_iproc_idec_1_);
dont_initialize();
sensitive >> a;

SC_METHOD(_iproc_idec_);
dont_initialize();
sensitive >> _idec_[0];
sensitive >> _idec_[1];

SC_METHOD(_iproc_c_);
dont_initialize();
sensitive >> _dec_;


};

void _iproc_idec_0_();
void _iproc_idec_1_();
void _iproc_idec_();
void _iproc_c_();
};
@ tt.cpp methods
#include "tt.h"

// @verilog
// assign _idec_[0] = (a>20)? 1'b1 : 1'b0;
void SAMPLE::_iproc_idec_0_(){
   _idec_[0] = ( a.read() > 20 )? 1 : 0;
}

void SAMPLE::_iproc_idec_1_(){
   _idec_[1] = ( a.read() < 20 )? 1 : 0;
}

//@verilog
// _dec_ = {_idec_[1],_idec_[0]};
void SAMPLE::_iproc_idec_(){
   int _int_idec_1_ = int(_idec_[1].read());
   int _int_idec_0_ = int(_idec_[0].read());
   _dec_ = _int_idec_1_ << 1 | _int_idec_0_;
}

//@verilog
// mux && alu
void SAMPLE::_iproc_c_(){
   switch(int(_dec_.read())){
     case 1 : c = a.read() -1; break;
     case 2 : c = a.read() +1; break;
   }
}
hardware view
 learning plus: encoder 小技巧....
2010年12月19日 星期日
ILP Scheduling with DVFS constrain @ perl
在之前的 post 中 Force-Directed Scheduling with golden check @ perl 完成了 Syntax2SystemC gen 的部份, 雖然考慮到 cell 的 time delay 對 total avg power 的 optimal. 但這也只是 static power saving 的動作. 但其實在 timing path 上, 可以針對每個 processor element 加入不同的 frequency or power supply 來 inc/dec timing path 上的 delay, 讓 design 能夠更 meet 我們所需要的 constrains
learning plus: DVFS emulator
SmartReflex™ Power and Performance Management Technologies
底下就針對 DVFS 如何加入到 DFG graph 中的方式做探討.
flow chart
 step1. 產生 DFG graph.
step2. 產生 constrain DFG graph @ time/hardware constrains
step3. find time critical path.
針對 critical path 上的 vertex 插入 DVFS vertex. 來 balance critical path. 且再最後 arch gen 的時候, 能夠 cluster 在同個 PE 底下.
step3. 用 ILP + 標準差 的方式找出在 constrain 下的最佳 min sum(peak power) 的解.
step4. explore SystemC
step1. 產生 DFG graph.
step2. 產生 constrain DFG graph @ time/hardware constrains
step3. find time critical path.
針對 critical path 上的 vertex 插入 DVFS vertex. 來 balance critical path. 且再最後 arch gen 的時候, 能夠 cluster 在同個 PE 底下.
step3. 用 ILP + 標準差 的方式找出在 constrain 下的最佳 min sum(peak power) 的解.
step4. explore SystemC
ILP flow
1. Nv is the total number of vertex operations in the sequencing DFG, excluding the
source and sink nodes (NO–OPs).
2. vi is any vertex in the DFG performing certain operations and 1 ≤ i ≤ Nv .
3. FUk is the functional unit of type k.
4. Mk is the maximum number of functional units of type FUk .
5. Costk is cost of functional unit of type FUk may be power, area or delay.
6. CS [i] is the ASAP time stamp for the operation vi .
7. CL [i] is the ALAP time stamp for the operation vi .
8. xi,c is the binary decision variable which is 1 if vertex vi starts in control step c,
else 0.
sample code case for 5 taps fir
#!/usr/bin/perl


use Data::Dumper;
use SysPerl::syntax2DFG;
use SysPerl::constrain2DFG;
use SysPerl::schedule::integer_linear_programming;
#use SysPerl::schedule::force_directed;
use SysPerl::arch::arch2DFG;
use strict;

#===================================
# @step 1 : gen simple DFG graph
# return  : DFG graph
#         : vertex_pre_stack
#         : vertex_nxt_stack
#===================================
#
#  y = b0*x0 + b1*x1 + b2*x2 + b3*x3 + b4*x4 + b5*x5;

my $tt = ['y','=','b0','*','x0','+',
                 ,'b1','*','x1','+',
                 ,'b2','*','x2','+',
                 ,'b3','*','x3','+',
                 ,'b4','*','x4','+',
                 ,'b5','*','x5',';'];

my $syn  = SysPerl::syntax2DFG->new();
   $syn->read_text($tt);
   $syn->run_text();
   $syn->free();

#   my $graph = $syn->get_deep_copy_graph();

# remove tmp_reg && feedback assign
# ex : d=c;
#      e=d+1;
    $syn->run_updt_DFG();

# get all graph && DFG flow 2 schedule
my $DFG = $syn->get_deep_copy_DFG();

# dump graph as dot file
  $syn->dump_DFG_graphviz_file('syn2DFG.dot');
  $syn->free();

#=====================================
# @step2. :
# flow 1  : insert time weighted constrain 2 simple DFG graph and
#           gen Cstep graph(cycle step grpah)
# flow 2  : insert average power weighted constrain 2 Cstep and gen the force vale
#           @ force directed scheduling
# return :  cycle graph
#=====================================
# set unit time wait delay
my $constrain_time_weighted_vertices = {
     '+'  => 1,   # add delay 1 unit s
     '-'  => 1,   # sub delay 1 unit s
     '*'  => 1,   # mul
     '/'  => 1,   # div
     '%'  => 1,   # rem
     '>>' => 1,   # rsht
     '<<' => 1,   # lsht
};

#set unit average power consumed
my $constrain_power_weighted_vertices = {
     '+'  => 1.54,
     '-'  => 1,
     '*'  => 6.7,
     '/'  => 1,
     '%'  => 1,
     '>>' => 1,
     '<<' => 1,
};

my $con = SysPerl::constrain2DFG->new();
   $con->set_deep_DFG($DFG);

   $con->set_constrain_time_weighted($constrain_time_weighted_vertices);
   $con->set_constrain_power_weighted($constrain_power_weighted_vertices);

   $con->run_constrain_time_weighted_DFG();
   $con->run_constrain_NewDFG();

#   $con->dump_ALUDFG_graphviz_file('alu.dot');
   $con->dump_NewDFG_graphviz_file('con.dot');

#=============================
# schedule && cluster
#=============================
#my $sch = SysPerl::schedule::force_directed->new();
#   $sch->set_deep_cons2DFG($con);
#
#   $sch->run_forece_directed_scheduling();
#   $sch->report();

my $pe_number_constrain = {
     '+'  => 2,   # add numbers constrain for each time step
     '-'  => 2,   # sub
     '*'  => 2,   # mul
     '/'  => 2,   # div
     '%'  => 2,   # rem
     '>>' => 2,   # rsht
     '<<' => 2,   # lsht
};

my $sch = SysPerl::schedule::integer_linear_programming->new();
   $sch->set_deep_cons2DFG($con);

   $sch->set_pe_number_constrain($pe_number_constrain);
   $sch->run_integer_linear_programming_scheduling();
   $sch->report();

#=============================
# explore hardware
#=============================
my $arc = SysPerl::arch::arch2DFG->new();
   $arc->set_deep_sched2arch($sch);
   $arc->run_ALU_cluster();
   $arc->run_explore_SystemC();
project: https://github.com/funningboy/hg_lvl_syn/blob/master/main_ILP.pl
Ref : 以多重電位操作之VLIW架構下運用ILP為基礎之低功率排程演算法
2010年12月17日 星期五
Force-Directed Scheduling with golden check @ perl
在之前的 post Force-Directed Scheduling with high level synthesis @ perl 中已經完成了 Force-Directed scheduling 核心部份.而這邊主要是 architecture gen 跟 SystemC map.
主要概念如下圖. architecture (CTL) 會根據每個 cycle step 來決定哪個 processor element 要 work. 等全部運算完後會把 DON 拉成 true 給 test bench. 且在下個 cycle 把算完的 data 讀入. 最後再跟 golden model 比對,做 function check.


# @ author: funningboy
# @ email : funningboy@gmail.com
#     syntax2SystemC  flow

use Data::Dumper;
use SysPerl::syntax2DFG;
use SysPerl::constrain2DFG;
use SysPerl::schedule2DFG;
use SysPerl::arch2DFG;
use strict;

#===================================
# @step 1 : gen simple DFG graph
# return  : DFG graph
#         : vertex_pre_stack
#         : vertex_nxt_stack
#===================================
#
#  c = (a+b)>>1;
#  d = w*(a-b);
#  e = d-c-g*c;

my $tt = ['c','=','(','a','+','b',')','>>','1',';'];
my $cc = ['d','=','w','*','(','a','-','b',')',';'];
my $gg = ['e','=','d','-','c','-','g','*','c',';'];
#my $gg = ['e', '=', 'e', '+', '1', ';'];

my $syn  = SysPerl::syntax2DFG->new();
  $syn->read_text($tt);
  $syn->run_text();
  $syn->free();

  $syn->read_text($cc);
  $syn->run_text();
  $syn->free();

  $syn->read_text($gg);
  $syn->run_text();
  $syn->free();

#   my $graph = $syn->get_deep_copy_graph();

# remove tmp_reg && feedback assign
# ex : d=c;
#      e=d+1;
   $syn->run_updt_DFG();

# get all graph && DFG flow 2 schedule
my $DFG = $syn->get_deep_copy_DFG();

# dump graph as dot file
 $syn->dump_DFG_graphviz_file('syn2DFG.dot');
 $syn->free();

#=====================================
# @step2. :
# flow 1  : insert time weighted constrain 2 simple DFG graph and
#           gen Cstep graph(cycle step grpah)
# flow 2  : insert average power weighted constrain 2 Cstep and gen the force vale
#           @ force directed scheduling
# return :  cycle graph
#=====================================
# set unit time wait delay
my $constrain_time_weighted_vertices = {
    '+'  => 1,   # add delay 1 unit s
    '-'  => 1,   # sub delay 1 unit s
    '*'  => 2,   # mul
    '/'  => 2,   # div
    '%'  => 2,   # rem
    '>>' => 1,   # rsht
    '<<' => 1,   # lsht
};

#set unit average power consumed
my $constrain_power_weighted_vertices = {
    '+'  => 4,
    '-'  => 4,
    '*'  => 8,
    '/'  => 10,
    '%'  => 10,
    '>>' => 1,
    '<<' => 1,
};

my $con = SysPerl::constrain2DFG->new();
  $con->set_deep_DFG($DFG);

  $con->set_constrain_time_weighted($constrain_time_weighted_vertices);
  $con->set_constrain_power_weighted($constrain_power_weighted_vertices);

  $con->run_constrain_time_weighted_DFG();
  $con->run_constrain_NewDFG();

#   $con->dump_ALUDFG_graphviz_file('alu.dot');
  $con->dump_NewDFG_graphviz_file('con.dot');

#=============================
# schedule && cluster
#=============================
my $sch = SysPerl::schedule2DFG->new();
  $sch->set_deep_cons2DFG($con);

  $sch->run_forece_directed_scheduling();
  $sch->report();

#=============================
# explore hardware
#=============================
my $arc = SysPerl::arch2DFG->new();
  $arc->set_deep_sched2arch($sch);
  $arc->run_ALU_cluster();
  $arc->run_explore_SystemC();
Q: SystemC compile?
http://funningboy.blogspot.com/2010/09/risc-cpu-systemc.html
project
https://github.com/funningboy/SOC_c_model/blob/master/Algorithm/Force_Directed_Scheduling/main.pl
ps: future works
1.pipeline or parallel detected.
2.bus interface.
3.memory map location
4.processor element sharing
2010年12月16日 星期四
design 4 test @ soc
VLSI CAD Algorithms
http://www.engr.uconn.edu/~tehrani/teaching/cad/index.html
design 4 testing
http://www.engr.uconn.edu/~tehrani/teaching/test/index.html
2010年12月14日 星期二
perl delete array
在 array function 上. 除了用 push, pop 來改變 array 的 pointer外. 也可以用
delete 來清除 array 內部的 data, 但這樣會遇到一個問題. 就是 delete 完後 array 不會 shit 到最新的位置, 所以在做查找時候會出現 undef.
範例. 假設我們 delete 了 dd[0] 的 data. 而下次我們要取得 dd[0] 時,應該為 'c' 才對. 但是現在卻是 undef...xd
use Data::Dumper;
use strict;

my $dd = ['d',
          'c',
          'x',
          'e'];

delete $dd->[0];

print Dumper($dd);
result
$VAR1 = [
          undef,
          'c',
          'x',
          'e'
        ];
solution
建立個新的 array 之後再 map 過去...XD.感覺是個很笨的方式..
不然也可以用 "splice" / "join + split" ...
use Data::Dumper;
use strict;

my $dd = ['d',
          'c',
          'x',
          'e'];

delete $dd->[0];

my $a=[];

foreach my $k (@{$dd}){
  if($k){
   push(@{$a},$k);
 }
}

@{$dd} = @{$a};

print Dumper($dd);
ex: join + split
use Data::Dumper;
use strict;

my $dd = ['d',
          'c',
          'x',
          'e'];

delete $dd->[0];

my $st = join(' ',@{$dd});
@{$dd} = split(' ',$st);

print Dumper($dd);
perl pointer ....
最近被 perl 的 pointer 搞得昏天暗地. 原本以為 $a = $b; pointer 可以指到一個新的記憶體位置並把 $b 的內容 copy 過去. 但是發現卻不是如此... 而是 $a = $b 共用同個記憶體位置. 所以改變 $a 的同時 $b 也會改變.
底下的範例 $arr_e = $arr_b 的 內容, 但是我們改變 $arr_e 的時候,也同時改變了 $arr_b 的記憶體位置.
my $arr_b = ['d','c','x','e'];

my $arr_e = $arr_b;

push (@{$arr_e},'s');

print Dumper($arr_b);
result
$VAR1 = [
         'd',
         'c',
         'x',
         'e',
         's'
       ];
除非我們用 value copy 的方式. 把 $arr_b pointer 內的 data 根據 type 建立起一個相同 type 的 buffer 來儲存. 這樣 pointer 會產生個新的 pointer 位置.
my $arr_b = ['d','c','x','e'];

my @arr_e = @{$arr_b};

push (@arr_e,'s');

print Dumper($arr_b);
result
$VAR1 = [
         'd',
         'c',
         'x',
         'e',
       ];
2010年12月6日 星期一
Force-Directed Scheduling with high level synthesis @ perl
早在之前的 post 中 ASAP ALAP scheduling @perl ,DFG @ perl,DFG @ scheduling Algorithm..提過 DFG 在 high level synthesis 的重要性, 底下就寫個範例來實現從 syntax 到 hardware architecture explore 的 synthesis flow.
 step1.
syntax parser 2 DFG
目前只提供 directed graph 方式, no cycle graph....
ex: e=e+1 為 cycle graph...
step1.
syntax parser 2 DFG
目前只提供 directed graph 方式, no cycle graph....
ex: e=e+1 為 cycle graph...
 step2.
add time constrain
針對不同的 OP 加入 time info
step2.
add time constrain
針對不同的 OP 加入 time info
 step3.
Cstep (cycle step) gen.
建立起每個 cycle step 的 info.
step4. add power constrain
step3.
Cstep (cycle step) gen.
建立起每個 cycle step 的 info.
step4. add power constrain
 step1.
syntax parser 2 DFG
目前只提供 directed graph 方式, no cycle graph....
ex: e=e+1 為 cycle graph...
step1.
syntax parser 2 DFG
目前只提供 directed graph 方式, no cycle graph....
ex: e=e+1 為 cycle graph...
#  c = (a+b)>>1;
#  d = w*(a-b);
#  e = d-c-g*c;

my $tt = ['c','=','(','a','+','b',')','>>','1',';'];
my $cc = ['d','=','w','*','(','a','-','b',')',';'];
my $gg = ['e','=','d','-','c','-','g','*','c',';'];
#my $gg = ['e', '=', 'e', '+', '1', ';'];

my $syn  = SysPerl::syntax2DFG->new();
 $syn->read_text($tt);
 $syn->run_text();
 $syn->free();

 $syn->read_text($cc);
 $syn->run_text();
 $syn->free();

 $syn->read_text($gg);
 $syn->run_text();
 $syn->free();
產生sample graph
result:
 step2.
add time constrain
針對不同的 OP 加入 time info
step2.
add time constrain
針對不同的 OP 加入 time info
my $constrain_time_weighted_vertices = {
    '+'  => 1,   # add delay 1 unit s
    '-'  => 1,   # sub delay 1 unit s
    '*'  => 5,   # mul
    '/'  => 8,   # div
    '%'  => 8,   # rem
    '>>' => 1,   # rsht
    '<<' => 1,   # lsht
};
如果超出 time constrain 就會建立出 w::@, r::@ 的 Vertex. 分別代表 w::@ 寫到內部的 register 跟 r::@ 讀取內部的 register, 且彼此差一個 clock cycle.
ex:
>>::0
表示 op(>>),id(0)
result
 step3.
Cstep (cycle step) gen.
建立起每個 cycle step 的 info.
step4. add power constrain
step3.
Cstep (cycle step) gen.
建立起每個 cycle step 的 info.
step4. add power constrain
#set unit average power consumed
my $constrain_power_weighted_vertices = {
    '+'  => 4,
    '-'  => 4,
    '*'  => 8,
    '/'  => 10,
    '%'  => 10,
    '>>' => 0,
    '<<' => 0,
};

my $con = SysPerl::constrain2DFG->new();
  $con->set_deep_DFG($DFG);

  $con->set_constrain_time_weighted($constrain_time_weighted_vertices);
  $con->set_constrain_power_weighted($constrain_power_weighted_vertices);

  $con->run_constrain_time_weighted_DFG();
  $con->run_constrain_NewDFG();

#   $con->dump_ALUDFG_graphviz_file('alu.dot');
  $con->dump_NewDFG_graphviz_file('con.dot');
step5.
run Force-Directed Scheduling && report
my $sch = SysPerl::schedule2DFG->new();
  $sch->set_deep_cons2DFG($con);

  $sch->run_forece_directed_scheduling();
  $sch->report();
results
$VAR1 = {
         'ALU' => {
                    '-::1' => {
                                'begin' => 2,
                                'end' => 2
                              },
                    '+::0' => {
                                'begin' => 1,
                                'end' => 1
                              },
                    '>>::0' => {
                                 'begin' => 1,
                                 'end' => 1
                               },
power for each cycle step
$VAR1 = {
         '1' => 17,
         '2' => 16
       };
future works...
1. cluster register
reduce the feedback registers to store the tmp value
2. cluster op 2 ALU block, such as
//hardware ALU block
void iALU_block_1(int a,int n, int *c){
    c = a + b;
}
...


//@ cycle domain
// cycle 1
iALU_block_1(a,b,&c);
iALU_block_2(a,b,&c);

//cycle 2...
3. architecture explore from DFG...
c/verilog ...
project:
https://github.com/funningboy/SOC_c_model/blob/master/Algorithm/Force_Directed_Scheduling/main.pl
refs:
Force Directed Scheduling for Behavioral Synthesis
Modified Force-Directed Scheduling for Peak and Average Power
Parallel Algorithms for Force Directed Scheduling of Flattened and
[PDF] Scheduling
ebook
http://ishare.iask.sina.com.cn/f/10389743.html
2010年12月3日 星期五
ASAP ALAP scheduling @perl
 利用 ASAP, ALAP 做 scheduling 找出每個 Vertex 的 tolerance range. 我們就可以利用這樣的 info 來減少 peak power 的產生. 範例如下圖所示
constrain
1. 在不影響每個 Vertex 的先後順序下, 用 ASAP 算出 begin 值. 用 ALAP 算出 end 值.
2. 當 begin==end 時,為 critical path, 表示這個 vertex 不能被移動, begin!=end 表示為 vertex 可以移動的位置.
example :
vertex 1 : begin time 2 end time 4
vertex 2 : begin time 3 end time 3
vertex 3 : begin time 2 end time 4
由此可知, vertex 2 的位置為固定值, 只能靠移動 Vertex1, Vertex3 來減少 peak power.
利用 ASAP, ALAP 做 scheduling 找出每個 Vertex 的 tolerance range. 我們就可以利用這樣的 info 來減少 peak power 的產生. 範例如下圖所示
constrain
1. 在不影響每個 Vertex 的先後順序下, 用 ASAP 算出 begin 值. 用 ALAP 算出 end 值.
2. 當 begin==end 時,為 critical path, 表示這個 vertex 不能被移動, begin!=end 表示為 vertex 可以移動的位置.
example :
vertex 1 : begin time 2 end time 4
vertex 2 : begin time 3 end time 3
vertex 3 : begin time 2 end time 4
由此可知, vertex 2 的位置為固定值, 只能靠移動 Vertex1, Vertex3 來減少 peak power.
 worst case
 best case
 ps: 這可以用 short path algorithm 來算出最小值
example :
power_vertex1(x) 2<=x<=4;
power_vertex2(y) 3<=y<=3;
power_vertex3(z) 2<=z<=4;
find min( power_vertex1(x) + power_vertex2(y) + power_vertex3(z) )
ps: 這可以用 short path algorithm 來算出最小值
example :
power_vertex1(x) 2<=x<=4;
power_vertex2(y) 3<=y<=3;
power_vertex3(z) 2<=z<=4;
find min( power_vertex1(x) + power_vertex2(y) + power_vertex3(z) )
   my $tt = CDFG->new();

   $tt->set_time_weighted_vertex('#::1',0);
   ...
   $tt->set_time_weighted_edge('<::0','#::1',1);
   ...

   # initial set
   $tt->run_time_weighted_ini();

   # ASAP flow
   $tt->run_time_weighted_test();
   $tt->run_time_weighted_ASAP();
   $tt->rst_time_weighted_ASAP();
   # dump or not
   $tt->dump_ASAP_graphviz_file('ASAP.dot');

   # ALAP flow
   $tt->run_time_weighted_test();
   $tt->run_time_weighted_max_path();
   $tt->run_time_weighted_ALAP();
   $tt->rst_time_weighted_ALAP();
   # dump or not
   $tt->dump_ALAP_grpahviz_file('ALAP.dot');

   # report
my $rpt = $tt->run_report();
   print Dumper($rpt);
project:
https://github.com/funningboy/SOC_c_model/blob/master/ASALAP/main.pl
2010年11月28日 星期日
DFG @ perl
早在之前曾經探討過在 "high level ALU numbers @ estimator" 主要是分析每個 block (always) 內所需要的 ALU 個數, 但這還必須考慮到每個 ALU 彼此之間的相關性, 判斷是否可以化簡還是可以做到 parallel..,之後在針對每個 ALU 的 time slide level 做調整, 如 ASAP(as soon as possible), ALAP(as later as possible)的演算法 ...可參考Data Flow Graphs Intro .這邊就不多做說明, 底下我們就用簡單的 syntax 來產生最簡單的 DFG graph, 之後我們可以用這個 graph 做基底加入 time wait, hw constrain, power ... 的 information.
main.pl
 Ref: [PDF] Data Flow Graphs Intro
http://en.wikipedia.org/wiki/Data_flow_diagram
http://funningboy.blogspot.com/2010/09/alu-estimator-rtl-verilog.html
Ref: [PDF] Data Flow Graphs Intro
http://en.wikipedia.org/wiki/Data_flow_diagram
http://funningboy.blogspot.com/2010/09/alu-estimator-rtl-verilog.html
my $dfg = DFG2Graph->new('c=(a+b)*c;');
   $dfg->run_text();

#   $dfg->dump_graph();
   $dfg->dump_graphviz();
project: https://github.com/funningboy/SOC_c_model/blob/master/DFG/main.pl
Result :
 Ref: [PDF] Data Flow Graphs Intro
http://en.wikipedia.org/wiki/Data_flow_diagram
http://funningboy.blogspot.com/2010/09/alu-estimator-rtl-verilog.html
Ref: [PDF] Data Flow Graphs Intro
http://en.wikipedia.org/wiki/Data_flow_diagram
http://funningboy.blogspot.com/2010/09/alu-estimator-rtl-verilog.html
2010年11月26日 星期五
proxy website @ yahoo 999
 最近因為 Yahoo 999 的問題卡了幾天, 沒想到透過 Mozilla Firefox + proxy website list 就可以解決了, 但是 proxy website 後端的 https 加密機制跟轉向過後的網址我們並不知道,只能透過 Mozilla 來處理 cookie 跟轉址的 methods. 底下用 perl 寫個簡單的 download 程式,並透過 proxy website....當然你也可以用這個方式來隱藏你的 ip, 不過最好不用連到需要登入的網站. 畢竟我們是透過 proxy 的方式. 說不定你的帳號密碼會被紀錄下來...XD
mech.pl
最近因為 Yahoo 999 的問題卡了幾天, 沒想到透過 Mozilla Firefox + proxy website list 就可以解決了, 但是 proxy website 後端的 https 加密機制跟轉向過後的網址我們並不知道,只能透過 Mozilla 來處理 cookie 跟轉址的 methods. 底下用 perl 寫個簡單的 download 程式,並透過 proxy website....當然你也可以用這個方式來隱藏你的 ip, 不過最好不用連到需要登入的網站. 畢竟我們是透過 proxy 的方式. 說不定你的帳號密碼會被紀錄下來...XD
mech.pl
   #!/usr/bin/perl
    #using proxy server to download your file...
    # author : sean chen
    # mail   : funningboy@gmail.com
    # 2010/11/26

    use strict;
    use warnings;
    use Data::Dumper;
    use File::Basename;

    my $path = $ARGV[0]
      or die "Must specify your download path \
              ex: http://xxx/xxx/xxx/jpg";

    # create a new browser
    use WWW::Mechanize;
    my $browser = WWW::Mechanize->new( env_proxy  => 1,
                                       keep_alive => 1,
                                       timeout    => 60 );

    $browser->cookie_jar(HTTP::Cookies->new());

    # proxy website
    $browser->get("http://hidemy.biz/");

    # post form
    $browser->form_number(1);
    $browser->field("u", $path);
    $browser->click();

    #get new url
    my $url = $browser->uri;

    my @arr = split("\/",$path);

    open (oPtr,">$arr[$#arr]") || die "$!";
    if($browser->success()){
         binmode(oPtr);
         print oPtr $browser->content();
    } else {
       print $browser->status(); die;
    }
how to use it
perl mech.pl http://www.ccc.ccc/ddd/ddd.jpg
2010年11月23日 星期二
hot_or_not @ social network movie
 最近看了一部好看的電影 "social network", 內容就請自行goole吧. 不果說真的現在社群的力量真是太強大了, 不像以前是靠 CPU 致富, 現在要靠 "社群&&網路" 摟...XD
不過回想到當初學生時代,那時候還很流行抽學辦,每次都要跟公關混熟不然拿到的都是張費紙..
.基於這樣的原因下, 想說透過 "自己->朋友1->朋友2->朋友3" 的分析找出最 hot/match 的選項, 這樣就不用巴結公關摟, 只需巴結你的朋友群, 再透過這個朋友認識下個朋友,依序認識到你最想要認識的...雖然說 facebook 已經提供了 "共通好友" 的功能,但還不能很陰險的把所有資料給抓出來,再進行分析比對. 底下就先寫個簡單的 sample layout view. 內部的分析之後再完成摟.
最近看了一部好看的電影 "social network", 內容就請自行goole吧. 不果說真的現在社群的力量真是太強大了, 不像以前是靠 CPU 致富, 現在要靠 "社群&&網路" 摟...XD
不過回想到當初學生時代,那時候還很流行抽學辦,每次都要跟公關混熟不然拿到的都是張費紙..
.基於這樣的原因下, 想說透過 "自己->朋友1->朋友2->朋友3" 的分析找出最 hot/match 的選項, 這樣就不用巴結公關摟, 只需巴結你的朋友群, 再透過這個朋友認識下個朋友,依序認識到你最想要認識的...雖然說 facebook 已經提供了 "共通好友" 的功能,但還不能很陰險的把所有資料給抓出來,再進行分析比對. 底下就先寫個簡單的 sample layout view. 內部的分析之後再完成摟.
wretch       xxx@wretch.cc      :: 無名帳號
facebook     xxx@facebook.com   :: facebook帳號
relation     xxx->ddd->sss->your id
ps:       如何認識到 xxx?
          要從你的朋友 sss 再認識 ddd 就可以認識到 xxx

msn          xxx@msn.com        ::msn
yahoo        xxx@yahoo.com      ::yahoo
match score  9                  ::跟constrain match 的值
sample view
 HTML generator on line
http://www.spiderweblogic.com/HTML-Tag-Generator.aspx
XML parser
http://www.xml.com/pub/a/98/09/xml-perl.html
http://oreilly.com/catalog/perlxml/chapter/ch03.html
YAHOO Error 999
http://answers.yahoo.com/question/index?qid=20090107150130AArM2zP
proxy
http://briian.com/?p=5661
http://kobesearch.cpan.org/htdocs/libwww-perl/LWP/UserAgent.pm.html#ua_gt_proxy_schemes_proxy_url
proxy list
http://freenuts.com/top-10-free-online-proxy-websites/
wget
http://www.gnu.org/software/wget/manual/wget.html#HTTPS-_0028SSL_002fTLS_0029-Options
HTML generator on line
http://www.spiderweblogic.com/HTML-Tag-Generator.aspx
XML parser
http://www.xml.com/pub/a/98/09/xml-perl.html
http://oreilly.com/catalog/perlxml/chapter/ch03.html
YAHOO Error 999
http://answers.yahoo.com/question/index?qid=20090107150130AArM2zP
proxy
http://briian.com/?p=5661
http://kobesearch.cpan.org/htdocs/libwww-perl/LWP/UserAgent.pm.html#ua_gt_proxy_schemes_proxy_url
proxy list
http://freenuts.com/top-10-free-online-proxy-websites/
wget
http://www.gnu.org/software/wget/manual/wget.html#HTTPS-_0028SSL_002fTLS_0029-Options
2010年11月11日 星期四
OS case stusy
 1.mm(virtual memory -> physical memory)
GDT ( Global Descriptor Table )
1.mm(virtual memory -> physical memory)
GDT ( Global Descriptor Table )
- 0 NULL
- 1 kernel code
- 2 kernel data
- 3 user space code
- 4 user space data
- base -> entry address
- limit -> entry size
- 0 - Division by zero exception
- 1 - Debug exception
- 2 - Non maskable interrupt
- 3 - Breakpoint exception
2010年11月9日 星期二
OrzMicroKernel case stusy && emulator
 Results:
   @iOS work on normal queue -> id @,0
@NORMAL queue
queue :: id  0,time_out :     9,priority :     0,work_time :     2
queue :: id  1,time_out :     2,priority :     1,work_time :     3
queue :: id  2,time_out :     4,priority :     2,work_time :     3

@EMERGENCY queue

   @iOS work on normal queue -> id @,0
@NORMAL queue
queue :: id  0,time_out :     8,priority :     0,work_time :     1
queue :: id  1,time_out :     1,priority :     1,work_time :     3
queue :: id  2,time_out :     3,priority :     2,work_time :     3

@EMERGENCY queue

   @iOS work on emergency queue -> id @,1
@NORMAL queue
queue :: id  2,time_out :     2,priority :     2,work_time :     3
queue :: id  0,time_out :     7,priority :     0,work_time :     1

@EMERGENCY queue
queue :: id  1,time_out :     0,priority :     1,work_time :     2

   @iOS work on emergency queue -> id @,1
@NORMAL queue
queue :: id  2,time_out :     1,priority :     2,work_time :     3
queue :: id  0,time_out :     6,priority :     0,work_time :     1
ps: 應該要好好認真的把 OS 看熟才是...XD project @ https://github.com/funningboy/SOC_c_model/tree/master/iOS/ Refs: OS Kernel 相關閱讀與實作心得﹝一﹞ http://en.wikipedia.org/wiki/X86_memory_segmentation x86 Instruction Set Reference x86 Disassembly/Loop Examples OrzMicrokernel tasks.asm 工作排程器的切換執行權函式註解,
2010年11月8日 星期一
2010年11月3日 星期三
co-syn with Google server
results-[Uu] -[Tt] -[Pp] your_path -[Dd] -[Yy] -[Pp] your_path -u -t 3600 -p /home/sean/prj/ss #back up the project 'ss' && upload 2 google doc @ period of 3600s # 每3600s back up 一次,且上傳到 google doc server. -u -t 0 -p /home/sean/prj/ss #back up the project 'ss' && upload 2 google doc right now # 立即備份,且上傳到 google doc server -d -y 2010/11/04 -p /home/sean/prj/ss #download the project 'ss' by day # 下載back up data by day
 code @ https://github.com/funningboy/co_syn/blob/master/GoogleDoc.pl
Refs:
SSL install
http://bredsaal.dk/lwpuseragent-and-https
http://code.activestate.com/lists/perl-win32-web/1972/
content type ref
http://en.wikipedia.org/wiki/Internet_media_type11
others API 4 google
learning plus: Google Finance 4 Quote
learning plus: Google Picasa API
learning plus: Google Finance API
Google Blogger API
Google Upload 2 Google DOC
code @ https://github.com/funningboy/co_syn/blob/master/GoogleDoc.pl
Refs:
SSL install
http://bredsaal.dk/lwpuseragent-and-https
http://code.activestate.com/lists/perl-win32-web/1972/
content type ref
http://en.wikipedia.org/wiki/Internet_media_type11
others API 4 google
learning plus: Google Finance 4 Quote
learning plus: Google Picasa API
learning plus: Google Finance API
Google Blogger API
Google Upload 2 Google DOC
2010年10月27日 星期三
sample "entry case" 2 our trade API
 當你握有滿手好牌,卻又不知該怎麼辦時,我想數據分析應該還有一定的準確性..@@
底下我們就用 Trader API 來寫個簡單的進出場判斷.
透過 "策略分析" 跟 "profit-analysis" 來回測我們的進出場判斷條件...@@
當你握有滿手好牌,卻又不知該怎麼辦時,我想數據分析應該還有一定的準確性..@@
底下我們就用 Trader API 來寫個簡單的進出場判斷.
透過 "策略分析" 跟 "profit-analysis" 來回測我們的進出場判斷條件...@@
#!/usr/bin/perl

#==================================================
#author: sean chen mail: funningboy@gmail.com
#publish 2010/10/27
#License: BSD
#
# 進場策略 rules
# R1. ( T[0]_K(9) cross over T[0]_D(9) ) && ( T[-1]_K(9) <> D(9). 且 昨日 KD 必須小於 今日 KD
#
# R2. T[0]_MACD_DIF(12-26) > 0 && T[0]_MACD_DIFF(12-26) > T[1]_MACD_DIFF(12-26)
#     當日 MACD-DIFF > 0 且 必須大於昨日的 MACD-DIFF
#
# R3. 外資連續買超1日
#
#==================================================

use SYS::GLB;

use FINANCE::KD;
use FINANCE::MACD;

use TRADER::UTIL;
use Data::Dumper;
use strict;

my $pre_time   = "2010/10/25";
my $cur_time   = "2010/10/26";

my %stock_list =(
                "STOCKID" => ["2330.TW",
                              "2409.TW",
                              "2317.TW",],
                "PATH"    => ["./data_off/stock/2330.TW.csv",
                              "./data_off/stock/2409.TW.csv",
                              "./data_off/stock/2317.TW.csv",],
                "KD"      => ["-1",
                              "-1",
                              "-1",],
                "MACD"    => ["-1",
                              "-1",
                              "-1",],
                "EXTERNAL"=> ["-1",
                              "-1",
                              "-1",],
);

#printf Dumper(\%stock_list);

my $global = SYS::GLB->new();
my $market_super_hstable  = $global->get_market_super_hstable;
my $market_trader_hstable = $global->get_market_trader_hstable;

my $trader = TRADER::UTIL->new();
$trader->set_market_super_hstable($market_super_hstable);
$trader->set_market_trader_hstable($market_trader_hstable);

#==========================================================
# step 1 get KD value && Check R1
#==========================================================
my @KD_Arr =();

foreach my $path ( @{$stock_list{PATH}} ){
my $info   = FINANCE::HISTORY_INFO->new();
my $hslist = $info->get_file_info($path);

my $ikd = FINANCE::KD->new($hslist);
         $ikd->run_all('9');

my $pre_kd  = $ikd->get_KD('9',$pre_time); my %pre_kd = %{$pre_kd};
my $cur_kd  = $ikd->get_KD('9',$cur_time); my %cur_kd = %{$cur_kd};

#printf Dumper($pre_kd);
#printf Dumper($cur_kd);

  if( ($cur_kd{K} > $cur_kd{D} )&&
      ($cur_kd{K} > $pre_kd{K} )&&
      ($cur_kd{D} > $pre_kd{D} )   ){
        push(@KD_Arr,1);
} else{ push(@KD_Arr,-1); }

}

@{$stock_list{KD}} = @KD_Arr;

#==========================================================
# step 2 get MACD value && Check R2
#==========================================================
my @MACD_Arr =();

foreach my $path ( @{$stock_list{PATH}} ){
my $info   = FINANCE::HISTORY_INFO->new();
my $hslist = $info->get_file_info($path);

my $imacd = FINANCE::MACD->new($hslist);
           $imacd->run_all('9');

my $pre_macd  = $imacd->get_MACD('9',$pre_time); my %pre_macd = %{$pre_macd};
my $cur_macd  = $imacd->get_MACD('9',$cur_time); my %cur_macd = %{$cur_macd};

#printf Dumper($pre_macd);
#printf Dumper($cur_macd);

  if( ($cur_macd{DIF} > 0 )&&
      ($cur_macd{DIF} > $pre_macd{DIF} ) ){
        push(@MACD_Arr,1);
} else{ push(@MACD_Arr,-1); }

}

@{$stock_list{MACD}} = @MACD_Arr;

#========================================
# step 3. get super buy info && check R3
#========================================
my @Super_Arr =();

my $super = $trader->get_bk_external_super_buy_hstable('1','2010/10/26'); my %super = %{$super};
#print Dumper($super);

foreach my $sid (@{$stock_list{STOCKID}} ){
my $ch =0;
foreach my $id (keys %super ){
  if( $super{$id}->STID eq $sid ){
      $ch =1;
  }
}

if( $ch==1 ){ push(@Super_Arr,1);  }
else{         push(@Super_Arr,-1); }
}

@{$stock_list{EXTERNAL}} = @Super_Arr;

#=====================================
# Dumper results
#=====================================
printf Dumper(\%stock_list);
ref : http://github.com/funningboy
2010年10月26日 星期二
Trader API top view @ perl ...
Target:
其實理由很簡單,為了簡化我的交易系統,讓整體的 flow 更完整點,不然東一塊西一塊的看起來真醜....像之前的所寫過的 learning plus: SDDE Server-V1 ,learning plus: DDE server for Stock ..怎現在都不知道在做啥....XD, 不過人說最初的心血是不會白費的,好在之前有些紀錄.不然還真是砍掉重練.
Trader API  我們主要分成 3 大部份來講解
在 part 1 DDE, 主要透過 Web/DDE server 來抓取我們要的 info.
1. DDE part support
1-1 OFF_TIME data
1-1-1. history data @(Yahoo,Google)
1-1-2. super sell/buy [1,5,10,30] @ Web(yuanta)
1-1-3. trader info [1,5,10,30] @ Web (yuanta)
1-1-4. finance_bill [1] @ Web (yuanta)
1-2 ON_TIME data
1-2-1 Real DDE server @ Fubon e01
ex: data.pl
我們主要分成 3 大部份來講解
在 part 1 DDE, 主要透過 Web/DDE server 來抓取我們要的 info.
1. DDE part support
1-1 OFF_TIME data
1-1-1. history data @(Yahoo,Google)
1-1-2. super sell/buy [1,5,10,30] @ Web(yuanta)
1-1-3. trader info [1,5,10,30] @ Web (yuanta)
1-1-4. finance_bill [1] @ Web (yuanta)
1-2 ON_TIME data
1-2-1 Real DDE server @ Fubon e01
ex: data.pl
 我們主要分成 3 大部份來講解
在 part 1 DDE, 主要透過 Web/DDE server 來抓取我們要的 info.
1. DDE part support
1-1 OFF_TIME data
1-1-1. history data @(Yahoo,Google)
1-1-2. super sell/buy [1,5,10,30] @ Web(yuanta)
1-1-3. trader info [1,5,10,30] @ Web (yuanta)
1-1-4. finance_bill [1] @ Web (yuanta)
1-2 ON_TIME data
1-2-1 Real DDE server @ Fubon e01
ex: data.pl
我們主要分成 3 大部份來講解
在 part 1 DDE, 主要透過 Web/DDE server 來抓取我們要的 info.
1. DDE part support
1-1 OFF_TIME data
1-1-1. history data @(Yahoo,Google)
1-1-2. super sell/buy [1,5,10,30] @ Web(yuanta)
1-1-3. trader info [1,5,10,30] @ Web (yuanta)
1-1-4. finance_bill [1] @ Web (yuanta)
1-2 ON_TIME data
1-2-1 Real DDE server @ Fubon e01
ex: data.pl
my $google = NET::GoogleDailyData->new();
 $google->get_history_data('2330.TW','2010/01/01','2010/10/10');
 $google->exp_history_data('2330.TW',"./DATA/2330.TW.csv");

my $yahoo  = NET::YahooDailyData->new();
 $yahoo->get_history_data('2330.TW','2010/01/01','2010/10/15');
 $yahoo->exp_history_data('2330.TW',"2330.TW.csv");

my $trader = NET::TraderDetail->new();
 $trader->get_trader_data();
 $trader->exp_trader_data("2010_10_20_trader_detail.csv");

#===========================================
#
# get super buy/sell[1,5,10,30] info from web
# get trader [1,5,30] info from web
#
#============================================
my $global = SYS::GLB->new();
my $market_super_hstable = $global->get_market_super_hstable;
#  printf Dumper($market_super_hstable);
my $market = NET::Market->new($market_super_hstable);
 $market->get_market_super_buyer_seller_data();
 $market->exp_market_data();

my $market_trader_hstable = $global->get_market_trader_hstable;
#printf Dumper($market_trader_hstable);
my $td4bysel = NET::Trader4BuySellDetail->new($market_trader_hstable);
 $td4bysel->get_market_trader_data();
 $td4bysel->exp_market_trader_data();
在 part 2 FINANCE 為資料分析 跟 簡單的判斷
2. FINANCE part support
2-1 Indicator
2-1-1 KD
2-1-2 BIAS
2-1-3 DMI
2-1-3 MACD
2-1-4 MA
2-1-5 OBV
2-1-6 PSY
2-1-7 RSI
2-1-8 SAR
2-1-9 VR
2-1-10 WR
2-2 Trader info
2-2-1 get trader info list by day
2-2-2 get statistic info by constrain
2-3 super buy/sell info
2-3-1 get super buy/sell by day
2-3-2 get statistic info by constrain
ex:
my $ikd = FINANCE::KD->new($hslist);
my $kd  = $ikd->get_KD('30','2010/08/12');
printf Dumper($kd);

my $ibias = FINANCE::BIAS->new($hslist);
my $bias  = $ibias->get_BIAS('30','2010/08/12');
printf Dumper($bias);

my $idmi = FINANCE::DMI->new($hslist);
my $dmi  = $idmi->get_DMI('30','2010/08/12');
printf Dumper($dmi);

my $trader = TRADER::UTIL->new();
  $trader->set_market_super_hstable($market_super_hstable);
  $trader->set_market_trader_hstable($market_trader_hstable);

my $rst = $trader->get_bk_external_super_buy_hstable('1','2010/10/26');
  $rst = $trader->get_bk_main_super_sell_hstable('1','2010/10/26');
printf Dumper($rst);

  $rst = $trader->get_bk_external_trader_buy_hstable('1','2010/10/26','1440');
  $rst = $trader->get_bk_internal_trader_sell_hstable('1','2010/10/26','9800');
在 part 3 PROFIT 為回測分析我們進場點的 report
my %data = (
       "START_TIME"        => '2010/09/01',    #開始時間
       "END_TIME"          => '2010/10/18',    #結束時間
       "CAPITAL"           => '500000',        #成本
       "LEAVE_PROFIT_LOST" => '15.0',          #出場停損 10%
       "LEAVE_PROFIT_MAKE" => '10.0',           #出場獲利 7%
       "KEEP_PROFIT_LOST"  => '5.0',           #持有時確保 損失 達 -5%,如超過則回補
       "KEEP_PROFIT_MAKE"  => '3.0',           #持有時確保 獲利 達  3%,如操過則加碼
       "KEEP_PROFIT_LOST_T"=> '1',             #最多回補次數 3 次
       "KEEP_PROFIT_MAKE_T"=> '0',             #最多加碼次數 3 次
       "KEEP_PROFIT_LENGTH"=> '1',             #每5 天 check 損失/獲利
       "PRICE_UP_LIMIT"    => '40',            #股價 <> '10',            #股價 > 10  的才會進場 check
);

my $prt = PROFIT::profit->new(\%data);
  $prt->get_input_set();
  $prt->set_history_path("./daily/");
  $prt->set_profit_info("Sharkv2_2010_09_10_c3.csv");
  $prt->get_profit_run();
  $prt->get_profit_report("rep.csv");
~
有興趣的人可以到 http://github.com/funningboy 參考看看,當然也歡迎一起開發..@@
2010年10月20日 星期三
git 初體驗
git 是個分散式的版本控制軟體, 透過 repo 的方式,使用者可以修改/上傳 所屬的 project. 除了可以確保 master 的 version 外. master 也可以藉由別人修改的 patch 來 update 原來所屬的 project. 可避免共同開發時所造成的 "版本" 不符 跟 file overwrite 的狀況.
ps: 最近會慢慢把之前的 project 改成 git 的型式 ...
Refs:
使用Git與Github管理軟體開發專案
Git 版本控制系統(2) 開 branch 分支和操作遠端 repo.
Github 使用
2010年10月19日 星期二
Tiger preview && Shark v2 2010_08~10 profit reports
好久沒有更新交易資料了,除了目前已經在 run 的 Shark_v2 外,感覺似乎少了Real Data 的部份. 雖然之前有發過些零星的 DDE 程式,如 CDP 當沖程式 From TSTS星人, RealDDE 4 Fubon Server...,NDde....,但感覺好像就是少了個什麼. 畢竟 Shark_v2 是盤後分析 tool, 而盤中的變化要依靠券商所提供的 tool,但券商的 tool 的策略跟我想要的還是有些差距,變的是我們要透過外加個殼去 access DDE. 而主要在 real data(Tiger) 的部份, 是要分析盤中的委買賣價差, 成交量是否放大... 因為我們是反轉系統(Shark_v2),判斷底端頭部位置一但出現強勢攻擊訊號,表示頭部形成準備上衝...^_^
 底下是 2010-09~10 Shark_v2 的 profit reports,發現在高價股 2454.TW 的進場判斷失去準度,且連續賠錢出場...ㄟ害...不過如果扣除 2454.TW 的虧損,還是有不錯的獲利拉
...ps 自我安慰中...XD
底下是 2010-09~10 Shark_v2 的 profit reports,發現在高價股 2454.TW 的進場判斷失去準度,且連續賠錢出場...ㄟ害...不過如果扣除 2454.TW 的虧損,還是有不錯的獲利拉
...ps 自我安慰中...XD
 底下是 2010-09~10 Shark_v2 的 profit reports,發現在高價股 2454.TW 的進場判斷失去準度,且連續賠錢出場...ㄟ害...不過如果扣除 2454.TW 的虧損,還是有不錯的獲利拉
...ps 自我安慰中...XD
底下是 2010-09~10 Shark_v2 的 profit reports,發現在高價股 2454.TW 的進場判斷失去準度,且連續賠錢出場...ㄟ害...不過如果扣除 2454.TW 的虧損,還是有不錯的獲利拉
...ps 自我安慰中...XD
DBI::SQL link @ perl
底下找了些link for SQL link,也不知道有沒有幫助,不過多知道點也是不錯的拉...@@
Refs:
SQLite Tutorial
http://defindit.com/readme_files/sqlite.html
http://mailliststock.wordpress.com/2007/03/01/sqlite-examples-with-bash-perl-and-python/
2010年10月15日 星期五
CUDA @ NVIDIA hardware driver
除了透過 OpenGL 來做2D/3D 硬體加速控制外. NVIDIA 也有一套類似 OpenGL 的 software (hardware)control 叫 "CUDA",只能說這是家很有個性的公司,因為連 Linux 的 driver 也要透過 wrapper 來溝通,這邊姑且不論 wrapper 的架構.我們就以 GPU 的觀點來看,在 GPU 的 design 上,主要是處理影像的運算(float point),如 vertex, ploy, text...的type.所以內部可分成很多的 ALU macros 跟 private/share cache ...可以 parallel or pipeline 的架構處理大量的 DSP 運算.而 CUDA 可以用 software 的語法描述來直接控制 hardware macros.
 Refs
CUDA tutorial
pycuda @ python
CUDA Training
ps: 沒有 NVIDIA 的顯卡,所以只好無聊寫個 ALU macro emulator...XD
大致上是有 3 個 independent 的 ALU macros, 每個 ALU 的 status 會存入 queue 中, 而 schedule management 會去 ask work queue, 判斷每個 ALU macro 的狀態, 如果 ALU macro = IDLE, schedule management 就會把 command assign 給這個 ALU macro.
sample part @ code
Refs
CUDA tutorial
pycuda @ python
CUDA Training
ps: 沒有 NVIDIA 的顯卡,所以只好無聊寫個 ALU macro emulator...XD
大致上是有 3 個 independent 的 ALU macros, 每個 ALU 的 status 會存入 queue 中, 而 schedule management 會去 ask work queue, 判斷每個 ALU macro 的狀態, 如果 ALU macro = IDLE, schedule management 就會把 command assign 給這個 ALU macro.
sample part @ code
void *check_work_queue(void *t){
int i;

  for(;;){
   //check 4 each ALU in work_queue
   pthread_mutex_lock(&count_mutex);
   gid = -1;
   for(i=0; i<3; i++){
       if( is_work_queue_exist(&qulist,i) == QUEUE_ER_ARB ){
            gid = i;
            break;
        }
    }

 //   dump_work_queue(qulist);
   pthread_mutex_unlock(&count_mutex);

   sleep(ALU_DEF_DELAY);

     if( DONE == ALU_OK)
         pthread_exit(NULL);
  }
}
Results
time @ Fri Oct 15 16:51:49 2010

assign ALU 0
command :     0,in_a :     3,in_b :     4

time @ Fri Oct 15 16:51:51 2010
queue :: id  0,cmd :     0,in_a :     3,in_b :     4, (pre)out_c :     7

assign ALU 1
command :     1,in_a :     3,in_b :     4

time @ Fri Oct 15 16:51:53 2010
queue :: id  1,cmd :     1,in_a :     3,in_b :     4, (pre)out_c :    -1

assign ALU 1
command :     2,in_a :     3,in_b :     4

time @ Fri Oct 15 16:51:55 2010
queue :: id  0,cmd :     0,in_a :     3,in_b :     4, (pre)out_c :     7
queue :: id  1,cmd :     1,in_a :     3,in_b :     4, (pre)out_c :    -1

assign ALU 2
project download here
2010年10月13日 星期三
why use verilator....
今天被問到一個有趣的問題."為什麼要用verilator 來跑模擬呢?".就用以下幾點來回答這個問題好了.
Answers:
1. simulation time
SystemC(gcc) < Verilog(VCS + PLI)
2. license SystemC(free), Verilog(nc-sim/nc-verilog)
3. library 公司之前的 project 沒有 high level 的 model lib,為了要跟現有的 project 結合,且又要加快驗證流程.
4. dumper 在 SytemC 上寫 dump function 比 Verilog 簡單.可以用 c++ 的語法,做成個class 可重複使用.而 Verilog 則比較困難,還要考慮每個 cycle(timing) 的關係,且 dump waveform 的時間太久.連我自己看 waveform 都要眼花了...XD
design flow 大致長這樣,我們會跳過 SystemC 的 cycle accurate time model, 畢竟這跟 RTL 的 verilog 類似, 爾且我們在前端已經做過 TLM 的 verify, 所以更可以確保 RTL 的 Verilog 的正確性, 之後再用 verilator 轉成 SystemC 的 cycle accurate time model 來加速驗證.
 Refs:
Verilog to c++/ SystemC @ Verilator
Design Automation Tool from Behavior Level to Transaction Level
System Level - SystemC
Refs:
Verilog to c++/ SystemC @ Verilator
Design Automation Tool from Behavior Level to Transaction Level
System Level - SystemC
 Refs:
Verilog to c++/ SystemC @ Verilator
Design Automation Tool from Behavior Level to Transaction Level
System Level - SystemC
Refs:
Verilog to c++/ SystemC @ Verilator
Design Automation Tool from Behavior Level to Transaction Level
System Level - SystemC
2010年10月11日 星期一
spirit @ iphone JB case study
 有 JB 過 iphone 的人,應該對 spirit 不陌生. 底下就針對 spirit 的 JB flow 做簡易的分析.
在之前的 post IPhone Case Study 有大概介紹過, 如何用 libimobiledevice
來 access iphone 的 file system, 可參考 iphone wiki 是如何使用 MobileDevice.
flow charts
step1. find top flow
有 JB 過 iphone 的人,應該對 spirit 不陌生. 底下就針對 spirit 的 JB flow 做簡易的分析.
在之前的 post IPhone Case Study 有大概介紹過, 如何用 libimobiledevice
來 access iphone 的 file system, 可參考 iphone wiki 是如何使用 MobileDevice.
flow charts
step1. find top flow
    idevice_get_device_list() //透過'usblib'取得 idevice(iphone) 的位置
    memset()                  //建立個 mem space 給 idevice
    memcpy()
    idevice_device_list_free()//free device list
    idevice_new()             //建立 idevice
    time()                    //建立 time stamp
    send_files_thread()       //把 dylib 放到 (idevice)iphone 上
    restore_thread()          //同時 backup (idevice) 的資料
    idevice_free()            //free idevice
step 2. call 'idevice_get_device_list()' @ libimobiledevice
會去 call 'usbmuxd' lib 來取得 dev_list
idevice_error_t idevice_get_device_list(char ***devices, int *count)
{
...
 if (usbmuxd_get_device_list(&dev_list) < 0) {
                debug_info("ERROR: usbmuxd is not running!\n", __func__);
                return IDEVICE_E_NO_DEVICE;
        }
...

        for (i = 0; dev_list[i].handle > 0; i++) {
                newlist = realloc(*devices, sizeof(char*) * (newcount+1));
                newlist[newcount++] = strdup(dev_list[i].uuid);
                *devices = newlist;
        }

}
而usbmux為 iphone 跟 pc 間的主要橋樑,流程可參考 usbmuxd 內的 README, 從流程中大概可以知道 usbmuxed 會建立起一組 tcp (ssl) 的連線. 利用這個 channel 來做 synchronous iphone and pc 的動作.
而 channel 間彼此是用 XML Message @ Mac OS X 的 format 來溝通.利用 plist @ python 的 lib 當 XML parser, 把上層的 command 跟底層 Transport layer 的 info 做溝通.
0. iTunes opens a connection to usbmuxd and asks it for device notifications
1. User inserts phone into computer
2. usbmuxd notices the phone and pings it with a version packet
3. phone replies
4. usbmuxd now considers the phone to be connected and tells iTunes
5. iTunes opens another separate connection to usbmuxd and asks it to connect
   to, say, the afc port on the device
6. usbmuxd sends a pseudo-TCP SYN packet to the phone
7. the phone's kernel driver receives the SYN packet and itself opens a
   TCP connection to localhost on the afc port
8. the phone replies with a pseudo-TCP SYN/ACK indicating that the port is open
   and the connection can proceed
7. usbmuxd sends a final ACK to the phone
8. usbmuxd replies to iTunes with a "connection successful" message
9. any data that iTunes writes to the usbmuxd socket from now on is forwarded,
   through pseudo-TCP, through USB, back into a more regular TCP connection to
   localhost, to the afc daemon on the phone, and vice versa
 plist_t n = plist_dict_get_item(props, "DeviceID");
             plist_get_uint_val(n, &val);
             dev->device_id = (uint32_t)val;
//建立到上層的 dev struct 中

         n = plist_dict_get_item(props, "ProductID");
         n = plist_dict_get_item(props, "SerialNumber");
         n = plist_dict_get_item(props, "LocationID");

//取得 DeviceID, ProductID...後,利用 SSL 產生 private key 建立加密的socket 連線
step 3. 把 dylib 透過底層的link 加載到 idevice(iphone)的 file system 上.
結論
Level 1. usblib usb connect
Level 2. usbmuxd socket connect
Level 3. libimobiledevic application/usr space
ps: 如果你很懶的話,可以直接用 ubuntu 提供好的 package + source code
Refs:
iphone wiki
libimobiledevic
2010年10月5日 星期二
MESI emulator @ cache protocol
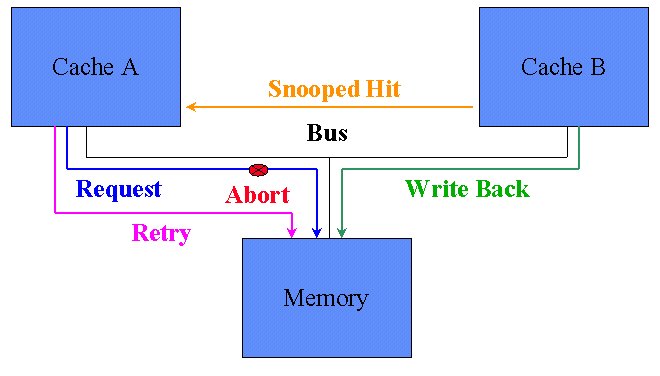 在傳統 single core 下, Cache 只需要考慮 hit/miss 的狀態.但進入 multi cores 的世代, Cache 除了要考慮 hit/miss 之外,還要考慮是否是Share memory part or local(private) memory part. 所以Intel 提出了 MESI 的架構來解決share memory data read/write 的問題.
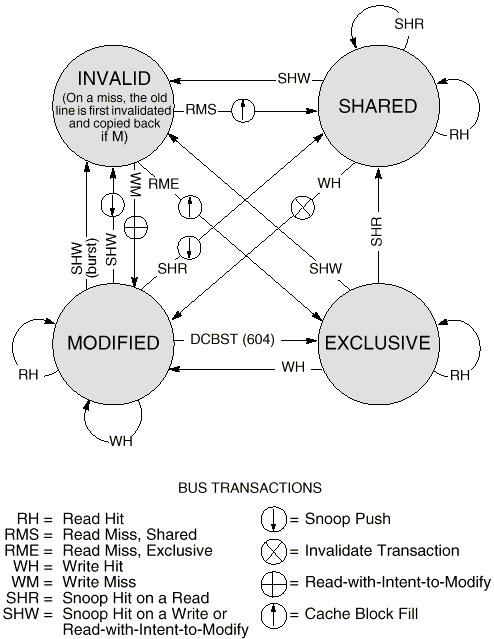 其實想法很簡單, 如果是share part的部份.有write update 就 broadcast 出去,叫其他的 Cache update, 順便把data 寫回 memory, 如果是 read update 就只要 update 自己本身的 Cache 就好.
底下我們用sample emulator 來實現 MESI 的架構.
constrains:
CPU 的 schedule 為已知, 避免同時有兩個CPU 的 race condition.
cache 架構不是正式的 tags,block, valid. 只有考慮 address 跟 valid 的判斷.
有興趣的人可以抓來玩玩. ^_^
download here.
Refs:
Memory part 2: CPU caches
Cache工作原理-5
Cache Coherence
CMP中Cache一致性协议的验证
Optimizing the MESI Cache Coherence Protocol for Multithreaded Applications on Small Symmetric Multiprocessor System
Cache is King -or- Things are about to get MESI
MESI Cache Coherency Protocol
其實想法很簡單, 如果是share part的部份.有write update 就 broadcast 出去,叫其他的 Cache update, 順便把data 寫回 memory, 如果是 read update 就只要 update 自己本身的 Cache 就好.
底下我們用sample emulator 來實現 MESI 的架構.
constrains:
CPU 的 schedule 為已知, 避免同時有兩個CPU 的 race condition.
cache 架構不是正式的 tags,block, valid. 只有考慮 address 跟 valid 的判斷.
有興趣的人可以抓來玩玩. ^_^
download here.
Refs:
Memory part 2: CPU caches
Cache工作原理-5
Cache Coherence
CMP中Cache一致性协议的验证
Optimizing the MESI Cache Coherence Protocol for Multithreaded Applications on Small Symmetric Multiprocessor System
Cache is King -or- Things are about to get MESI
MESI Cache Coherency Protocol
2010年9月30日 星期四
risc cpu @ systemc
 hi all,
If you are interest in the CPU architecture design,i think the 'rsic cpu' is a good choice.It is a sample package in systemc example, but it contain some problems with multi-drive. What's the multi-drive, it means the multi inputs drive the same output. you can image the data in this point is unstable, it should be 1 or 0 or x.... ,so the compiler would confuse what's the data in it.Because in systemc is no wire definition, in 'sc_signal' declare it like the register or buffer design, it would keep the current data until the next trigger to change it's data. we use a very sample way to avoid it, to create a new module and change the declare of 'sc_signal' to 'sc_in' and 'sc_out' . all new packages and version is release in here
please use this command to compile our package.
hi all,
If you are interest in the CPU architecture design,i think the 'rsic cpu' is a good choice.It is a sample package in systemc example, but it contain some problems with multi-drive. What's the multi-drive, it means the multi inputs drive the same output. you can image the data in this point is unstable, it should be 1 or 0 or x.... ,so the compiler would confuse what's the data in it.Because in systemc is no wire definition, in 'sc_signal' declare it like the register or buffer design, it would keep the current data until the next trigger to change it's data. we use a very sample way to avoid it, to create a new module and change the declare of 'sc_signal' to 'sc_in' and 'sc_out' . all new packages and version is release in here
please use this command to compile our package.
g++ *.cpp -I/usr/systemc/include -L/usr/systemc/lib-linux -o cpu -lsystemc1 fix lists 1. multi drive example Error: (E115) sc_signal
//1 use this command to load our asm code 2 icache file
perl assembler.pl test2.asm -code > icache

//2 use this command to get visible asm code
perl assembler.pl test2.asm  > view

//3 run and check
./cpu
2010年9月29日 星期三
ALU estimator @ RTL verilog
purpose:
在 RTL design 中,除了做 function 驗證之外, 如果我們能夠事先得知 ALU 的個數,那在synthesis 跟 area estimation 上就有些許的幫助. 可以在RTL level 得到這些 rough data 做簡略的架構分析跟 optimization.
method:
step 1.analysis time windows @ each always block,
step 2.find the max ALU numbers in our definition(Add,Sub,Mul...)
target:
找出在 Design 中所需要的 ALU 個數
sample code
ps:這邊不考慮 carry && over float 的判斷
  always @(posedge clk or posedge rst )begin
       if( rst )begin
            out_a <= 0;
            tmp_a <= 0;
       end
       else  begin
            if( sel_1 =='b1 ) begin
                out_a <= in_a + in_b + 2;
            end
            else begin
                if( sel_2 ==1'b1 )begin
                    out_a <= in_a - in_b + tmp_a;
                    tmp_a <= in_a>>1;
                end
                else begin
                    out_a <= in_a>>1;
                end
            end
       end
  end

  always @(posedge clk or posedge rst )begin
     if( rst )begin
          out_b <= 0;
     end
     else begin
          if( out_b < 10 ) begin
              out_b <= out_b +1;
         end
     end
Results:
可發現在 always block 1 最少需要 2 個 ADD, always block 2 最少要 1 個 ADD, 但在 always block 彼此是獨立的條件下, 所以在這個 Design 下最少需要 2+1 個 ADD. 當然其他可以以此類推. 最後可以用 prime time 合成一個 sample ADD.把 sample ADD 的 Info 建成 table, 帶入你的 Design 就可以大概的得知 Design 的 Area.
ADD-> @ always block -> block level -> counts$VAR1 = {
'1' => {
'4' => 1,
'3' => 2
},
'2' => {
'3' => 1
}
};
SUB-> @ always block -> block level -> counts$VAR1 = {
'1' => {
'4' => 1
},
'2' => {}
};
MUL-> @ always block -> block level -> counts$VAR1 = {
'1' => {},
'2' => {}
};
tool requirements:
perl verilog package
code download here.
Refs:
ESL Design Flow,
peak power,
NetWork on Chip @c,
2010年9月27日 星期一
encoder 小技巧....
有沒有平常被一堆的判斷式搞到昏頭轉象呢,在Verilog coding 時又要考慮到在 always block 內部的判斷是否會有 latch 產生,最後在codelink時候又擔心coverage不足夠呢... 其實簡單的想把判斷是全部展開成個encoder table,內部存著Hash key->vale 就ok 拉.不僅可以發現是否有判斷條件少了,且增加閱讀的效率...
original part
          if( in_a ==1 ){
              out = in+1;
          } else {
              if( in_b == 0 ){
                  out = in-1;
              } else {
                  if( in_c == 1) {
                       out = in*2;
                 }else {
                       out = in;
                 }
             }
          }
encoder part
//range 0 ~ 7
s = in_c << 2 | in_b << 1 | in_a;

switch(s){
  case  0 : out = in-1; break; // in_c(0), in_b(0), in_a(0)
  case  1 : out = in+1; break; // in_c(0), in_b(0), in_a(1)
  case  2 : out = in;   break; // in_c(0), in_b(1), in_a(0)
  case  3 : out = in+1; break; // in_c(0), in_b(1), in_a(1)
  case  4 : out = in-1; break; // in_c(1), in_b(0), in_a(0)
  case  5 : out = in+1; break; // in_c(1), in_b(0), in_a(1)
  case  6 : out = in*2; break; // in_c(1), in_b(1), in_a(0)
  case  7 : out = in+1; break; // in_c(1), in_b(1), in_a(1)
 }
OpenEmbedded case study
BitBake 為OpenEmbedded 的核心,主要解決 cross-compile && configure 的問題.因為在 embedded 系統下,光是 Environment build 就要花一斷時間,又要考慮到porting 的問題更是雪上加霜, 所以藉由 BitBake 來做到 svn, git, svk + compile + configure, 透過版本的 syn 跟 local build 達到快速客至化的動作.
可參考底下的連結,有比較詳細的說明.
 pic ref OpenEmbedded and BitBake
Refs:
Welcome to OpenEmbedded
轉換OpenEmbedded的repository為Subversion系統
SVK與嵌入式系統開發
OpenEmbedded First Try
SVK 使用雜記與隨想
OpenEmbedded and BitBake
pic ref OpenEmbedded and BitBake
Refs:
Welcome to OpenEmbedded
轉換OpenEmbedded的repository為Subversion系統
SVK與嵌入式系統開發
OpenEmbedded First Try
SVK 使用雜記與隨想
OpenEmbedded and BitBake
pic ref OpenEmbedded and BitBake
Refs:
Welcome to OpenEmbedded
轉換OpenEmbedded的repository為Subversion系統
SVK與嵌入式系統開發
OpenEmbedded First Try
SVK 使用雜記與隨想
OpenEmbedded and BitBake
2010年9月26日 星期日
Curt @Jserv case study
難得有機會可以拜讀大師(Jserv)的作品"Curt",這是網路上有名的自由軟體作者Jserv所做的小型OS系統,系統雖小但五藏俱全,提供了sp, stat, help 的 threads,跟Schedule 的機制,系統流程主要可分成兩大部份,Step 1.boot-loader, 把image load 到RAM的low level assembly code, Step 2. start OS && schedule handle. 詳細流程可參考"國立台灣師範大學資訊工程系"的"嵌入式系統"教材.
底下小弟只是把所知到的data整理成flow表,如需詳細說明部份在Curt的Download檔裡也有說明.
Step1.
*initial set
*flush TLB/ICahe/DCahe
*Interrupt disable
*clock set
*UART Hardware 2 Console Display set
*all enable && jump to RAM main() @0xc0000000
這邊也可參考類似的flow @Uboot .
Step2.
*OS start
*initial ready_lists 4 each threads, delayed_list,termination_wait_list,termination_wait_list
*set thread 2 thread table && priority/function set
* run thread && schedule detection (SCHED_TIME_EXPIRE||SCHED_THREAD_REQUEST)
        //儲存CPU status && Disable Interrupt
        cpu_sr = save_cpu_sr();

        //取得最高priority 的 thread  Id
        top_prio = get_top_prio();

        /* If the timer expires... */
        if (sched_type == SCHED_TIME_EXPIRE) {
                /* Threads that are currently running will continue to run it
                 * at the highest priority */

                if (current_thread->prio < top_prio) {
                        current_thread->time_quantum = TIME_QUANTUM;
                        restore_cpu_sr(cpu_sr);
                        return;
                }
                /* otherwise, threads in a ready state, then run the highest
                 * priority one. */

                //取得 ready_list的 first Node 2 entry list && change context switch mode
                pnode = delete_front_list(&ready_list[top_prio]);
                if (is_empty_list(&ready_list[top_prio]))
                        prio_exist_flag[top_prio] = false;
                next_thread = entry_list(pnode, thread_struct, node);
                next_thread->state = RUNNING;
                next_thread->time_quantum = TIME_QUANTUM;

                /* Ready to change the status of the currently executing thread */
                current_thread->state = READY;
                insert_back_list(&ready_list[current_thread->prio],
                                 ¤t_thread->node);
                prio_exist_flag[current_thread->prio] = true;
                total_csw_cnt++;
                /* actual context switching */
                context_switch_in_interrupt();
        }
code ref: Jserv's 解析 CuRT 與嵌入式系統設計
放大參考here
ps: 如有錯誤的地方歡迎指正,謝謝
2010年9月24日 星期五
x.org case study
在dinotrace @ waveform viewer提到 GUI Interface 的實現方式,原本以為只有 widget(GUI layout) + event(process trigger) ...,但其實 x.org(X11) 在terminal 的表現上比較像 Server/Client 的概念. 可參考底下的說明...XD,真的是隔行如隔山,讀起來被感艱辛阿...各位看官就當看故事書吧.
Xorg 嶄新的硬體加速與效能提昇機制
Xorg 嶄新的硬體加速與效能提昇機制(续)
flow chart.
 請參考名詞解說
Refs:
The Xlib Manual
Xlib API
wm-spec
http://www.opengl.org/
請參考名詞解說
Refs:
The Xlib Manual
Xlib API
wm-spec
http://www.opengl.org/
請參考名詞解說
Refs:
The Xlib Manual
Xlib API
wm-spec
http://www.opengl.org/
2010年9月20日 星期一
Mouse emulator @ Linux
底下是 In-Air Mouse and Joystick 的 Demo,利用 Remote control 來模擬真實 mouse 的情形.想說不如來找找有沒有source code 可以研究.沒想到居然還有個叫 Keymouse 的 project,喝喝...看來google 真是太神了.
1.先用 modprobe 掛載 devices到 /dev/input上,
% sudo modprobe uinput2. sample code ref here 確定uinput掛載好後,用ioctl()來控制IO2的讀寫.最後用linux/input.h 中的 input_event來模擬我們 input的vector.
#include <stdio.h>
#include <string.h>
#include <errno.h>
#include <sys/types.h>
#include <sys/stat.h>
#include <fcntl.h>
#include <linux/input.h>
#include <linux/uinput.h>
#include <sys/time.h>
#include <unistd.h>

// Test the uinput module

struct uinput_user_dev   uinp;
struct input_event       event;

int main(void) {

            int ufile, retcode, i;

            ufile = open("/dev/input/uinput", O_WRONLY | O_NDELAY );
            printf("open /dev/input/uinput returned %d.\n", ufile);
            if (ufile == 0) {
                        printf("Could not open uinput.\n");
                        return -1;
            }

            memset(&uinp, 0, sizeof(uinp));
            strncpy(uinp.name, "simulated mouse", 20);
            uinp.id.version = 4;
            uinp.id.bustype = BUS_USB;

            ioctl(ufile, UI_SET_EVBIT, EV_KEY);
            ioctl(ufile, UI_SET_EVBIT, EV_REL);
            ioctl(ufile, UI_SET_RELBIT, REL_X);
            ioctl(ufile, UI_SET_RELBIT, REL_Y);

            for (i=0; i<256; i++) {
                        ioctl(ufile, UI_SET_KEYBIT, i);
            }

            ioctl(ufile, UI_SET_KEYBIT, BTN_MOUSE);

            // create input device in input subsystem
            retcode = write(ufile, &uinp, sizeof(uinp));
            printf("First write returned %d.\n", retcode);

            retcode = (ioctl(ufile, UI_DEV_CREATE));
            printf("ioctl UI_DEV_CREATE returned %d.\n", retcode);
            if (retcode) {
                        printf("Error create uinput device %d.\n", retcode);
                        return -1;
            }

            // NOW DO STUFF !!!!

            for (i=0; i<100; i++) {

                        struct timeval tv1;

                        // move pointer upleft by 5 pixels
                        memset(&event, 0, sizeof(event));
                        gettimeofday(&event.time, NULL);
                        event.type = EV_REL;
                        event.code = REL_X;
                        event.value = -5;
                        write(ufile, &event, sizeof(event));

                        memset(&event, 0, sizeof(event));
                        gettimeofday(&event.time, NULL);
                        event.type = EV_REL;
                        event.code = REL_Y;
                        event.value = -5;
                        write(ufile, &event, sizeof(event));

                        memset(&event, 0, sizeof(event));
                        gettimeofday(&event.time, NULL);
                        event.type = EV_SYN;
                        event.code = SYN_REPORT;
                        event.value = 0;
                        write(ufile, &event, sizeof(event));

                        // wait just a moment
                        do { gettimeofday(&tv1, NULL); } while ((tv1.tv_usec &
0x3FFF) != 0);
                        do { gettimeofday(&tv1, NULL); } while ((tv1.tv_usec &
0x3FFF) == 0);
            }

            // destroy the device
            ioctl(ufile, UI_DEV_DESTROY);

            close(ufile);

}
ps: Keymouse 也是用此原理來做的, 你可以在 device.cpp 發現相似的地方.
Refs:
Sending simulated mouse events using uinput
Mouseemu / uinput
Linux Cross Reference
Linux 驅動程式的 I/O, #4: fops->ioctl 實作
2010年9月19日 星期日
dinotrace @ waveform viewer
 怎麼 Dinotrace 的 widgets 是如此的醜陋,如果你習慣了Debussy/Verdi 的介面,建議還是用 GTKwave 比較好看的多...不過基於研究的出發點,底下我們就針對幾個topics來討論.
1.VCD format:
怎麼 Dinotrace 的 widgets 是如此的醜陋,如果你習慣了Debussy/Verdi 的介面,建議還是用 GTKwave 比較好看的多...不過基於研究的出發點,底下我們就針對幾個topics來討論.
1.VCD format:
//定義 create date or modify date
$date
        Mon Jun 15 17:13:54 1998
$end

//定義 VCD Version
$version
        Chronologic Simulation VCS version 4.0.3
$end

//定義 timescale (時間的刻度)
$timescale
        1ns
$end

//定義 Port range && key map
//ex: $var reg       1 !    clk  $end
//代表 signal name (clk), range 1 bit, key value "!"

$scope module benchx $end
$var reg       1 !    clk  $end
$var reg      11 "    count [10:0] $end
$var reg       1 #    toggle_01  $end
$upscope $end

$enddefinitions $end
#0
$dumpvars
x!                            //clk      =x @0
x#                            //toggle_01=x @0
bxxxxxxxxxxx "                //count    =bxxxxxxxxxxx @0
$end
#5
0!                            //clk      =0 @5
#10
1!                            //clk      =1 @10
z#
#15
0!
#20
1!
#25
0!
b00000000000 "
0#

//ps: 如果沒有定義,就接續上個定義的data.
2. widgets :
這邊用 GTK 當sample...
 GtkWidget *window;
 window = gtk_window_new (GTK_WINDOW_TOPLEVEL);       //建立window
 gtk_widget_set_usize (GTK_WIDGET (window), 200, 100);//設定大小
 gtk_window_set_title (GTK_WINDOW (window), "GTK Menu Test");//name
 gtk_signal_connect (GTK_OBJECT (window), "delete_event",
                        (GtkSignalFunc) gtk_main_quit, NULL); //關閉鈕
 ....
 gtk_widget_show (window); //show window
Menu Widget
了解VCD file format and Widgets 之後,其實剩下的就只是GUI interface的建立.如button + event + menu + widgets + VCD file parser 的結合.
Refs:
VCD file format
Waveform_viewer
verdi tutorial
SpringSoft
訂閱:
文章 (Atom)