2011年10月4日 星期二
2011年10月2日 星期日
Eclipse + plug-in
eclipse plug-in
http://www.eclipse.org/articles/Article-Plug-in-architecture/plugin_architecture.html
http://www.numeclipse.org/architecture.html
Crawljax is an open source Java tool for automatically crawling and testing modern (Ajax) web applications.
http://crawljax.com/
Wicked Shell is an Eclipse plugin providing direct access to your system's shell.
http://www.wickedshell.net/
Eclipse + GDB
http://wiki.eclipse.org/DSDP/DD/GDB
http://code.google.com/p/tarlog-plugins/
http://explorerplugin.sourceforge.net/
OCP key notes
OCP(open core protocol)
key notes.
level definition : signals -> group -> transfer -> transaction
Phase definition: Request->Data Handshake->Response
burst definition : Imprecise(MRMD early termination)/
precise(MRMD un early termination)/
SRMD
burst type : Incrementing
Custom(pack)
Wrapping
Custom(no pack)
Exclusive OR
Streaming
Unknown
tags : response ID (S->M)
threads : request ID(M->S)
Signal groups : basic signals, simple extensions, burst extensions,
tag extensions, thread extensions
posted/un-posted/broadcast
ocp word : number of bits
Addresses granularity is 8 bits
ordering/pipelining
burst supported the last info for Data/Response/Request
(imprecise burst_size=1, precise burst_size=count)
Ref: http://www.ocpip.org/
2011年9月30日 星期五

2011年9月27日 星期二
PYPY toolchain case study
-input program(python)
-output(#c,java)
-flow analysis
flow graph gen(block, start/exit/exception, condition)
block(operators,values,result->pointer map)
block(list, input, exit, def, use, alive)
-annotator
class def(SomeObject, IntegerObject, StringObject...)
class def(SomeList, SomeTuple, SomeDic...) for high level
analysis pass(map flow graph(High level) 2 low level graph)
-Rtype()
Rtype def(int,float,char...)
low level optimization(malloc remove,func inline,stackless)
-lltype()
lltype def(LLVM based)
2011年9月26日 星期一

2011年9月20日 星期二

2011年9月19日 星期一
Handle-C
Handle-C 一種高階的HardWare語法, 有點像是把Hardware的Driver寫成API 的語法,讓使用者能透過這些API,直接控制硬體的行為模式.不過缺點就是Platform被綁死,而系統的最佳化取決於架構的型式.
-hardware keyword(token)
type()   : unsigned, signed,
length() : int <3>, [3:0]
size()   : [10]

unsigned 4 RAM[4][4]; 4*4 4 bits RAM


-logic/arithmetic
&,/,^,+,-...


-interface definition


-module keyword
RAM,ROM,BUS,...


-method/processor
pra : parallel
seq : sequence

par
{
    {
        a = b;
        c = d;
        link ! x;
    }

    link ? y;
}

/*
cycle  Branch_1    Branch_2
1      a=b;        delay
2      c=d;        delay
3      channel_out channel_in
*/

-special keywords
<- Take LSBs
\\ Drop LSBs
@  Concatenation

x = 0xC7;
y = x <- 4; // y = 0X7
z = x \\ 4; // z = 0xC
x = y @ z;  // x = 0x7C


-standard library
static extern
volatile

extern "C" int printf(const char *format, ...);


-try except(reset)
try ... reset

try {
 a = 1;
}
reset(_condition)


- RAM Bank/Bolck Check
x = y>z ? RamA[1] : RamA[2]; // fail
x = RamA[y>z ? 1 : 2];  // pass


-Functions and macros:
functions : not recursive
macros    : recursive

macro expr multiply(x,y) = select(width(x) == 0, 0
    multiply(x\\1,y<<1) +
    (x[0] == 1 ? y : 0));

a = multiply(b,c);

a = ((b\\3)[0] == 1 ? c<<3 : 0) +
    ((b\\2)[0] == 1 ? c<<2 : 0) +
    ((b\\1)[0] == 1 ? c<<1 : 0) +
    (b[0]      == 1 ? c    : 0);

a = ((b&8) == 8 ? c*8 : 0) +
    ((b&4) == 4 ? c*4 : 0) +
    ((b&2) == 2 ? c*2 : 0) +
    ((b&1) == 1 ? c   : 0);

delay // clock cycle


-Platform type
set family = XilinxVirtex;
macro expr DoThis() =
select (__isfamily(XilinxVirtex)  : DoThing1() :
select (__isfamily(AlteraApex20K) : DoThing2() :
select (__isfamily(MadeUpDevice)  : DoThing3() : DoThing4())
)
);


-Clock timing
ram unsigned 8 ExtRAM[16384] with {
offchip = 1, westart = 2, welength = 1,

data = {"P1", "P2"},
addr = {"P9", "P10"},
we = {"P23"},
oe = {"P24"},
cs = {"P25"}
};

-diff Clock interface
FIFO/PORT/BUS
Ref:http://babbage.cs.qc.edu/courses/cs345/Manuals/HandelC.pdf
2011年9月15日 星期四
hyper block
Spark
Parallel synthesis
http://mesl.ucsd.edu/spark/download.shtml
xPilot
Parallel synthesis
xPilot: A Platform-Based Behavioral Synthesis System
hyper Block
Mitrion SDK PE
The Mitrion SDK PE is a complete development environment for Mitrion-C applications. It includes the Mitrion-C compiler, a graphical simulator, documentation and examples. You can use the Mitrion SDK PE to develop and simulate applications for the Mitrion Virtual Processor without having access to any FPGA hardwareimpulse-c
http://www.impulseaccelerated.com/
http://www.impulseaccelerated.com/Tutorials/Basic/Tutorial_Basic_HW_Gen.pdf
handle-c
http://en.wikipedia.org/wiki/Handel-C
src carte
rctoolbox
cpsr (the current program status register)
spsr (saved program status register)
http://www.eetimes.com/discussion/cole-bin/4217014/Digging-for-gold-at-the-ESC
2011年9月14日 星期三
2011年9月2日 星期五
Jacquard @ Eclipse synthesis tool

features
1. IP lib support (Add, Sub ...for xilinx)
2. automatic insert (double click in GUI)
3. optimization
3.1 high level
loop unrolling, fusion, inline, reduce , divider/multiplier elimination , array...
Ref: http://www.jacquardcomputing.com/roccc/tutorials/4-optimizations/high-level-optimizatons/
ex:
constrain @ if (*) latency > 1 unit cycle.
method @ operator bind (<<,(recourse)+,(recourse)-)
ps : a*5 = (a*4) + a = (a<<2) + a
a*7 = (a*8) - a = (a<<3) - a
or
(32bits)a = (32bits)b * (32bits)c = (16bits)b * (16bits)c
method @ operator width reduce (32->16)

3.2 low level
operator balance, copy reduction, fanout tree gen ...
ref: http://www.jacquardcomputing.com/roccc/tutorials/4-optimizations/low-level-optimizations/
ex:
c = sum(a,b);
...
e = sum(c,e);

@ system call (sum)2 times,
@ methods resource bind & schedule
4. external ip wrapper

5 testbench gen
6 protocol interface support
2011年9月1日 星期四
2011年8月24日 星期三
Static Single Assignment Form lecture 07 class
definition
SSA
dominator frontier
dominator
Phi node insert
Ref: http://www.cis.upenn.edu/~cis570/schedule.html
SSA
dominator frontier
dominator
Phi node insert
Ref: http://www.cis.upenn.edu/~cis570/schedule.html
Introduction to Data-flow Analysis lecture 04 class
Control-Flow Analysis lecture 03 @ class
2011年8月23日 星期二
good compiler class
http://www.cis.upenn.edu/~cis570/schedule.html
http://web.cecs.pdx.edu/~mperkows/
http://web.cecs.pdx.edu/~mperkows/CLASS_574/index.html
http://www.cs.ucla.edu/~palsberg/
ps: 其實把key word 打上 Google, 應該就有一堆東西撈不完了.
對我這個半路出家的人來說,真是受益良多.
http://web.cecs.pdx.edu/~mperkows/
http://web.cecs.pdx.edu/~mperkows/CLASS_574/index.html
http://www.cs.ucla.edu/~palsberg/
ps: 其實把key word 打上 Google, 應該就有一堆東西撈不完了.
對我這個半路出家的人來說,真是受益良多.
Loop unswitching
# Original
# int i, w, x[1000], y[1000];
#  for (i = 0; i < 1000; i++) {
#    x[i] = x[i] + y[i];
#    if (w)
#      y[i] = 0;
#  }
#
#----------------------------------
# Loop unswitching
#
#  int i, w, x[1000], y[1000];
#  if (w) {
#    for (i = 0; i < 1000; i++) {
#      x[i] = x[i] + y[i];
#      y[i] = 0;
#    }
#  } else {
#    for (i = 0; i < 1000; i++) {
#      x[i] = x[i] + y[i];
#    }
#  }

1.可確保在for loop 中的 lp_body 是 clean 的,
  表示在 lp_body 中,只有 DFG 的 (BasicBlock)BB, 可避免不必要的條件中斷(Branch).

2.可透過 struct 的分析,把 for loop 當成個 node, 可以簡化成 sample BB with CFG control.
之後利用 BDD (Binary decision diagram) 的方式做出每個 Output condition 的機率,
有利於 compiler 做 branch jump 的 predict

x1,x2,x3,Y
---------
[0,0,0] = 0
[0,0,1] = 0
[0,1,0] = 1
[0,1,1] = 1
[1,0,0] = 1
[1,0,1] = 1
[1,1,0] = 1
[1,1,1] = 0

@ y = 0 prb(3/8)
@ y = 1 prb(5/8) <= predict better

3. key notes
判斷 condition branch 是否 stable, 會不會在 for loop 內改變狀態, 如果是 stable 才做 Loop unswitching
'<'+'br'+'>' problems
最近被Blogger的排版設定給氣死,沒事把換行符號給設定死,
害我的排版變得有時候換行,有時候沒有換行...真是他XXX的好.
各位看官就將就將就一下吧,目前已經設定改好,我想之後的 post 排版應該會好看些.
ps: 可以在設定那邊選取,是否每次換行時加入'<'+'br'+'>' 的選項
Ref: http://blog.grovehillsoftware.com/2009/04/blogger-causing-problems-for.html
害我的排版變得有時候換行,有時候沒有換行...真是他XXX的好.
各位看官就將就將就一下吧,目前已經設定改好,我想之後的 post 排版應該會好看些.
ps: 可以在設定那邊選取,是否每次換行時加入'<'+'br'+'>' 的選項
Ref: http://blog.grovehillsoftware.com/2009/04/blogger-causing-problems-for.html
2011年8月22日 星期一
unroll loop
#
# for(i=0; i<2; i++) {
#     c[i] = a[i] + a[i+1];
# }
#
#----------------------------
#
# c[0] = a[0] + a[1];
# c[1] = a[1] + a[2];
#
#----------------------------
# @ deepest loop case without subloop  loop *lp         =

cfg->get_LoopInfo();
Condition *cond  = lp->get_Condition();
loop_node *Entry = lp->get_LoopEntry();
loop_node *Body  = lp->get_LoopBody();
loop_node *Exit  = lp->get_LoopExit();
#loop lp->get_SubLoops();

faltList<>       = cond->get_Flattens();

int run_size = do_run_size();

InstructionList<> = Body->get_Instructions();

tmp_InstructionList = [];

for(int i =0; iget_Operand_Src1();
     Operand  *src2 = (Instruction)ii->get_Opernad_Src2();
     Operand  *dst  = (Instruction)ii->get_Opernad_Dst();
     Operator *op   = (Instruction)ii->get_Operator();

     if( src1->isArrayAccess() && faltList.find(src1->get_Array_ID()) != faltList.end() ) {
         int      new_src1_inx = faltList.find(src1->get_Array_ID())->get_Lists()->get_Value(i) +
                                 src1->get_Array_ID()->get_Offset();

         Operand *new_src1 = new Operand(src1->get_Array(),new_src1_inx);
     }


     if( src2->isArrayAccess() && faltList.find(src2->get_Array_ID()) != faltList.end() ) {
         int      new_src2_inx = faltList.find(src2->get_Array_ID())->get_Lists()->get_Value(i) +
                                 src2->get_Array_ID()->get_Offset();

         Operand *new_src2 = new Operand(src2->get_Array(),new_src2_inx);
     }


     if( dst->isArrayAccess() && faltList.find(dst->get_Array_ID()) != faltList.end() ) {
         int      new_dst_inx = faltList.find(dst->get_Array_ID())->get_Lists()->get_Value(i) +
                                dst->get_Array_ID()->get_Offset();

         Operand *new_dst = new Operand(dst->get_Array(),new_dst_inx);
     }


     Instruction *new_ii = new Instruction(new_dst,new_src1,op,new_src2);
     tmp_InstructionList.push(new_ii);
 }
}


BasicBlock *lp_pre = Entry->get_Proc();
BasicBlock *lp_nxt = Exit->get_Succ();

cfg->del_Loop_BB([Entry,Pre_Header,Header,Body,Exit]);
cfg->del_Loop_Edge([{lp_pre,Entry},{Entry,Pre_Header},{Pre_Header,Header},{Header,Body},{Body,Exit},{Exit,Header}]);

BasicBlock *bb_entry = new BasicBlock();
BasicBlock *bb_exit  = new BasicBlock();
BasicBlock *bb_cont  = new BasicBlock();

cfg->set_BasicBlock([bb_entry,bb_exit,bb_cont]);
cfg->set_Edge([{lp_pre,bb_entry},{bb_entry,bb_cont},{bb_cont,bb_exit},{bb_exit,lp_nxt}]);


foreach ii in tmp_InstructionList
      bb_cont.set_Instruction(ii);


# { i:[0,1], ... }
int do_run_size() {

int num = 0;

foreach flat in faltList {

 foreach id in flat->get_IDs() {

     if ( num == 0 )
          num = id->get_Lists().size()
     else
          assert( id->get_Lists().size() == num && "size error in loop condition" );
 }
}

return num;
}
2011年8月21日 星期日
BDD (Binary decision diagram)
binary decision tree.以前唸書的時候,邏輯設計課要學卡諾圖(Karnaugh map)化簡,不過現在有一個比較好用的tool,BDD(binary decision diagram)可以幫我們判斷出條件 Path 的路徑 跟 Output 的 case 解.當然這也可以分析出 code 的 condition coverage 跟做些 reduction 的 methods.
可參考底下的教學跟安裝.
Refs:
http://en.wikipedia.org/wiki/Binary_decision_diagram
http://lyle.smu.edu/~bxu/SimpleADD.html
2011年8月19日 星期五
pre_header
#
# for (int i=0; i<10; i++) {
#     c = a + b + i;
# }
#
#------------------------------
# i = 0;
# do {
#   j = a + b
#   c = j + i;
#   i++;
# } while(i<10)
#
# @ predict jump
#-------------------------------
#
# loop(entry):{}
# loop(lp_eader):{ i=0; }
# loop(lp_body):{ j=a+b; c=j+i; i=i+1; }
# loop(lp_exit):{ i<10; }
# loop(exit):{}
#
# E0:{loop(entry)->loop(lp_header)}
# E1:{loop(lp_header)->loop(lp_body)}
# E2:{loop(lp_body)->loop(lp_exit)}
# E3:{loop(lp_exit)->loop(lp_body)}
# E4:{loop(lp_exit)->loop(exit)}

#------------------------------
# j = a + b;
# for (int i=0; i<10; i++) {
#      c = j + i;
# }
#------------------------------
#
# j = a + b;
# i = 0;
# do {
#    c = j + i;
# } while(i<10)
#
# loop(entry):{}
# loop(lp_pre_header):{ j=a+b; }
# loop(lp_header):{ i=0; }
# loop(lp_body):{ c=j+i; i=i+1; }
# loop(lp_exit):{ i<10; }
# loop(exit):{}
#
# E0:{loop(entry)->loop(lp_pre_header); }
# E1:{loop(lp_pre_header)->loop(lp_header); }
# E2:{loop(lp_header)->loop(lp_body); }
# E3:{loop(lp_body)->loop(lp_exit); }
# E4:{loop(lp_exit)->loop(lp_header); }
# E5:{loop(lp_exit)->loop(exiy); }


loop *lp          = cfg->get_LoopInfo();
loop_node *entry  = lp->get_LoopEntry();
loop_node *exit   = lp->get_LoopExit();
loop_node *header = lp->get_LoopHeader();
loop_node *body   = lp->get_LoopBody();

InstructionList<> = body->get_Instructions();

pre_header_list = [];

foreach ii in InstructionList {

     if ( ii->isMoveAble2PreHeader() )
          pre_header_list.push(ii);
}

if ( !pre_header_list.empty() ){

 loop *pre_header = new loop();
 cfg->set_Loop(pre_header);

 entry->del_Succ(header);
 entry->set_Succ(pre_header);

 pre_header->set_Succ(header);
 pre_header->set_Proc(entry);

 header->del_Proc(entry);
 header->set_Proc(pre_header);


  foreach ii in pre_header_list {
          pre_header->set_Instruction(ii);
          header->del_Instruction(ii);
  }

}


bool isMoveAble2PreHeader() {

     OperandList<> = Instruction(this)->get_Operands();

     bool change = true;

     foreach op in OperandList {

       if( (Operand)op != result ) {

         if( (Operand)op->get_Parent() != loopInfo && (Opernand)op->isStable() )
             change &= true;
         else
             change &= false;

       }
    }

return change;
}
form wiki definition:
loop pre-header
Suppose block M is a dominator with several incoming edges, some of them being back edges (so M is a loop header). It is advantageous to several optimization passes to break M up into two blocks Mpre and Mloop. The contents of M and back edges are moved to Mloop, the rest of the edges are moved to point into Mpre, and a new edge from Mpre to Mloop is inserted (so that Mpre is the immediate dominator of Mloop). In the beginning, Mpre would be empty, but passes like loop-invariant code motion could populate it. Mpre is called the loop pre-header, and Mloop would be the loop header.
refs: http://en.wikipedia.org/wiki/Control_flow_graph
cycle graph
DataFlowGraph *dfg DataFlowGraph();

  dfg = dfg->run_Structure_analysis();  # reduce dead code
  dfg = dfg->run_LoadStore_analysis();  # reduce memory access
  dfg = dfg->run_reSchedule_analysis(); # parallel / serial
  dfg = dfg->run_Hardware_analysis();   # SIMD / MIMD ...

  assert( dfg->run_Pass() && "run BB analysis fail" );


  # assignment cycle graph for each BB
  #
  BasicBlockList<> = dfg->get_BasicBlocks();

  float tmp_time;

  while ( !BasicBlockList.empty() ) {

       (BasicBlock) bb = BasicBlockList.pop();

       tmp_time = 0;

       float { start_time:0, end_time:0 } = bb->init_time();

       tmp_time = start_time;

       foreach (Instruction)ii in bb->get_Instructons() {

             tmp_time =  max(tmp_time + ii->get_Operate_time(), tmp_time);

             if( tmp_time > Clock_Freq ) {

                 bb->set_end_time = ( tmp_time - ii->get_Operate_time() );

                 BasicBlock *new_bb = dfg->split_BB(bb,ii);

                 if( dfg->run_Pass() && "split_BB fail" );

                 # split BB before ii, update "nALive", "outALive" for old.new BB

                 BasicBlockList.push(new_bb);
            }
       }
  }


  # cycle graph schdule
  #
  dfg->run_ASAP_schedule();
  dfg->run_ALAP_schedule();
  dfg->run_Force_Directed_schedule();

  # Hardware export
  #
  dfg->Module_export();
  dfg->Interface_export();
  dfg->Register_export();
  dfg->Memory_export();
  dfg->FSM_export();
  dfg->DataPath_export();
  dfg->Linker_export();
  dfg->test_bench_export();
2011年8月17日 星期三
SSA (static single assignment)
DataFlowGraph *dfg = DataFlowGraph([]);

foreach (BasicBlock)bb in (DataFlowGraph)dfg->get_BasicBlocks() {

    foreach (BasicBlock)preProc in (BasicBlock)bb->get_PreProcessor() {

        pre_aLiveOutList = preProc->get_aLiveOutRegs();

        foreach (Register)inReg in (BasicBlock)bb->get_aLiveInRegs() {

            if( pre_aLiveOutList.find(inReg) != Pre_aLiveOutList.end() ) {

                (Register)OutReg = preProc->get_Reg(inReg->get_ID());

                if( !PHI_Exist(OutReg,InReg) ) {

                     # deep copy the old register items 2 new register, such as "procs", "succs"...
                     { new_OutReg, new_InReg } = PHI_Insert(OutReg,InReg);

                     # remove the old register pointer
                     bb->remove_reg(InReg);
                     bb->set_reg(new_InReg);

                     # update the graph
                     preProc->remove_reg(OutReg);
                     PreProc->set_reg(new_OutReg);
               }

            }
       }
   }
}


#########################
# B1:{ a=1; }; B2:{ a=2; };  B3:{ a=a+1; }
# E1:{B1->B3}; E2{B2->B3};
#
# SSA graph
# B1: { a(1)=1; }; B2:{ a(2)=2; }; B3:{ phi a(3):[ B1:a(1), B2:a(2)]; a(3)=a(3)+1; }
Refs:
SSA wiki
http://en.wikipedia.org/wiki/Static_single_assignment_form
Use-define_chain for load store
http://en.wikipedia.org/wiki/Use-define_chain
2011年8月16日 星期二
sample compiler flow
寫了個 sample compiler flow,不過這裡面還有很多議題可以討論,就等小弟我慢慢的研究吧.
CFG *cfg = Parser(['file','code','temp_IR']);

# Blocks[BB(basicblock)];
# Edges [forward,backward,cross,tree,fallthrough(without branch condition)];
# SubGraph(DFG): data flow graph ex: c = a + b;
#
# @ ex: if ( a==1 ) { c = a+b; } else { c = a-b; }
#
# cfg_BB(0);                          # condition
# cfg_BB(0)->dfg_BB(0)                 # a==1
#            dfg_BB(0)->instruction_ii(0)     # a==1
#                       instruction_ii(0)->operator(0)[label,type,operand] # int(a) eq 1
# cfg_BB(1): #If(true)
# ...
# cfg_BB(2): #If(false)
# ...
# cfg_EE(0){cfg_BB(0),cfg_BB(1),'E0',0};     # edge 'E0' weighted 0 cfg_BB(0)->cfg_BB(1)
# ...
# linklist gen

list<>cfg_order = cfg->search_methods([deep_first_search(),
                                       breadth_first_search(),
                                       post_order_search(),
                                       pre_order_search(),
                                       topology_sequence_search(),
                                       reverse_topology_sequence_search()]);

# cfg_order = [ cfg_BB(0), cfg_BB(1), cfg_BB(2) ];


# find domin path, check dependence for each BasicBlock
Dom *dom_tree = Dom(cfg);

list<>dom_order = dom_tree->search_methods([post_order_domin(),
                                            pre_order_domin(),
                                            imm_domin()]);

# dom_order = { Dom(cfg_BB(0):{cfg_BB(0)}),
                Dom(cfg_BB(1):{cfg_BB(0),cfg_BB(1)}),
                Dom(cfg_BB(2):{cfg_BB(0),cfg_BB(2)}) };

Dom_Graph *dom_graph = dom_tree->gen_graph();

#      cfg_BB(0)   @ dom_graph(directed graph)
#          |
#     -----------
#     |         |
#     V         V
# cfg_BB(1) cfg_BB(2)


# find the correlation for each instruction
Reg *reg = Reg(cfg);

list<>reg_bb_order = reg->search_SSA();

# reg_bb_order = { BB0:[ cfg_BB(0)->dfg_BB(0)->(a:0), cfg_BB(0)->dfg_BB(0)->(eq:0),  cfg_BB(0)->dfg_BB(0)->(1:0) ],
#                  BB1:[ cfg_BB(1)->dfg_BB(1)->(c:1), cfg_BB(1)->dfg_BB(1)->(add:1), cfg_BB(1)->dfg_BB(1)->(a:1), cfg_BB(1)->dfg_BB(1)->(b:1) ],
#                  BB2:[ cfg_BB(2)->dfg_BB(2)->(c:2), cfg_BB(2)->dfg_BB(2)->(sub:2), cdg_BB(2)->dfg_BB(2)->(a:2), cfg_BB(2)->dfg_BB(2)->(b:2) ] }

SSA_Graph *ssa_graph = reg->toSSA();

#              (a:0) eq (1:0)
#                     |
#        --------------------------
#        |                        |
#        V                        V
# (c:1) add (a:1) (b:1)    (c:2) sub (a:2) (b:2)

list<> phi_order = ssa_graph->search_PHI(c);

# phi_order = [ BB1:c:1, BB2:c:2 ] @ node c

#CFG *nw_cfg = ssa_graph->toCFG();


# static analysis for BasicBlock such as if else, while, ...

Strc *strc_tree = Strc(cfg);

strc_tree->search_methods([Block(),
                           IfThen(),
                           IfThenElse(),
                           SelfLoop(),
                           NaturalLoop(),
                           Unreachable()]);

strc_tree->analysis([DeadCodeCut(),
                     LoadStroeMerge(),
                     ParallelMerge(),
                     SerialMerge()])

# DeadcodeCut    ex: for(i=0; i<10; i++) { a=1; } unreachable @ a=1;
# LoadStoreMerge ex: c     = a[10];           c = a[10];
#                    a[10] = c+1;       =     d = c+1;
#                    d     = a[10];
# SerialMerge    ex: BB(0) goto BB(1) @ if and only if BB(0)->BB(1) has one directed edge and BB(1) has only one sink edge.
#                    merge BB(0) and BB(1) to BB(0-1)
# ParallelMerge  ex: BB(0) and BB(1) are dependent @ if and only if Dom(BB(0)) != Dom(BB(1)), path(BB(0)) != path(BB(1))
#                    BB(0) BB(1) can be parallel

cfg = str_tree->update_cfg();


# find Branck location, and predict it happened or not,
Div_Graph *div_graph = Div_Graph(cfg);

div_graph->analysis([BranchPredict(),
                     BranchCut()]);

# ex: if ( a==1 ) { if( b==1 ) { c=a+b; } }
#                |
#     if( a==1 && b==1 ) { c=a+b; }

cfg = div_graph->update_cfg();


# platform Assignment
# X86/Arm/Mips...
X86 *x86 = X86(cfg);

# x86 SIMD analysis, ex: MAC d = (a*b)+c merge a = a*b and d = a+c
x86->analysis_SIMD();
...
ref: Muchnick book
2011年8月14日 星期日
Dominator tree @ A simple and fast dominance algorithm
在 compiler 中,為了要分析出 data 彼此間的相依關係, 可以透過 dominator tree 的方式來解決. 假設
a(b) & b(a) = b dom in a & a dom in b; #a = b,
a(b) & b(c) = b dom in a & c dom in b; # a(c) c dom in a
a(b) & c(b) = b dom in a & b dom in a; # a != b
...
當然也可以解決 loop 的問題, 之後可建立起 block graph + SSA(static single assignment) graph, 來做些 merge 跟 code reduction 的動作.
Dominator tree
refs:
^ Cooper, Keith D.; Harvey, Timothy J; and Kennedy, Ken (2001). "A Simple, Fast Dominance Algorithm". http://www.hipersoft.rice.edu/grads/publications/dom14.pdf.
http://en.wikipedia.org/wiki/Dominator_%28graph_theory%29
View more presentations from sean chen.
2011年8月11日 星期四
open course @ college
http://videolectures.net/mit_ocw/
最近在看 open course wave 順便學一下聽力跟複習一下之前所交過的東西,只能說以前大學時候真的是太"混"了,看來該來的還是要還的阿.XD
 Lecture 1: Goals of the course; what is computation; introduction to data types, operators, and variables
Eric Grimson
refs:
http://ocw.mit.edu/courses/
http://en.wikipedia.org/wiki/Open_educational_resources
Lecture 1: Goals of the course; what is computation; introduction to data types, operators, and variables
Eric Grimson
refs:
http://ocw.mit.edu/courses/
http://en.wikipedia.org/wiki/Open_educational_resources
Lecture 1: Goals of the course; what is computation; introduction to data types, operators, and variables
Eric Grimson
refs:
http://ocw.mit.edu/courses/
http://en.wikipedia.org/wiki/Open_educational_resources
2011年8月9日 星期二
python tutorial @ Goolge
如果你夠懶, 且英文也不錯, 對 Python 也有興趣, 相信底下的 link 對於"初學者"有很大的幫助, 當然我也是一邊看一邊去官網查 DOC, 彼此共勉之吧...其他部分就請去 youtube google 一下吧.
2011年8月7日 星期日
Latch design & filter ....
 一般在 Design 時,都會避免使用到 latch, 之所以如此, 最主要的原因還是在 "Debug", 因為 latch 是 Level sensitive, 一但多個 level trigger 會使得 Data 的狀態一直在改變. 但 latch 也不是毫無用處, 因為有時會為了偷時間, 會在 critical path 上插入 latch 來 meet design.
 ex: flip flop 2 latch(1.5T) + latch 2 flip flop (0.5T) for 2T design. or multi clock design... 雖然說可以用 mix up(TetraMax) 的方式把不同 clock domain 串起來,如 111222(@ clock 1 to clock 2), 而不是 121212(clock to clock2 to clock1)的方式,但實際在run ATPG 時, 一般都會把這種的 path 給 mask 掉, 相對的所測的 test case 是不是變少了, 雖然說可以用 feedback 的方式把 flip flop 的 Q 接回 D 來測倍頻, 但 test case 不是倍頻的話,要怎嚜測呢?. 似乎可以透過 STA 把 latch 想成 flip flop, 把 path 1 (flip 2 latch) 的 slack 跟
path 2 (latch 2 flip) 的 slack 相比, 是否就可以算出 barrow time, 在去驗證這時間點的 pattern, 不過最暴力的方式,還是打 functional pattern.
Latch sample code.
http://kb.cnblogs.com/a/1264292/
refs:
ex: flip flop 2 latch(1.5T) + latch 2 flip flop (0.5T) for 2T design. or multi clock design... 雖然說可以用 mix up(TetraMax) 的方式把不同 clock domain 串起來,如 111222(@ clock 1 to clock 2), 而不是 121212(clock to clock2 to clock1)的方式,但實際在run ATPG 時, 一般都會把這種的 path 給 mask 掉, 相對的所測的 test case 是不是變少了, 雖然說可以用 feedback 的方式把 flip flop 的 Q 接回 D 來測倍頻, 但 test case 不是倍頻的話,要怎嚜測呢?. 似乎可以透過 STA 把 latch 想成 flip flop, 把 path 1 (flip 2 latch) 的 slack 跟
path 2 (latch 2 flip) 的 slack 相比, 是否就可以算出 barrow time, 在去驗證這時間點的 pattern, 不過最暴力的方式,還是打 functional pattern.
Latch sample code.
http://kb.cnblogs.com/a/1264292/
refs:
Latches and timing closure: a mixed bag
Latches can improve both the area and performance of your design, but they do create complexities in timing closure.
Selecting clock skews at advanced nodes
Minimizing clock skew across the network may result in high power and timing difficulties. This paper suggests careful selection of clock skews.
2011年8月3日 星期三
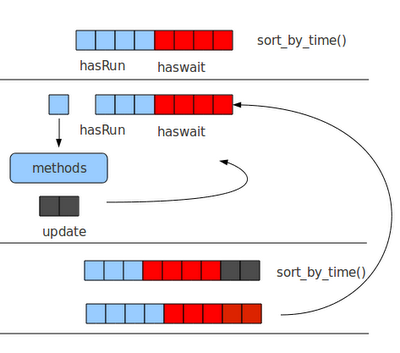
sample simulation env
底下寫了個 pseudo code for sample simulation.主要建立起每個 Signal 的 class. 在依序填入 Signallist 中,之後根據現在的 time cycle 取得 runnable 的 Signal, 取得 Signal 後,根據其 Driver 的 Method 做動作.如果其 Method 會 Driver 到其他的 input/inout Signal, 再把其 Driver 的 Signal 填入 Signallist 中,再重新 Sort 一次,直到這次的 Cycle 內的所有 Signals 都以完成.

# Sample.v
# module Sample(clk,rst,a,c)
# input  clk,rst;
# intput a[31:0];
# output c[31:0];
# reg    b[31:0];
#
# assign c = (b==10)? b+a : a;
#
# always@ (posedge clk or posedge rst) begin
# if (rst==1'b1)
#     b <= 0;
#  else
#     b <= b + 1;
# end
# endmodule
#
# test_Sample.v
# always
# #10 clk ~= clk
#
# initial begin
# #0  Rst = 1'b0;
# #5  Rst = 1'b1;
# #20 Rst = 1'b0;
# ....
# #100 $finish
# end
#

init_Architecture() {
 _module_      = Module({name:Sample});

 _a_           = _module_.Input.Signal([{name:a},
                                        {length:32},
                                        {cur:[{time:0},{val:x}]},
                                        {nxt:[{time:0},{val:x}]}]);

 _c_           = _module_.Output.Signal([{name:c},
                                         {length:32},
                                         {cur:[{time:0},{val:x}]},
                                         {nxt:[{time:0},{val:x}]}]);

 _clk_         = _module_.Clk.Signal([{name:Clk},
                                      {length:1},
                                      {cur:[{time:0},{val:x}]},
                                      {nxt:[{time:0},{val:x}]}]});

 _rst_         = _module_.Rst.Signal(...);

 _b_           = _module_.Reg.Signal(...);

 _method_0_    = _module_.Method([{{C1:{_rst_==1'b1}},{P1:{_b_=0}}},
                                  {{C2:{_rst_==1'b0}},{P2:{_b_=_b_+1}}}]);

 [_clk_,_rst_].set_Driver(_method_0_);

 _method_1_    = _module_.Method([{{C1:{_b_==10}},{P1:{c=b+a}}},
                                  {{C2:{_b_!=10}},{P2:{c=a}}}]);

 [_b_].set_Driver(_method_1_);

 [_clk_,_rst_,_a_,_c_,_b_].set_Parent(_module_);
 [_method_0_,_method_1_].set_Parent(_module_);

 gl_Module_List.push(_module_);

 _module_.Signal_List.push([_a_,_c_,_clk_,_rst_]);
}


init_Time_Wave(){

 _gl_clk_  = Clk([{start_time:0},
                  {end_time:100},
                  {period:10}]);

 _gl_rst_  = Rst([{time:  0:F},
                  {time:  5:R},
                  {time: 20:F},
                  {time: 80:R},
                  {time:100:F}]);

 _gl_time_ = Time();
}


run_gl_Module_List(time cur_time,
            time nxt_time) {

 schedule_list = [];
 update_list   = [];

 # @ find the signals
 foreach _module_ ( gl_Module_List ){

   foreach _signal_ ( _module_.Signal_List )
       if( _signal_.cur.time <= cur_time )
           schedule_list.push(_signal_);

 }

 schedule_list.sort_by_time();


 while( !schedule_list.empty() ){

     _schedule_ = schedule_list.pop_left();
     _driver_   = _schedule_.get_Driver();

     method_list = _driver_.get_Methods();

     foreach _method_ ( method_list )
         update_list = method.run_Signal_update();


     foreach _update_ ( update_list ){

      Signal(_update_).cur.val = Signal(_update_).nxt.val;
      Signal(_update_).cur.time = nxt_time;
      Signal(_update_).nxt_time = nxt_time + nxt_time - cur_time;

        if( Signal(_update_).get_Driver()!= Output ){
            schedule_list.push(_update_);
            schedule_list.sort_by_time();
        }

     }
 }
}


run_Simulation(){

 _gl_cur_time_ = _gl_clk_.start_time();
 _gl_nxt_time_ = 0;

 # check simulation time
 while ( _gl_cur_time <= _gl_clk.end_time() ) {

   _gl_nxt_time = _gl_cur_time_ + _gl_clk_.period()>>1; # @ posedge/negedge edge check

   run_gl_Module_List(_gl_cur_time_,_gl_nxt_time_);

   _gl_cur_time = _gl_nxt_time;

 }
}
refs:
http://www.ocpip.org/datasheets.php
http://www.greensocs.com/
source code download
http://sourceforge.net/projects/greensocs/develop
2011年7月29日 星期五
sad day ....
看來我的英文真是菜到爆,應該只有國小程度吧...XD,沒想到連考黑板題也寫的七七八八,真該撞牆好了.看來我還是沒有那個命阿.
題目:
> 5
print out 出底下 answer.
1
1 2 1
1 2 4 2 1
1 2 4 8 4 2 1
1 2 4 8 16 8 4 2 1
底下用 @ python
# \* breif sort + inverse
# *  retrun [] */
def new_sort_0(i):

 new_sort_0 = []
 new_sort_1 = []

 for j in range(i):
     new_sort_0.insert(j,pow(2,j))

 new_sort_0.insert(i,pow(2,i))

 new_sort_1 = new_sort_0[:]

        new_sort_1.reverse()
        new_sort_1.pop(0)

 return new_sort_0 + new_sort_1


# \* brief leaf 2 middle
# *  return [] */
def new_sort_1(i):

 new_sort = []

        # @ leaf
 for j in range(i):
     new_sort.insert(j     ,pow(2,j))
     new_sort.insert(-(j+1),pow(2,j))

        # @ middle
 new_sort.insert(i,pow(2,i))

 return new_sort


# @ run test
for i in range(5):
 a = new_sort_1(i)
 b = new_sort_0(i)
 print a, b
 del a, b
2011年7月28日 星期四
Samsung I9100 Galaxy S II new toy ....
 最近買了人生中的第1支 "Smart Phone",很明顯的我是個不"smart"的人,居然跑去辦"韓國"人的機子,不過沒辦法誰叫人家真的是"強",雖然說明了就是"抄襲",但就是能做的出那種質感.HTC 是也不賴拉,但就市場定位來看,有愈來愈像 Nokia 的行銷手法.機海戰術要打到人心確實是有點難度,畢竟選擇太多很難讓人把焦點 focus 住,如果能像 "iphone" 一樣,把後端的 Service 做好一點.相信也還是有一定的水準的.
ps: S2 還滿方便的地方就是 synchronous 的功能,不像一般要透過條 usb 線,S2 只要用wifi 就可以跟 PC, TV 做 co-synchronous 的動作.
底下無聊,就整理些相關的 report,有興趣就看看吧
samsung_i9100_galaxy_s_ii spec
http://www.gsmarena.com/samsung_i9100_galaxy_s_ii-3621.php
root hack
http://forum.xda-developers.com/showthread.php?t=1125414
S2 games
http://www.galaxys2forums.com/samsung-galaxy-s2-games/
http://pdadb.net/index.php?m=search&quick=1
最近買了人生中的第1支 "Smart Phone",很明顯的我是個不"smart"的人,居然跑去辦"韓國"人的機子,不過沒辦法誰叫人家真的是"強",雖然說明了就是"抄襲",但就是能做的出那種質感.HTC 是也不賴拉,但就市場定位來看,有愈來愈像 Nokia 的行銷手法.機海戰術要打到人心確實是有點難度,畢竟選擇太多很難讓人把焦點 focus 住,如果能像 "iphone" 一樣,把後端的 Service 做好一點.相信也還是有一定的水準的.
ps: S2 還滿方便的地方就是 synchronous 的功能,不像一般要透過條 usb 線,S2 只要用wifi 就可以跟 PC, TV 做 co-synchronous 的動作.
底下無聊,就整理些相關的 report,有興趣就看看吧
samsung_i9100_galaxy_s_ii spec
http://www.gsmarena.com/samsung_i9100_galaxy_s_ii-3621.php
root hack
http://forum.xda-developers.com/showthread.php?t=1125414
S2 games
http://www.galaxys2forums.com/samsung-galaxy-s2-games/
http://pdadb.net/index.php?m=search&quick=1
2011年7月19日 星期二
MyHDL @ python
MyHDL 是個用 Python 的 HW simulator, 使用者可寫個類似像 Verilog 的 Python 語法, 之後在透過 Python 的 virtual machine 來做 simulation. 如果你夠懶, MyHDL 還提供 translator 的方式幫你把 Python 轉成 Verilog/VHDL.
ACTIVE_LOW, INACTIVE_HIGH = 0, 1

def Inc(count, enable, clock, reset, n):

   """ Incrementer with enable.

   count -- output
   enable -- control input, increment when 1
   clock -- clock input
   reset -- asynchronous reset input
   n -- counter max value

   """

   @always(clock.posedge, reset.negedge)
   def incLogic():
       if reset == ACTIVE_LOW:
           count.next = 0
       else:
           if enable:
               count.next = (count + 1) % n

   return incLogic
ps: 個人還是覺得用 SystemVerilog / SystemC 就 ok 了, 畢竟這還是主流. 至少有 EDA tool的廠商 support. 不過 Python 還真是好物, 可以用的 Lib 還真多, 不需要考慮物件的 type 跟 Memory release... 的問題. 多學點東西也是好的啦...XD
ref:http://www.myhdl.org/doc/current/
2011年7月15日 星期五
where is your Golden Model ?
最近在推 ESL flow 中,發現很多公司的接受度不高,當然最主要的還是 ESL flow map 的問題,大致如下.
 Questions:
1.公司現有的 RTL IP 都已經過驗證,為什麼還要 ESL flow?
2.Project 的時間性,沒有多餘的時間去驗證 ESL flow 是否符合現有的 Design flow?
3.ESL flow 的真實性,有沒有 FPGA 驗證?
4.ESL flow 可否 Synthesis 成 Gate Level 的 Design?
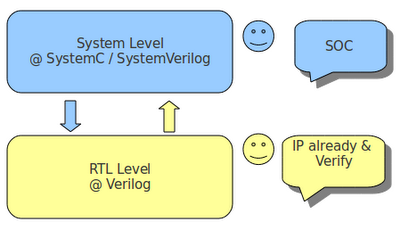
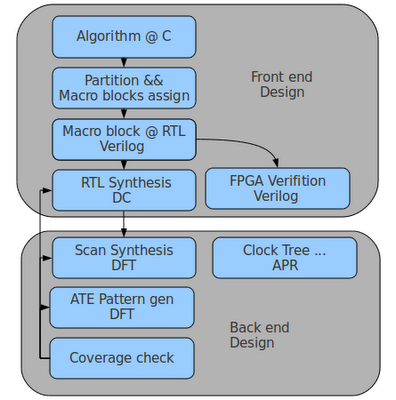
Answers:
在現有的 Design flow,大致如下圖所示, 主要還是 RTL(verilog) -> Synthesis -> FPGA -> Software coding. 而這樣的 life time 會過長. 所以說 ESL 利用 top down 的 Design 方式,把 HW/SW co-design 到 virtual platform 上做 simulation 跟 verification. 可以較精確的評估出 system 的 performance 跟 bottleneck. 當然這是站在 ESL 的角度而言. 但如果今天能夠把現有的 RTL 轉成 ESL flow, 是不是又可以驗證出過去舊有的 Design 跟現有的 ESL 是否 match, 藉此找出彼此間的 gap, 可能是 time frame miss,system block 切不乾淨...的問題.等ESL 跟 RTL match 後, 是不是就可以把現有的 Design 跟新的 Design 做 co-synchronous, 達到 platform reusable 跟 system level 的最佳化.
ps: 當然現有 tool 都已 support "Soft IP". 而 Designer 可就現有的 Design 跟 Soft IP 結合的 virtual platform, 做初步的 simulation 跟 verification, 來決定哪個 platform or ip 是最符合公司的 requirement. 減少 try and run 的時間.
Questions:
1.公司現有的 RTL IP 都已經過驗證,為什麼還要 ESL flow?
2.Project 的時間性,沒有多餘的時間去驗證 ESL flow 是否符合現有的 Design flow?
3.ESL flow 的真實性,有沒有 FPGA 驗證?
4.ESL flow 可否 Synthesis 成 Gate Level 的 Design?
Answers:
在現有的 Design flow,大致如下圖所示, 主要還是 RTL(verilog) -> Synthesis -> FPGA -> Software coding. 而這樣的 life time 會過長. 所以說 ESL 利用 top down 的 Design 方式,把 HW/SW co-design 到 virtual platform 上做 simulation 跟 verification. 可以較精確的評估出 system 的 performance 跟 bottleneck. 當然這是站在 ESL 的角度而言. 但如果今天能夠把現有的 RTL 轉成 ESL flow, 是不是又可以驗證出過去舊有的 Design 跟現有的 ESL 是否 match, 藉此找出彼此間的 gap, 可能是 time frame miss,system block 切不乾淨...的問題.等ESL 跟 RTL match 後, 是不是就可以把現有的 Design 跟新的 Design 做 co-synchronous, 達到 platform reusable 跟 system level 的最佳化.
ps: 當然現有 tool 都已 support "Soft IP". 而 Designer 可就現有的 Design 跟 Soft IP 結合的 virtual platform, 做初步的 simulation 跟 verification, 來決定哪個 platform or ip 是最符合公司的 requirement. 減少 try and run 的時間.
 Questions:
1.公司現有的 RTL IP 都已經過驗證,為什麼還要 ESL flow?
2.Project 的時間性,沒有多餘的時間去驗證 ESL flow 是否符合現有的 Design flow?
3.ESL flow 的真實性,有沒有 FPGA 驗證?
4.ESL flow 可否 Synthesis 成 Gate Level 的 Design?
Answers:
在現有的 Design flow,大致如下圖所示, 主要還是 RTL(verilog) -> Synthesis -> FPGA -> Software coding. 而這樣的 life time 會過長. 所以說 ESL 利用 top down 的 Design 方式,把 HW/SW co-design 到 virtual platform 上做 simulation 跟 verification. 可以較精確的評估出 system 的 performance 跟 bottleneck. 當然這是站在 ESL 的角度而言. 但如果今天能夠把現有的 RTL 轉成 ESL flow, 是不是又可以驗證出過去舊有的 Design 跟現有的 ESL 是否 match, 藉此找出彼此間的 gap, 可能是 time frame miss,system block 切不乾淨...的問題.等ESL 跟 RTL match 後, 是不是就可以把現有的 Design 跟新的 Design 做 co-synchronous, 達到 platform reusable 跟 system level 的最佳化.
ps: 當然現有 tool 都已 support "Soft IP". 而 Designer 可就現有的 Design 跟 Soft IP 結合的 virtual platform, 做初步的 simulation 跟 verification, 來決定哪個 platform or ip 是最符合公司的 requirement. 減少 try and run 的時間.
Questions:
1.公司現有的 RTL IP 都已經過驗證,為什麼還要 ESL flow?
2.Project 的時間性,沒有多餘的時間去驗證 ESL flow 是否符合現有的 Design flow?
3.ESL flow 的真實性,有沒有 FPGA 驗證?
4.ESL flow 可否 Synthesis 成 Gate Level 的 Design?
Answers:
在現有的 Design flow,大致如下圖所示, 主要還是 RTL(verilog) -> Synthesis -> FPGA -> Software coding. 而這樣的 life time 會過長. 所以說 ESL 利用 top down 的 Design 方式,把 HW/SW co-design 到 virtual platform 上做 simulation 跟 verification. 可以較精確的評估出 system 的 performance 跟 bottleneck. 當然這是站在 ESL 的角度而言. 但如果今天能夠把現有的 RTL 轉成 ESL flow, 是不是又可以驗證出過去舊有的 Design 跟現有的 ESL 是否 match, 藉此找出彼此間的 gap, 可能是 time frame miss,system block 切不乾淨...的問題.等ESL 跟 RTL match 後, 是不是就可以把現有的 Design 跟新的 Design 做 co-synchronous, 達到 platform reusable 跟 system level 的最佳化.
ps: 當然現有 tool 都已 support "Soft IP". 而 Designer 可就現有的 Design 跟 Soft IP 結合的 virtual platform, 做初步的 simulation 跟 verification, 來決定哪個 platform or ip 是最符合公司的 requirement. 減少 try and run 的時間.

2011年7月12日 星期二
UVM
最近發現個好物, UVM/OVM. 可以幫助 Designer 做 high level 的 performance/power estimation.不像以前還要自己刻個 "function class" + "Parser" 把每個 SystemC/System-Verilog Block 自動的掛到 virtual platform 上, 做簡單的 performance/power 的 simulation, 現在想想真是蠢呆了.
UVM/OVM support System-Verilog 讓 Designer 有 object oriented 的概念. 可 Extend, reused ...etc, 且能做到 High level 的 verification 如 算出 FSM, code, functional, path coverage ...可大幅提高 verification/ build platform 的速度.
ps: Eclipse 還真強大,連這都有真是佩服....
 Refs :
http://www.dvteclipse.com/documentation/sv/Getting_Started.html
http://www.doulos.com/knowhow/sysverilog/uvm/
Refs :
http://www.dvteclipse.com/documentation/sv/Getting_Started.html
http://www.doulos.com/knowhow/sysverilog/uvm/
Refs :
http://www.dvteclipse.com/documentation/sv/Getting_Started.html
http://www.doulos.com/knowhow/sysverilog/uvm/
2011年7月9日 星期六
how to define "test / verify"
最近被問到如何去定義你的 test or verify. 當下就只有想到打 test patterns 去算 Coverage. 感覺不是個 good answer. 應該像是 Design flow 一樣, 根據不同的 Level 有不同的測試流程. 如 在Abstract Level, 測試 command 是否正確, 判斷是否會 overflow, 接著在 Communication Level, 測試 Communication 是否會 lost, 等架構都決定好後, 最後再做 Synthesis from RTL 2 Gate, 測試 Gate Level, 判斷是否會 short, Vdd, Gnd...etc Pass. 當然這都必須建立起每個 Level 的 test platform, 而在 OVM/VVM/UVM 可建立起在 Sytem Level 的 university verify model for functional testing. 可減少在 Software Designer 跟 Hardware Designer 之間的 Gap, 不用等到 Hardware Designer 把架構決定後 Software Designer 才開始 work. 把 Phase merge 起來, 減少 re-Debug / re- Define 的時間.
 Ref:
http://www.doulos.com/knowhow/sysverilog/VMM/
http://www.testbench.in/
http://www.accellera.org/activities/vip
Ref:
http://www.doulos.com/knowhow/sysverilog/VMM/
http://www.testbench.in/
http://www.accellera.org/activities/vip
2011年7月5日 星期二
IC design vs Verification
底下是 ppt Tech_Job 的文章,看完之後還真頗有感覺.
看來只有做過的人才懂 Verify 的重要,不然我們永遠都在 RD(黑暗) 底下工作.
如果沒有我們, 即使在好的 Design 沒有經過實體的驗證 Flow,永遠只是天馬行空的想法.不過在台灣做 Verify 的人確實比較不被重視,真是該檢討一下才對...
=============================================================
作者: Muscato (科技始終來自於惰性) 看板: Tech_Job
標題: Re: [請益] IC design vs verification
時間: Sun Jun 19 11:11:32 2011
我想提供個不同的觀點
我本身也在美國工作過六年
當一開始一畢業的的 Ultrasparc CPU Design Verification
做到後來 48 port/16Gbps Fibre Channel Director 的 ASIC Design
中間做過的產品也得過 EMC Product of the year award
就是因為同時做過 Design 和 Verification,我才覺得 Verification 的重要
以一顆大型chip 來說,除非你是當到 Architect 等級了
不然當 Designer 很簡單,把你負責的 Block 搞好就是了
能真正看到 Whole Chip Level 的人不多
每個人負責的多半是一本spec 裡的一部份
管你裡面怎麼胡搞蝦搞,反正到最後 input/output 和 spec 規範的一樣
沒人理你裡面是不是一團漿糊
DV 呢? 從剛開始菜鳥來看,Designer 看的 Block Level Spec 你也要會
多半也還要幫忙 wholechip level debug
spec 你要看的比 designer 還熟,還細
因為你的責任就是雞蛋裡挑骨頭,把所有可能的問題找出來
等有經驗後,你要負責 Verification Env 的建構
也許有人會想,反正 Verilog/SystemVerilog 寫寫不就好了
是沒錯
但為什麼有人就是可以寫出一個很容易擴充的環境
在 RTL Sim 也許還看不出來
等到 Post Silicon Verification 的時候
Testbus 能看到的就那幾根毛
如何簡單快速的把在 silicon 遇到的問題在 RTL Sim 裡複製出來跑模擬
這才是功力所在
光用 random pattern + constraint 就快速打到你要寫 directed test 才打到的bug
這能夠省下無數寶貴的時間
VMM/Coverage/Assertion,每一項都有學問在
我還看過有人只用 Assertion 就可以把一個複雜的 module 驗到沒有 bug
我待過的公司都對 dv 的人客客氣氣,從不會有 design 就高人一等的感覺
沒有這些 dv,產品搞不好根本不能賣
說到分紅,我待過的公司從來都沒有差別待遇
分紅多與少,看的是你的表現
和產品賺不賺錢也沒什麼差
產品不賺錢,常常是上頭豬腦袋,沒做好市場研究或不會賣,不是產品沒做好
身為一個工程師,把產品做好,你的責任就盡到了
要說到 Job security,一個好的 dv 的人比一個 designer 安全的多
說到找工作,DV 的工作也比 designer 好找的多
特別是 Senior DV Enginner/Lead
要找到一個夠格的 DV Lead 比一個 Designer Engineer 難的多
因為太難養成一個夠水準的驗証工程師了
再說到當老闆往上爬? 我們這些工程師都一樣啦,早點看開比較不會受傷
管你 dv 還是 design,能爬到上面的有多少是純工程背景
多半都是 Marketing/Sales/Production 的人
為什麼?
因為他們最接近市場,他們知道客人要什麼,他們也能言善道會交際
同時,他們看的懂成本和收支表
還有,我並不喜歡學校/團隊至上論
我朋友 Oregon State MS,待的也不是什麼大公司團隊
一樣拿到 Waitrop 現在公司的 Offer
工作幾年後,看的是你的人脈和你在工作上學到了多少
看的是你面試臨場表現態度與你現場吸收學習的能力
學校能幫你畢業第一次,但不能幫你一輩子
共勉之
※ 引述《waitrop (嘴砲無雙)》之銘言:
: 不太想回文的,因為可能會變成一偏引戰文,
: 不過感覺還是有義務回文,
: 尤其是有興趣在美國發展的人,
: 以工作內容和人數而言,
: verification像是螞蟻雄兵,
: 公司裡頭撿垃圾的丐幫,
: 以前公司的高層說法,
: 一個designer要配三個verification的人,十個software,
: 實際上前公司的部門人數比也才1:1, 甚至verification人更少,
: 當然那跟政治環境有關係,掌權的人有人事權,
: 即使到了我現在的公司,人數比也大概1:2,
: verification大概兩倍的人,不過有些designer會幫忙驗證抓Bug,
: 而且人力真的很吃緊,預計verification還會繼續找人,
: 政治上,verification永遠在designer後面,
: 分紅獎金等也是如此,不過verification也算是designer一部份,
: 大致上看到的權力分配是(數位設計而言)
: core designer>core verification>SOC=system/software>layout,
: 當頭(VP, CTO, CEO)的都是core designer,
: 老二都是verification,只有非常少數是verification當頭,
: 不管是designer or verification 最終的目標都是當architect,
: 只有到那程度才有辦法設計晶片,掌握大局,
: 不然充其量也都只是繞線連線打雜,
: 目前的美國業界設計方式是由architect以及大頭們設計spec,
: 東西切乾淨再把每個block assign給designer/engineer,
: architect也先做好modeling, 可以預測結果以及效能,
: 如果是買IP,modeling跟verification這兩塊會變成最重要,
: 目前看到美國公司的工作情況是大部份會把layout outsource,
: 可能是國外,可以是外包公司,
: 甚至TSMC, tool company 願意提供這方面的服務,
: SOC跟繞線連線的工作也漸漸outsource,
: verification, system當然也是outsource, 尤其人力這麼吃緊,
: 留下來的大部份是不能換的architect, core design, core/architect verify,
: 就業方面,
: verification的確好找工作很多,也好換工做,
: 如果你學校學歷不是最好,經歷title低一點,公司團隊名聲差,
: verification會是你的機會,
: 當年我畢業的時候找了designer, architect modeling, verification,
: software是傻傻的投Google之類的公司,
: 結果拿到verification的工作,
: 這次換工做也是找這些工作,
: 最後也是verification公司最好, package最好,
: 前公司扣除特殊情況(不要再跟我吵特例),
: 大部份的新人designer都是要全美前十名學校,
: 即使是有經驗的人除非很強或公司團隊有名,不然學歷也是要前十名,
: 這已經是非常寬鬆的條件,
: 我目前的公司即使是MIT, Stanford畢業生都不一定有面試機會,
: 蘋果跟股歌只會更挑,
: verification就不一樣,
: 只要你願意打雜做黑的,畢業生學歷不太好都有機會做,
: 未來發展方面,
: 就像我之前說得,現在已經是IP Design年代,
: 大部份的公司都是買IP回來兜,
: 再加上tool越來越發達,純design, layout會越來越少,
: 即使是verification, 如果是block level 打訊號驗證,也不太需要了,
: 至少要到architect level才會有留下來的機會,
: 很多問題都是架構上的錯誤造成的,根本跟block design, IP無關,
: ※ 引述《javatea (:))》之銘言:
: : 進業界也滿一年多了 目前工作屬Deisng/SoC相關
: : 因為可能會轉換跑道 所以想多了解design及verification的未來性
: : 從美國的各大IC公司最近的機會來看 verfication需求越來越大
: : 除了最近跟一些senior聊過還有這一年多來對於產業的了解
: : 對於verification的觀感也跟在當學生的時候完全不同
: : 其實大部分的學生會偏向Design
: : 也真的是因為Design這個名詞好聽一些 根本沒給verficiation領域考慮的機會
: : 低估或者根本不考慮verification在整個IC/SoC的地位越來越重要
: : Verification並非單純像是test monkey般
: : 而是需要對design(無論IP or chip-level) 有一定程度的了解
: : 才能完成整個流程 我目前不完全了解這領域就是了...
: : 但感覺verification領域蠻有發展...不知道我的認知是不是算正確
: : 另外也希望有大大分享台灣Deisgn/verification的情況實際是如何呢?
: : 非常感謝
2011年6月29日 星期三
UML + SOC
在Front End SOC design 上,除了系統架構必須要符合 spec 的 throughput 之外, HW/SW Partition and Optimization 變得更為重要.但現今 SOC 的系統下,用傳統的IP Design flow 上,根本看不出系統的 Bottleneck 在那,只能靠 try and error, 不斷做些重複且沒有效率的工作, 如果能事先把 Design 切成 Blocks,而內部詳細的Design 我們不去care, 只考慮 Input/Output 的 Cycle or delay time, 這樣是不是就可以快速的得到我們想要的 solutions, 等架構決定後, 再做 RTL coding, 不僅可加快驗證的速度且也能 gain 到最大的 Performance, 而 UML 提供了簡單的 GUI Interface, 跟 Interface definition, 讓使用者可以快速的得知每個 Cycle 被 Wake up 的 Devices, 跟 Devices 的 work flow.
 Ref: http://www.springerlink.com/content/978-0-387-25744-0#section=533862&page=1
Ref: http://www.springerlink.com/content/978-0-387-25744-0#section=533862&page=1
2011年6月17日 星期五
new challenge
沒想到研發替代役3年的時間還真快,接下來又要面臨到新的挑戰,人生不就是該這樣起起伏伏嗎.要勇於面對接下來的挑戰.歡迎有興趣的公司與我聯絡,不過還是以大台北地區的公司為主,謝謝.
Email: funningboy@gmail.com
ps: 底下是這3年來幫公司做過的projects.
Work items
View more presentations from sean chen.
2011年5月26日 星期四
Structural Checking of Voltage-Island and Power Gating Low-Power Logic Design
小弟最近花了點時間在弄 IC/CAD Structural Checking of Voltage-Island and Power Gating Low-Power Logic Design 的題目.
寫了一堆很像蛆的程式碼, 主要功能是 "驗證 Design 是否滿足 Isolation Condition Constrain". 如果你有興趣,就不妨參考看看吧...XD.
感覺裡面還有很多可以改進的地方, 如 class 的分層部份,可以預先加入 Verify 的條件判斷. 雖然目前只是驗證 Design 是否滿足Constrain, 但將來也有可能要 update Design 時候. 那時就需要 register Verify 來確保每次 update 是否還維持其 Design 的完整性. 還有 ISO Rule Check 部份, 可以考慮其相依性, 減少 Search/Loop 的次數. 這邊小弟只寫了 ISO2, ISO3, ISO4, ISO5 的條件判斷. 剩下的部份就請好心人事把他完成吧.
Flow 大致是如此, Parser 出我們要的 Class type, 依序建立在 ISO_Table, SC_Table.底下. 之後透過 SC_Util, ISO_Util 來 Access SC_Table, ISO_Table..
 底下用個簡單的 sample code 來抓取 Design port 的 Deepest Fan-In port lists.
 底下用個簡單的 sample code 來抓取 Design port 的 Deepest Fan-In port lists.
SC_Util *sc_util = new SC_Util();

typedef std::vector<SC_Module::SC_Port_D*>           PtVec;
typedef std::vector<SC_Module::SC_Port_D*>::iterator PtVec_iter;

PtVec   pt_vv;

SC_Module::SC_Port_D *sc_port = sc_util->split_path_2_Port(sc_root,"u1/u2/u3/CPF_ISO__cell_368/Ib");

//get Deepest Fain Vector
sc_util->get_PreestVec(sc_port,&pt_vv);

sc_port->dump_Context();
std::cout << sc_util->get_HierarchyName(sc_port) << std::endl;


for(PtVec_iter pt_it  = pt_vv.begin();
              pt_it != pt_vv.end();  ++pt_it){

   SC_Module::SC_Port_D *sc_preest_p = static_cast<SC_Module::SC_Port_D*>(*pt_it);
                         sc_preest_p->dump_Context();

   std::cout << sc_util->get_HierarchyName(sc_preest_p) << std::endl;
}

delete sc_util;
project : https://github.com/funningboy/iso_cell_rc1
Refs:
http://lowpowerdesign.blogspot.com/
http://cad_contest.cs.nctu.edu.tw/cad11/Problems.htm
GCC Optimization results in “Undefined symbol” at runtime
Bison 2.5
Code-Level And API Options
2011年5月17日 星期二
verilog gate parser @ boost
最近真是煩悶阿...., 不是系統太大導致之前寫的 code 爆掉. 不然就是進度完全的 Delay...,
看來用 "perl" 來硬幹 "大系統" 真的就只有蠢, 本來想說能夠快速的系統開發,不考慮很底層的東西.看著 hash table 愈建愈大, 即使release 了一些,還是不能滿足需求阿... 所以只好砍掉重練了XD.
目前先用 C++ 來建底層的 interface. 而 Parser 的部份採用 Boost c++ 的 Spirit library, 用過的人都知道,這真是個好物阿....
sample case.
module SC_BUF  (A, Y);
  input  A;
  output Y;
     buf (Y, A);
endmodule
project: https://sites.google.com/site/funningboy/c/ParseVerilog.cpp?attredirects=0&d=1
2011年4月29日 星期五
GeniusTrader @ perl
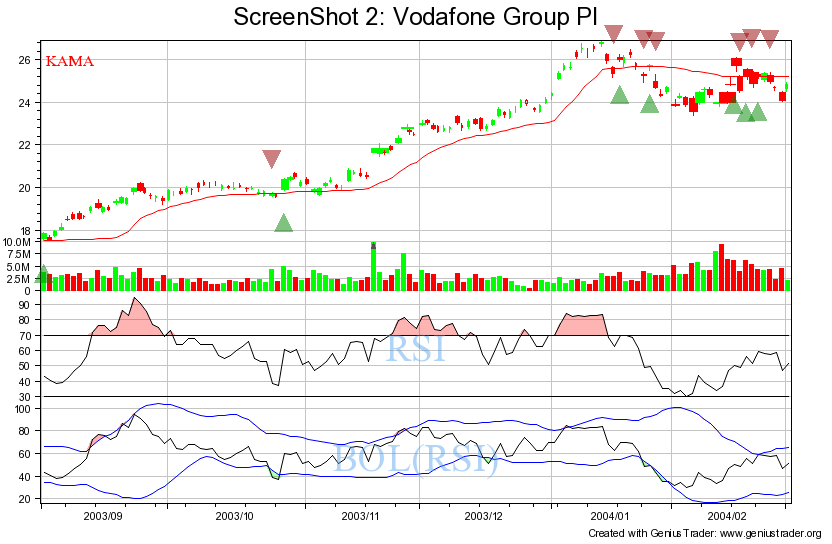
在TradeStation的交易系統上, 可以寫簡單的 Easy Language 做系統的回測分析. 可參考大象飛上天,裡面有很多簡單的例子.不過你需要先有 TradeStation 這套付錢的軟體. 這對Free Software的人來說真是太困難了. 還好有 GeniusTrader, 透過內建的 Indicator, money management...下些簡單的 Script commands, 可以模擬出類似 TradeStation 的 Chart 跟 Report 呢.
GeniusTrader support
1.backtrack history data insert
.txt
2.real time quote from Yahoo finance
DBI:SQLite3, MySQL,
3. indicator support
DMA,KD,...
5. money management & profit report
hold time, max benefit, max lost.
可參考底下的安裝流程.
http://geniustrader.org/first_use.html
ps: 記得設定 GeniusTrader 的 system 變數 @ ~/.gt/options
 Ref: http://www.geniustrader.org/
https://help.ubuntu.com/8.04/serverguide/C/postgresql.html
Ref: http://www.geniustrader.org/
https://help.ubuntu.com/8.04/serverguide/C/postgresql.html
DB::module Text
DB::text::directory /home/sean/prj/geniustrader/data
# relying on DB::Text defaults for sample database access

Brokers::module SelfTrade

Path::Font::Arial    /usr/share/fonts/truetype/msttcorefonts/arial.ttf
Path::Font::Courier  /usr/share/fonts/truetype/msttcorefonts/couri.ttf
Path::Font::Times    /usr/share/fonts/truetype/msttcorefonts/times.ttf

Analysis::ReferenceTimeFrame year

#Graphic::BackgroundColor black
#Graphic::ForegroundColor white

Aliases::Global::TFS    SY:TFS 50 10|CS:SY:TFS
Aliases::Global::TFS[]  SY:TFS #1 #2|CS:SY:TFS #1|CS:Stop:Fixed #3
ps: @ ex1 有沒有像 TradeStation 內的 Easy Language 阿.不過好像沒有 TradeStation那麼簡單. 全部是 GUI 的介面. 要跑回測要用 backtest.pl. 要圖形跑 graphic.pl. Run Mode 設定要修改 DB::module @ ~/.gt/options....還有一堆 script 要下,當然最大的特點是可以加入自己的想法到 library 中. 不過還是要找到適合自己的交易工具才重要. @ ex1
CS:Generic \
{S:Generic:CrossOverDown {I:DMI/3 14} 12 } \
{S:Generic:CrossOverUp   {I:DMI/3 14} -12 }
Ref: http://www.geniustrader.org/
https://help.ubuntu.com/8.04/serverguide/C/postgresql.html
2011年4月26日 星期二
Trader API update...
底下是 2009 年,高大師所做的演講,小弟就借來膜拜一下,順便把Trader API 做些改進.
Trading with opensource tools, two years later
update lists
1. DBI data base support
2. backup & redundant remove support
3. history data co-sync support
4. error check
5. iJump entry rule
6. profit analysis
ps: 如果你不想自己開發,我想底下的這套tool,對於股票的篩選還蠻有幫助的.
http://sonyshare.com/FreeSoft/index.php
Refs:
Finance-GeniusTrader
https://github.com/clkao
View more presentations from clkao
2011年4月25日 星期一
SystemC kernel core trace
小弟之前用SystemC 開發了一些簡單的IP, 但都沒有花時間在 trace 其核心是怎樣完成的,於是小弟最近就花點時間把底層的 kernel 部份看了一下,底下就大致說明整體SystemC 的核心架構是如何摟.
utils
利用底層的 C library 來實現 SystemC C++ library, 如 sc_memory map, sc_vector, sc_list...
分別用來儲存 sc_event, sc_cthread
kernel
主要是用 C library 中的 pthread 做 extend, 分別建立出 sc_thread, sc_thread, sc_method. 的 thread module 出來.在透過 sc_object_manager 把現有的 thread 儲存到 sc_list 中, 最後在根據每個 thread 的 time stamp 做 priority check. 且 sort 出在 current time stamp 要做的 thread. 把使用權給 lock 住, 以此確保 data 的正確性. 除此之外還要考慮到 thread 彼此間的關係, 藉由 Parent, children 的關係把 thread 的使用權 pass 下去. 這之中當然也 support pthread 中的 time wait, fork,join,event wait ... ,感覺有點像是 OS 的 multi tasks 的 schedule assignment.
datatypes
定義 struct type. 如 sc_int, sc_bit... 的資料型態.
tracing
為event signal trace, dump VCD waveform file.
boost
為boost c++ library
communication
提供sc_channel, sc_fifio, sc_signal, sc_clock 的function.
ps: 如果要更高階的語法來做 Architecture Algorithm 驗證.又不想要把type, class 定的很死.我想 Inline::CPP / Inline::C 可以是不錯的選擇, 可利用現有的 library 做到快速的 System explore. 不過很底層的東西就要看有沒有 support 的 Driver 摟.
refs:
http://search.cpan.org/~sisyphus/Inline/C/C.pod#Example_#1_-_Greetings
2011年4月17日 星期日
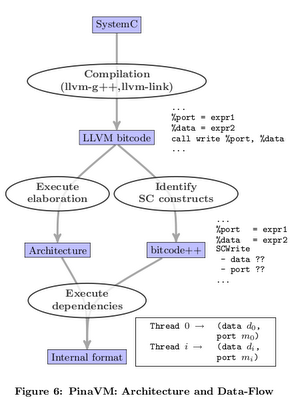
LLVM + SystemC = PinaVM
在之前的 POST 中,提及 LLVM + external Library 的技術外, 沒想到居然有 LLVM + SystemC 的 project "PinaVM". 主要改善 SystemC 的模擬時間(Device). 透過 SystemC frond end + LLVM back end 的 model . 不走 SystemC 內的 c++ lib, 而用 LLVM 的 JIT compile 針對 SystemC 內部的 sc_thread(), sc_signal(), sc_wait()...做 LLVM 的 Thread map.利用 LLVM 做 analysis 跟 Device 的 Opt. 產生出 opt 過的 exe.
 project
http://gitorious.org/pinavm/pages/Home
notes:
1. sc_module 2 Kernel(module) assign
2. sc_thread 2 Function assign
3. thread methods 2 Basic-Block graph assign
4. thread 2 llvm thread assign
ps: 可參考 jserv 所寫的 透過 LLVM 打造 Brainfuck JIT compiler
project
http://gitorious.org/pinavm/pages/Home
notes:
1. sc_module 2 Kernel(module) assign
2. sc_thread 2 Function assign
3. thread methods 2 Basic-Block graph assign
4. thread 2 llvm thread assign
ps: 可參考 jserv 所寫的 透過 LLVM 打造 Brainfuck JIT compiler
2011年4月14日 星期四
GpuOcelot overview
底下針對 GpuOcelot project 的 analysis part 來做說明.順便當成 notes,以免以後會忘記, 有興趣的人可以參考看看.
ocelot
Ref:
PTX: Parallel Thread Execution ISA Version 2.0
http://code.google.com/p/gpuocelot/wiki/References
View more presentations from sean chen.
2011年4月13日 星期三
Critical Fan-In flipflops with PHI Nodes check
 感覺可以用 PHINode 來分析 hardware Architecture 中的 Critical Fan-in Nodes. 透過 LLVM 產生的 IR code 中.會 Check alive-In alive-Out 的彼此關係. 除非有 feedback or loop 的 case 下,才會產生 PHINode, 這也表示在 PHINode 的 Fan-In > 1,於是我們可以得到 max path delay(paths) & min path delay(paths). 之後就可以針對這兩條 path 做 setup/hold time check.來 balance timing root tree...避免real time 時的 timing check error.小弟還沒驗證過拉,只是個從 LLVM 移植來的想法罷了.XD
entry:
   ...

for.body:
 %indvar = phi i32 [ 0, %entry ], [ %indvar.next, %for.body ]
 ...
 %indvar.next = add i32 %indvar, 1
 ...
PS: 不小心 goole 到 control flow graph 的 lib. 有興趣的人可以玩玩看. The Machine-SUIF Control Flow Graph Library
2011年4月6日 星期三
LLVM + Bus Interface.
在之前的 post 中提及 System On Chip Bus 的概念. 可參考底下的 link. 跟 PPT.
Refs:
Bus communication with thread emulator @c
learning plus: ESL Design Flow
Image Scalar 4 ESL Flow HW Algorithm
NetWork on Chip @c
learning plus: AMBA 4.0 AXI Bus Pt2
...
 透過 LLVM 轉出 IR byte-code
A parallel 'for' loop memory template for a high level synthesis compiler
假設大家對 Bus 有初步的概念後. 底下我們就來 hack LLVM 的 IR 轉成我們所需要的 IR 格式.可參考之前的 post Parallel IR gen. 藉由改變 Instruction 的 link 來表示每個 Instruction 所在的 cycle 位置. 除此之外. 這邊我們可以加入 Bus 的 cofactor 進來.
sample code.
View more presentations from Craig Moore
#define ADD_RSHT(a,b) (a+b)>>1

void PP(unsigned int *a, unsigned int *b){
 unsigned int r;

   for(r=0; r<1024; r=r+4){
       b[r]   = ADD_RSHT(a[r]  ,a[r+1]);
       b[r+1] = ADD_RSHT(a[r+1],a[r+2]);
       b[r+2] = ADD_RSHT(a[r+2],a[r+3]);
       b[r+3] = ADD_RSHT(a[r+3],a[r+4]);
 }
}
假設 pp Module 中 support 4 個 ADD_RSHT, 且 a[], b[] 為外部的 Memory.
結構大致如下所示.
 透過 LLVM 轉出 IR byte-code
%arrayidx = getelementptr i32* %a, i32 %tmp
...
%arrayidx6 = getelementptr i32* %a, i32 %tmp
...
%tmp6872 = or i32 %tmp, 3
%arrayidx36 = getelementptr i32* %a, i32 %tmp6872
%arrayidx59 = getelementptr i32* %b, i32 %tmp6872
%tmp69 = add i32 %tmp, 4
%arrayidx52 = getelementptr i32* %a, i32 %tmp69

%tmp3 = load i32* %arrayidx, align 4, !tbaa !0
%tmp7 = load i32* %arrayidx6, align 4, !tbaa !0
...
可以發現 load/store 的 value index 為 arrayidx(x). 這邊我們就把這樣的case 視為moudle PP 透過 bus 來 access external memory.如果把 a[r],a[r+1]... 視為連續的 Memory address.是不是就可以用 bus 的 Burst mode 來簡化. ex:
   a[r]           @ address 0x00000000
 a[r+1]     =>  @ burst 4
 a[r+2]         @ memory read
 a[r+3]         @ decoder/encoder...
有上面的概念後.下就hack LLVM 的 IR 產生我們所需要的 Bus IR.除此之外還可以加入點分析 Model進來,做到 co-analysis 的動作. Results:
External.Mem.Load:                                ; preds = %for.body
 %External_Mem_op15 = shl i32 %indvar, 2
 %External_Mem_arr14 = getelementptr i32* %a, i32 %External_Mem_op15
 %External_Mem_op13 = or i32 %External_Mem_op15, 1
 %External_Mem_arr12 = getelementptr i32* %a, i32 %External_Mem_op13
 %External_Mem_op11 = or i32 %External_Mem_op15, 2
 %External_Mem_arr10 = getelementptr i32* %a, i32 %External_Mem_op11
...
 %External_Mem_ld7 = load i32* %External_Mem_arr14
 %External_Mem_ld6 = load i32* %External_Mem_arr12
 %External_Mem_ld5 = load i32* %External_Mem_arr12
...
 br label %Exe

Exe:                                              ; preds = %External.Mem.Load
 %Exe_op26 = add i32 %External_Mem_ld6, %External_Mem_ld7
 %Exe_op25 = lshr i32 %Exe_op26, 1
 %Exe_op24 = add i32 %External_Mem_ld4, %External_Mem_ld5
 %Exe_op23 = lshr i32 %Exe_op24, 1
 %Exe_op22 = add i32 %External_Mem_ld2, %External_Mem_ld3
 %Exe_op21 = lshr i32 %Exe_op22, 1
 %Exe_op20 = add i32 %External_Mem_ld, %External_Mem_ld1
 %Exe_op = lshr i32 %Exe_op20, 1
 br label %External.Mem.Store

External.Mem.Store:                               ; preds = %Exe
 %External_Mem_arr19 = getelementptr i32* %b, i32 %External_Mem_op15
 %External_Mem_arr18 = getelementptr i32* %b, i32 %External_Mem_op13
 %External_Mem_arr17 = getelementptr i32* %b, i32 %External_Mem_op11
Project download https://sites.google.com/site/funningboy/c/llvm_bus.tar.gz?attredirects=0&d=1 ps: 可以參考 learning plus: C to Verilog notes 中的 reduce map 方式,把相同的 Instruction 做 reduce. ex: Old
 %External_Mem_ld6 = load i32* %External_Mem_arr12
 %External_Mem_ld5 = load i32* %External_Mem_arr12
ex: New
 %External_Mem_ld6 = load i32* %External_Mem_arr12
...
2011年4月5日 星期二
LLVM Training && graph theories
最近在練習寫 LLVM 的 IR code gen 時,遇到了一些阻礙. trace lib code 後.發現如果要建立起一個新的 BasicBlock 不但要 update "Preprocessor", "Successor", 還要 check Dominator tree 這樣才能確保 PHI Nodes 是否正確.流程大概是如此.
1. get terminator inst
BranchInst *BInst = dyn_cast<BranchInst>(BB->getTerminator())
2. get BranchInst type check
BInst->isConditional()
3. get successor target BasicBlock
BasicBlock *SuccBB = BC->getTerminator()->getSuccessor(0);
4. Create NewBB
// BasicBlock *NewBB_1 = BasicBlock::Create(SuccBB->getContext(),"_NewBB_",SuccBB->getParent());
5. move all PHINodes to NewBB
// for(BasicBlock::iterator IT = (*SuccBB).begin(); dyn_cast(IT); IT++){
...
6.remove Preprocessor pointer
SuccBB->removePredecessor(BC,false);
7. create new pointer
Value *val = BInst->getCondition();
BranchInst *BInst_1 = BranchInst::Create(SuccBB,NewBB_1);
BranchInst *BInst_2 = BranchInst::Create(NewBB_1,ElsBB,,BC);
最後結果 = fail. 因為要 check 的東西實在是太多了. 不如乾脆先把 PHINodes 獨立成一組 BasicBlock, 剩下的 Instructions 為另一組. 就可以免去 dominator tree check 時,每個 PHINode 的 Value 都要被 define 到.
ex: error
for.body: ; preds = %for.body.for.body_crit_edge, %entry, %_gg_
%tmp14 = phi i32 [ %tmp14.pre, %for.body.for.body_crit_edge ], [ %tmp1, %entry ]
要定義 %tmp14 的 input value 要有 _gg_ BasicBlock 的 value.
不過 LLVM 提供了一個快速的 API func, "splitBasicBlock".利用底下的指令, 就可以把上面的問題解決摟...XD... 害我整整花了一天的時間在 Debug.
BasicBlock::iterator IT = (*SuccBB).getFirstNonPHI();
BasicBlock *NewBB_1 = SuccBB->splitBasicBlock(IT, "_gg_");
Graph theories
http://www.cs.utah.edu/~mhall/cs6963s11/
http://courses.engr.illinois.edu/ece498/al/Syllabus.html
2011年3月30日 星期三
LLVM oIR code gen
在現今的 CPU 架構中都有 support SIMD(single instruction multi data) 的概念,來做到hardware 加速.底下小弟就舉個最簡單的範例吧.
假設底下 ex(1) 為原始的 hardware code.
ex(1)
void SCALAR(unsigned int a, unsigned int b, unsigned int *c){

    unsigned d = (a+b)>>1;
             d = d+2;
            *c = d;
}
ex(2) 為 clang compile 後的 LLVM IR. 在ex(2)中,我們發現 hardware 要先做 "add",在繼續做 "lshr" 的動作.所以要消耗兩個 cycle 的時間.今天假設我們的硬體support "add+lshr" 的指令.是不是就只需要一個 cycle 的時間就可完成.如ex(3)所示.這樣我們就可以減少 hardware Instruction counts.相對的效能就可以提升.有點類似 CUDA/ARM 裡面的特殊指令集拉...
ex(2)
define void @SCALAR(i32 %a, i32 %b, i32* nocapture %c) nounwind {
entry:
 %add = add i32 %b, %a
 %shr = lshr i32 %add, 1
 %add3 = add i32 %shr, 2
 store i32 %add3, i32* %c, align 4, !tbaa !0
 ret void
}
ex(3)
define void @SCALAR(i32 %a, i32 %b, i32* nocapture %c) nounwind {
entry:
 %shr = add_lshr i32 %b, %a, 1
 %add3 = add i32 %shr, 2
 store i32 %add3, i32* %c, align 4, !tbaa !0
 ret void
}
sample code @ llvm
#define DEBUG_TYPE "oIRPass"

#include "llvm/Pass.h"
#include "llvm/Module.h"
#include "llvm/Function.h"
#include "llvm/Instructions.h"
#include "llvm/Support/CFG.h"
#include "llvm/Support/Debug.h"
#include "llvm/Support/raw_ostream.h"
#include "llvm/ADT/SetVector.h"
#include "llvm/Analysis/Dominators.h"

#include <iostream>
#include <string>
#include <sstream>
#include <vector>
#include <set>
#include <map>

using namespace llvm;
using namespace std;


  class oIRPass : public FunctionPass {

        public:

            static char ID;

            oIRPass() : FunctionPass(ID) {}

           ~oIRPass(){
                       }

            virtual void getAnalysisUsage(AnalysisUsage &AU) const {
                  AU.setPreservesCFG();
            }

            bool runOnFunction(Function &F);

            void setInstAddLshrSucc(Instruction *Inst);

            void chkInstAddLshrSucc();

            std::string getInstAddLshrToString(Instruction *iPreInst,Instruction *iCutInst);

            std::string getResultToString(Instruction *Inst);

       private:
           std::vector<Instruction*> oIRInstSuccVec;
           std::map<Instruction*,std::string> oIRInstMap;
   };


  // get <Result>
  std::string oIRPass::getResultToString(Instruction *Inst){

  Instruction *IT = dyn_cast<Instruction>(Inst);
  assert( IT!=NULL && "getResultToString Error");

  bool pass = false;

  // @ successor Instruction::xx check
  for (Instruction::use_iterator uit = IT->use_begin(); uit!= IT->use_end(); ++uit) {
       Instruction *NIT = dyn_cast<Instruction>(*uit);
       assert( NIT!=NULL && "getResultToString Error");

       for(unsigned i=0; i<NIT->getNumOperands(); ++i){
           Value *val = NIT->getOperand(i);

         if(dyn_cast<Instruction>(val)){
          Instruction *PIT = dyn_cast<Instruction>(val);

          if( PIT==IT ){
          pass = true;
          return val->getNameStr();
          }
       }

      }
    }

   assert( pass==true && "getResultToString Error");
  }


  // Instruction 2 string
  // ex: %tmp22 = addlshr i32 %i,%j, 1 <<---
  std::string oIRPass::getInstAddLshrToString(Instruction *iPreInst,Instruction *iCutInst){

  Instruction *PreInst = dyn_cast<Instruction>(iPreInst);
  Instruction *CutInst = dyn_cast<Instruction>(iCutInst);

  BinaryOperator *prebin = dyn_cast<BinaryOperator>(PreInst);
  assert( PreInst!=NULL && prebin!=NULL && prebin->getOpcode()== Instruction::Add && "getInstAddLshrToString Error");

  BinaryOperator *cutbin = dyn_cast<BinaryOperator>(CutInst);
  assert( CutInst!=NULL && cutbin!=NULL && cutbin->getOpcode()== Instruction::LShr && "getInstAddLshrToString Error");

  // @ const cehck
  Value *val2 = cutbin->getOperand(1);
  ConstantInt *c2 = dyn_cast<ConstantInt>(val2);
  assert( c2!=NULL && "getInstAddLshrToString Error");

  Value *val0 = prebin->getOperand(0);
  Value *val1 = prebin->getOperand(1);

  unsigned int prebinWidth = cast<IntegerType>(prebin->getType())->getBitWidth();
  unsigned int cutbinWidth = cast<IntegerType>(cutbin->getType())->getBitWidth();

  // @ width check
  assert( cutbinWidth<=prebinWidth && prebinWidth==32 && "getInstAddLshrToString Error");

  stringstream sb;
  sb << c2->getZExtValue();
  std::string st = "%"+getResultToString(CutInst)+" = addlshr i32 "+"%"+val0->getNameStr()+", "+"%"+val1->getNameStr()+", "+ sb.str();

  return st;
 }


  // set Instruction successor match Add->LSHR?
  void oIRPass::setInstAddLshrSucc(Instruction *Inst){

  Instruction *IT = dyn_cast<Instruction>(Inst);
  assert( IT!=NULL && "setInstructionSucc Error");

  oIRInstSuccVec.clear();

  if(dyn_cast<BinaryOperator>(IT)){
     BinaryOperator *bin = dyn_cast<BinaryOperator>(IT);

     // @ Instruction::A
     if(bin->getOpcode() == Instruction::Add){
     oIRInstSuccVec.push_back(IT);

     // @ successor Instruction::Add check
     for (Instruction::use_iterator uit = IT->use_begin(); uit!= IT->use_end(); ++uit) {
          Instruction *NIT = dyn_cast<Instruction>(*uit);

         if(dyn_cast<BinaryOperator>(NIT)){
             BinaryOperator *nbin = dyn_cast<BinaryOperator>(NIT);

             if(nbin->getOpcode() == Instruction::LShr)
             oIRInstSuccVec.push_back(NIT);

          }
       }
     }

   }
  }


 // check Instruction successor match Add->LShr?
 void oIRPass::chkInstAddLshrSucc(){

      typedef std::vector<Instruction*>::iterator IT_iterator;

      // @ Instruction::Add token
      IT_iterator ITB = oIRInstSuccVec.begin();

      Instruction    *PreIT  = dyn_cast<Instruction>(*ITB);
      BinaryOperator *prebin = dyn_cast<BinaryOperator>(PreIT);
      assert( PreIT!=NULL && prebin!=NULL && prebin->getOpcode()== Instruction::Add && "chkInstructionSucc Error");

     // @ Instruction::LShr token
  for(IT_iterator IB = oIRInstSuccVec.begin(), IE = oIRInstSuccVec.end(); IB != IE; ++IB) {

      Instruction    *CutIT  = dyn_cast<Instruction>(*IB);
      BinaryOperator *cutbin = dyn_cast<BinaryOperator>(CutIT);
      assert( CutIT!=NULL && cutbin!=NULL && "chkInstructionSucc Error");

      Value *val1 = cutbin->getOperand(1);

      if(cutbin->getOpcode()== Instruction::LShr && dyn_cast<ConstantInt>(val1))
      errs() << "oIR found :: " << getInstAddLshrToString(PreIT, CutIT) << "\n";


    } //end for
 }


  bool oIRPass::runOnFunction(Function &F) {

        for (Function::iterator BB = F.begin(), BE = F.end(); BB != BE; ++BB) {
                   BasicBlock  *BC = dyn_cast<BasicBlock>(BB);

             for (BasicBlock::iterator IB = BB->begin(), IE = BB->end(); IB != IE; ++IB) {
                          Instruction *IT = dyn_cast<Instruction>(IB);

                      setInstAddLshrSucc(IT);
                      chkInstAddLshrSucc();
          }
        }

       return true;
    }

    char oIRPass::ID = 0;
    RegisterPass<oIRPass> PXX("oIR_pass", "oIR lib test",false,false);
Results:
oIR found :: %shr = addlshr i32 %b, %a, 1
refs:
LLVM + BOOST = LMBOOST....
Sampe Pass @ LLVM
LLVM 2.8 env set && pass manager set
2011年3月27日 星期日
CUDA + LLVM = GpuOcelot
 小弟最近在跟 GpuOcelot 的 project.底下先就 "build" 跟 "graph" 的一些觀念介紹.
Build Part
how to install GpuOcelot?
Step1. external lib build
可參考 svn 的方式.http://code.google.com/p/gpuocelot/wiki/Installation,把所需要的lib 依序 build 起來.
Refs:
LLVM 2.8 env set && pass manager set
Boost 1.4.X
ps: default prefix 路徑在 /usr/local/bin, /usr/local/lib 下, 且記得加入到 $PATH 下.
小弟最近在跟 GpuOcelot 的 project.底下先就 "build" 跟 "graph" 的一些觀念介紹.
Build Part
how to install GpuOcelot?
Step1. external lib build
可參考 svn 的方式.http://code.google.com/p/gpuocelot/wiki/Installation,把所需要的lib 依序 build 起來.
Refs:
LLVM 2.8 env set && pass manager set
Boost 1.4.X
ps: default prefix 路徑在 /usr/local/bin, /usr/local/lib 下, 且記得加入到 $PATH 下.
% export PATH=$PATH:/usr/local/bin:/usr/local/lib
% $PATH
Step2. hack source code. 2-1. boost env command 在 1.4 版之後 -lboost_filesystem-mt 改成 -lboost_filesystem.所以要改 ./scripts/build_environment.py 內 boost set.
//@ original
env.Replace(EXTRA_LIBS=['-lboost_system-mt',
                     '-lboost_filesystem-mt', \
                     '-lboost_thread-mt', '-lGLEW'])

//@ new
env.Replace(EXTRA_LIBS=['-lboost_system',
                     '-lboost_filesystem', \
                     '-lboost_thread', '-lGLEW'])
2-2. string 2 char*
ps : 好像在之前的版本沒有這個問題說...
// @ original
//      std::ofstream file(_path + "prof." + _kernelName + "_controlFlow.dot");

// @ new
std::string path =  _path + "prof." + _kernelName + "_controlFlow.dot";
std::ofstream file(path.c_str());
2-3. enum of class 在./gpuocelot/ocelot/ocelot/ir/interface/PTXOperand.h 中定義了 PTXOperand 的 Layer 如ex(1). 所以要存取 Register時, 應該是 ir::PTXOperand::Register, 而不是 ir::PTXOperand::AddressMode::Register,如果硬要把 AddressMode 加入的話.應該要改成 ex(2), 不過改成 ex(2) 後跟 design sink 不起來.所以還是把 AddressMode 拿掉如 ex(3). ex(1)
// @ original
namespace ir {
...
class PTXOperand {
      enum AddressMode {
                         Register,
      }
...
}
ex(2)
// @ new
namespace ir {
...
class PTXOperand {
   class AddressMode {
      enum AddressMode {
                         Register,
      }
   }
...
ex(3)
// @ original
if (ptxInstruction->a.addressMode == ir::PTXOperand::AddressMode::Special) {

// @ new
if (ptxInstruction->a.addressMode == ir::PTXOperand::Special) {
2-4 lib include
#include "boost/array.hpp"
...
Step3. run & build test
//@ build a& install
% ./build.py -i

//@ build test all
% ./build.py -t full

cd .release_build/
Graph theories Part 可以先從 "Advanced Compiler Design and Implementation" by Steven Muchnick 這本書看起. Ocelot 裡面有很多 Analysis 的方式是來自這本書的...當然小弟也是在進修中..XD Dominator (graph theory) SSA Graph Tree traversal
2011年3月25日 星期五
C to Verilog notes
底下列出目前在 C to Verilog 所看到的 features.
@ Pre-Synthesis part
1. Parallel support
Ref : parallel synthesis @ llvm
2. reduce redundant nodes
ex: original
a = 3+4;
b = b+a;
ex: new
// cut instruction "a = 3+4" & move the new point to next instruction
b = b+7
3. reduce redundant bit width
ex: original
int32_t a,c;
a =3;
c = 32'b(a)+32'b(1);
ex: new
int8_t a;
int9_t c;
a =3;
c = 8'b(a)+8'b(1);
4. remove Allocation
ex: original

void A(){
...
B (a,b,&c);
}

void B(int a,int b, int *c){
*c = a+b;
}
ex: new
void A(){
...
c = a+b;
}
5. instruction priority
c=a+b; instruction 1
d=c+1; instruction 2
priority 1 > 2
...
6. PHI node ignore. @ constrain at each Basic Block the data had already done.
ps: @ preprocessor Basic Block the PHI in-alive Nodes had already done.
ex:
%i.08 = phi i32 [ 0, %entry ], [ %inc, %popCnt.exit ]
%arrayidx = getelementptr i32* %B, i32 %i.08
...

//0    @ Basic block entry
//%inc @ Basic block popCnt.exit & replace it be %i.08
7. reduce redundant instructions
@ PHI part
%i.06.i = phi i32 [ 0, %for.body ], [ %inc.i, %for.body.i ]
%i.07.i = phi i32 [ 0, %for.body ], [ %inc.i, %for.body.i ]

// cut %i.07.i instruction

@ Operand
%add.01.i = add i32 %and.i, %sum.07.i
%add.02.i = add i32 %and.i, %sum.07.i

// cut %add.02.i instruction
8. loop with hardware resource constrain "2" Add.
ex : original
for(int i=0; i<10; i++)
   a[i] = b[i]+1;

...
ex : new
for(int i=0; i<10; i=i+2){
    a[i]   = b[i]+1;
    a[i+1] = b[i+1]+1;
}

...
@ Synthesis part
1. Global Value
@ In Verilog Module not support the local value
ex : @ Verilog

module xx(...);
input ...
output ...
reg ...
wire ...

...

always@(posedge clk)begin
...
end

...
endmodule
2. Schedule list external memory support. split the memory load instruction into two Basic blocks @ Memory request(address/mode)block , Memory (wait the require data)read block. ps: each Basic Block should be done at one cycle clock.
ex: original
for.body:
// @ address/mode phase
%arrayidx = getelementptr i32* %B, i32 %i.08

// @ data phase
%tmp3 = load i32* %arrayidx, align 4, !tbaa !0
...
ex: new

for.body.phase1:
%arrayidx = getelementptr i32* %B, i32 %i.08
br label %for.body.phase2

for,body.phase2:
%tmp3 = load i32* %arrayidx, align 4, !tbaa !0
@ Verilog view
module(...)
output [31:0] mem_address;
output [0 :0] mem_mode;
output [31:0] mem_store_data;
input  [31:0] mem_load_data;

reg [3 :0] cur_state,nxt_state;
reg [31:0] a;
....

case(cur_state)
for_body_phase1 : begin
                        mem_address = 0x00000000;
                        mem_mode    = read;

                        nxt_state = for_body_phase2;
                  end

for_body_phase2 : begin
                        a = mem_load_data;

                        nxt_state = alu_phase;
                  end

alu_phase       :
...

...
endcase
...

cur_state = nxt_state;
3. pipeline support
unroll the loop & pipeline insert.
@ example case
ex: original

%cat test.c

static inline unsigned int popCnt(unsigned int input) {
    unsigned int sum = 0;
    for (int i = 0; i < 32; i++) {
        sum += (input) & 1;
        input = input/2;
    }
    return sum;
}
how to unroll loop ?
// step1. gen IR bytecode
%clang -O3 -emit-llvm test.c -e -o test.bc

// step2. unroll the loop in bytecode
// you can check the opt by "opt -help | grep loop"
%opt -loop-unroll -unroll-count 20 test.bc -debug | llvm-dis

// step3. if step2 pass, then output new bytecode
%opt -loop-unroll -unroll-count 20 test.bc > opt_test.bc
un-pipeline IR & view
%llvm-dis opt_test.bc > opt_test.ll

%cat opt_test.ll

for.body.i.1: ...Instruction A   br label %for.body.i.2
for.body.i.2: ...Instruction B   br label %for.body.i.3
for.body.i.3: ...Instruction C   br label %for.body.i.4
for.body.i.4: ...Instruction D   br label %for.body.i.5
...
pipeline it
for.body.i.1 : ...Instruction A         br label %for.body.i.2
for.body.i.2 : ...Instruction B,A       br label %for.body.i.3
for.body.i.3 : ...Instruction C,B,A     br label %for.body.i.4
for.body.i.4 : ...Instruction D,C,B,A   br label %for.body.i.5
for.body.i.6 : ...Instruction   D,C,B   br label %for.body.i.7
for.body.i.8 : ...Instruction     D,C   br label %for.body.i.9
for.body.i.10: ...Instruction       D   br label %for.exit.i.0

for.exit.i.0 :
...
訂閱:
文章 (Atom)